

Introduction: )'( Solar Power at Burning Man (or Just Camping)


)'( OtherWorld Solar Power Reference Guide
Everything you wanted to know about solar but were afraid to ask
Volts X Amps = Watts
=What are you running?
Watts X hours = Watt hours
=And how long are you running it?
A guide to setting up your theme camp without a generator, from your OtherWorldly Sustainability team. Most of these examples are intended for dirtbags and cheapskates, but the overarching principles are fairly universal.
The purpose of this document is to guide you through the process of using electricity in your theme camp making use of batteries and solar power. Note that most of this 'ible is less about solar and more about energy efficiency. Also beware that there may be technical and safety errors in this document, use at your own risk.
Supplies
Borrowed solar panel
Big rechargeable battery, preferably from an e-bike or a deep cycle battery, a 'dead' car battery can work in a pinch. An electric car has a huuge battery, accessible through its 12v system.
MPPT solar charge controller (use a 'voltage boost' charger for an e-bike).
Inverter (optional)
DC to DC 20v~60v to 12v 'buck' converter if using e-bike battery.
Step 1: Overview and Contents
Overview
- Why bother with solar?
- Ultra cheap solar by the numbers.
- To size your system, first ask, What do you want to do and for how long? Answer in watt-hours.
- Music’s average electrical consumption: 10% of max speaker wattage.
- Volts x Amps = Watts. Watts x Hours = Watt-hours
- Heating and cooling are electrically expensive.
- Lithium phosphate batteries are a good investment. Sealed lead acid batteries don’t need water.
- Store batteries with a full charge.
- Light directly without lamp shades.
- Use coloured LEDs for coloured light, not coloured gel filters.
- LED lights only! Don’t use incandescent lights or incandescent Christmas lights.
- Solar systems comprise of a solar panel, MPPT charge controller, battery, low voltage cut off (recommended), inverter (sometimes), DCDC voltage converter (sometimes)
- 12v faerie lights on a 12v battery don’t need intermediary electronics.
- Save $ and resources by borrowing an installed solar panel, use a ‘dead’ car battery for small loads, use a boost solar charger and buck converter on an electric bike battery. Free 'dead' uninterruptible power supplies (UPS) for computers contain an inverter and a battery charger and can be resurrected by swapping out the 12v or 24v battery.
- A common trap: Short circuit protection can engage when plugging in an inverter or large DCDC converter or other things with big capacitors inside. Use a ‘soft starter’ temporary resistor circuit of some kind. Essentially this runs current to the downstream equipment through a several ohm resistor for a second or so before connecting directly.
Contents:
Part Zero, A quick start guide. If you don’t know where to start, start here.
Introduction/rant: Why bother with solar? Where to get equipment?
- Ultra Cheap solar by the numbers
- Assessing your needs. What's an amp? What do you want to do, and for how long?
- Background info on batteries
- Efficient lighting
- Solar power and tying it all together. 5 1/2 A few examples
- Hacky tips for cheapskates; dead car batteries and electric bike batteries (AKA solar for almost free)
- Electric car as giant battery!
- Summary
Step 2: Part Zero for First Timers

Part ZERO, A Quick Start Guide, Starting From Scratch
This is an introductory example of how to run a few lights on solar power.
Here’s what you need:
- Solar panel, 100 Watts to 300 Watts, (this is about the size of a coffee table, borrow one from a neighbour's yard)
- 12 volt Charge controller (this optimizes the raw solar electricity to efficiently charge a battery, ideally do yourself a favour and invest in a big MPPT (maximum power point tracking) one with bluetooth so you can use more solar later and tweak the settings) Note: it is technically possible to forego a controller by unplugging or laying your panels face down when the battery is full, but you’ll wreck your battery if you’re high and miss a narrow time~voltage window.
- 12v rechargeable battery (lithium phosphate is a good investment, a sealed ‘deep cycle’ lead-acid AGM (absorbed glass mat) battery is pretty good, a retired car battery is free and will do fine in a pinch)
- Low voltage cutoff (about $30 and protects the battery from over discharge)
- 12 volt lights (or a USB car adapter and USB 5v lights, or a small inverter ~50 Watts for regular household LED lamps
Here’s one example of how it goes together. Note some chargers have an internal low voltage cutoff feature and may also have a short circuit protector. (Beware, short circuit protectors can trigger falsely when plugging in devices with a lot of capacitor inrush such as inverters. A ‘soft-start’ circuit may be needed.)
And here’s some simple arithmetic to know how long the battery will last in terms of watt-hours:
Volts X Amps = Watts
Watts X Hours = Watt-hours
Watt-hours = how much electricity you actually use
We’ll need to learn one new word at this point; the word is ampere or ‘amp’. In practical terms amps means ‘how many electrons are currently flowing through a wire at this moment’. (More amps of current require a thicker wire)
Volts and amps are analogous to flowing water. Volts are like water pressure. Amps are like water flow rate. Multiply them together, and you get electrical power (just like a garden hose needs both pressure and flow to power a pebble across the yard). There could be a lot of volts with very little amps of ‘current’ but this wouldn’t produce much power. And there could be a lot of amps with very little volts of ‘pressure’ but this too wouldn’t produce much power. We need a meaningful amount of volts and amps.
From the amp we get amp-hours. Amp-hours are a common way to describe how big a battery is.
And now volts times amps equals Watts—a unit of instantaneous power. Watts times hours equals watt-hours—a unit of total energy. Volts times Amps times Hours = Watt-hours. The watt-hour is my favorite unit because it describes how much total electricity is stored or used. Watt-hours are an actual amount of electricity, like gallons of water or dollars of money. Electrical utility bills are in watt-hours because this is how much electricity you used last month.
Here’s a quick example to make sense of this jargon:
Start with your battery. The size (ie. the energy capacity) of a battery is often rated in amp-hours. A 100 amp hour, 12 volt battery contains 100Ah x 12V = 1200 watt-hours. But in practice we only should use about half of this or we’ll wreck our lead acid battery. A lithium battery is more generous and can use 80% of its nominal capacity.
So the available half of your 1200 watt-hour battery can run 600 watts for one hour. Or 1 watt for 600 hours. Or more preferably 10 watts for 600wh divided by 10w = 60 hours
Let’s try another example, this time starting from the load side:
Say you have a 5 volt string of faerie lights that uses 0.5 amps (AKA 500 milliamps) and a 5 watt lightbulb. And you have the above-mentioned 100 Amp-hour, 12 volt battery. How long can we run the lights?
You’ll run the 12v electricity through a 5v USB adapter to reduce the voltage to 5 volts. The wattage of the faerie lights is 5V times 0.5A = 2.5 Watts.
The 5 watt light bulb is already rated in watts.
So we have a total load of 5W+2.5W = 7.5W
And we have a 12 volt battery sized at 100 amp-hours or 12v times 100a = 1200 watt hours. Divide this in half to get the usable amount of 1200Wh / 2 = 600Wh in our battery ‘bank account’.
So we take 600 watt hours divided by 7.5 watts = 80 hours. Or three full days, or six blissful nights without burning a drop of gas.
Next add in some solar to have more electricity for a little music or a luxurious car buffer massage. Make sure your solar panel faces the early afternoon sun, and be careful not to step on it at night. A solar panel will earn maybe 10~20% less than its nominal rating. So your 350 Watt solar panel will earn roughly 300 watt-hours in an hour, and it will earn 900 watt-hours in three sunny midday hours. You’ll want to top up your battery for the night so a rule of thumb is to stop making smoothies etc. around 4pm and bank the rest of the day’s sunlight. Remember that solar panels barely work if they’re not facing the sun or if they’re even partially shaded, so you may need to point your panels to the sun.
Estimating music’s actual electrical consumption requires some experimentation and tools like a Kill-A-Watt…
Now look around your house. Notice the wattage rating on old-school incandescent lightbulbs. It’s about ten times more electricity than their LED equivalents. This means they wolf down ten times more electricity for the same amount of light. Now look at things that heat up like a coffee maker, toaster or hair dryer (1500 watts!).
In the default world we might start by reaching for a generator and never evolve beyond, but the climate doesn’t have time for this anymore and now you have the tools to help our climate and achieve a generator free camp.
Step 3: Ultra Cheap Solar by the Numbers
Part 1 Ultra Cheap solar by the numbers
Here’s what it can cost to get a bit of lighting and music.
260Watt solar panel: ~$300
Inverter: $200~$3000
Charge controller (or e-bike solar charger): ~$100.
Deep cycle battery ~$200
Low voltage cut off: ~$30
Scavenged cables: free.
Regular price tally: $830
Now let’s scrounge around a bit more and see if we can do better.
Solar panel borrowed: free
Inverter from a repurposed ‘broken’ (dead battery) uninterruptible power supply: free!
Charge controller (or e-bike solar charger): ~$100
Battery borrowed from an e-bike: free
Or use a ‘dead’ car battery: free
Low voltage cut off (if using lead acid battery): ~$30
DC DC 13.8v voltage converter (if using e-bike battery): ~$30
Scavenged cables: free
Cheapskate tally: $130
Step 4: Introduction: Why Bother With Solar? Where to Get Equipment?
Part 1 Introduction/Rant
So why bother with solar camping? It’s a good question, especially when the equipment may sit idle most of the time. Firstly, it’s better to try and use equipment that gets used constantly. This may be a matter of borrowing solar panels from an existing installation and a battery from an electric bike or reclaimed from an electric car. Quality of life may be another answer; when your generator goes off for the night, you dwell in darkness, whereas solar and battery, if used wisely, will keep the lights on permanently. And it will elegantly do its work in luxurious silence. Energy awareness might be your answer; at home there’s no reason to know what uses more or less electricity, it just comes out of the wall, full stop. And then there’s the matters of life and death; people die regularly from sleeping near generators. Someone lost their life in 2019 taking a nap at Burning Man near a generator. Global heating is the single biggest issue of our era. 2021 was full of warning shots like the deadly heat dome. We got here partly because of a lack of cultural knowledge regarding the efficient use of energy. Read Electrify by Saul Griffith, for a deep dive into energy awareness. Solar is a great way to learn practical skills and take the power back. Anyway, as some of us have discovered while camping in the sunny desert, it’s no fun when somebody doesn't cap the jerry can properly so gasoline gets splashed in one’s face when there’s no water to wash it off. No fun at all. So given the choice, and presented with a default-world noisy, planet killing, people killing, energy-ignorance machine fueled by oil wars, surely we can do better and be wiser, right? Right?!
A good source of portable solar equipment is Grin Technologies at ebikes.ca They also have the best electric bike kits.
Step 5: Assessing Your Needs
Part 2 Assessing your needs
The essential question of solar is What are you doing and for how long are you doing it?
This question is aimed at getting to the brass tacks of watts and watt-hours.
The electrical rating of your appliances is printed on the back or underside usually in watts or amps. You’ll find that devices involving temperature like kettles and coolers have larger numbers than LED lights and small electronics. Electric motors have a quirk that they pull a brief surge of electricity when they start up so they may have two electrical ratings for peak and average. This peak needs to be accounted for when rating your fuses and inverter, but is negligible in overall electrical consumption. Old-school incandescent lights like halogens pull about ten times more wattage than their spiffy new LED equivalents.
Take these wattage ratings and multiply them by duration of use in hours.
For example you might want to run a blender that uses 700 Watts for two minutes, but has a peak of 1000 watts, and a light that uses 3 watts for 12 hours. This means you need enough electricity to handle a peak load of about 1000 watts for the blender and enough battery storage to run your light for at least 12 hours.
The math is:
Volts X Amps = Watts
Watts X Hours = Watt-hours
Watt-hours = how much electricity you actually use
The blender and light calculations are:
Blender 700 watts x 0.333 hours (aka two minutes) = 24 watt-hours
+
Light 3 watts x 12 hours = 36 watt-hours
Total daily use = 60 watt-hours
Notice how the light uses over 200 times fewer watts than the blender. But importantly, the electric bill for the light is a third more than the blender because the light is on for much longer. The tiny light uses more watt-hours than the huge blender. Also notice that you need a thousand watt inverter to run the blender for two minutes, whereas a fifty watt inverter will run a handful of lights easily. Big inverters can get expensive so you may have an expensive two minutes of blending. The battery for this example can be fairly modest.
For a jolting example, let’s try a common solar nightmare: coffee. Say you wanted to have hot coffee on standby for a night shift. The light from the previous example pulls 3 watts and a coffee maker uses 1200 watts. We’ll run the light for 12h and the coffee maker will provide nice hot java for three hours. Let’s look at the electricity bill:
Light 3 watts x 12 hours = 36 watt-hours
+
Coffee 1200 watts x 3 hours = 3600 watt-hours
Total daily use = 3636 watt-hours
Notice how the light uses 400 times fewer watts than the coffee maker. Also notice that the total electrical bill is a hundred times more for three hours of coffee than twelve hours of light. A hundred times more battery; two orders of magnitude. This is the difference between buying one hundred batteries versus one battery, or ten thousand dollars versus one hundred dollars. That’s some pretty expensive coffee; maybe a camp stove and an insulated coffee urn are in order. (Or, yes, maybe your backup generator for 20 minutes to brew coffee. Just remember not to leave the generator running, powering nothing until it runs out of gas, again.)
Music is a little more tricky. A quick rule of thumb is 10%. Take the maximum wattage of your speakers; the average electrical consumption of your music will be about 10% of this number. Your ten thousand watt subwoofer is more like a one thousand watt load on your battery. You’ll still need a hefty inverter or a DC amplifier.
A definitive way to measure the electrical needs of your sound system is to use a watt-hour meter such as a Kill-A-Watt. This $50 little wonder will tell you what’s actually happening. To measure your electrical use plug your Kill-A-Watt into your electrical source, then plug your sound system into the Kill-A-Watt, now play your music at the volume you want for an hour or so. The Kill-A-Watt will tell you how much electricity it costs to play this music at this volume. You might be pleasantly surprised.
To conclude, the essential question of solar power is what do you want to do and for how long. The unit of the answer to this question is volts times amps times time = watt-hours. Watt-hours is the total amount of electricity you’ll use. Electrical bills are tallied in watt-hours. LED lights are very efficient, incandescent lights much less so, electric motors may not use a lot of electricity overall if they’re on briefly, and electric coffee makers can shove it.
Step 6: A Little About Batteries
Part 3 Background info on batteries
All batteries have a nominal voltage and amp-hour rating. Actual voltage varies with charge and can be a rough indicator of the state of charge. Amp-hours and watt-hours are indicators of how much electricity can fit in a given battery.
Traditionally the standard was to use lead acid batteries and this may still be a viable option for you but there are many other good options now, beware of false economy with lead acid. Get a lithium battery if you can, it can be more cost effective.
Briefly, lead acid batteries come in a few voltages, sizes, peak outputs and constructions. They are often 12 volts, 100 amp hours is a common size for car camping; they weigh a bit under a hundred pounds and cost a bit over a hundred dollars. Flooded lead acid batteries are cheapest but they need to be watered, and like all lead batteries, they contain sulfuric acid, yucky. Also they can, in very rare cases,cause hydrogen explosions. Car batteries put out a lot of electricity quickly, this is rated in cranking amps. ‘Deep cycle’ batteries store more electricity. AGM (absorbed glass mat) or sealed lead acid batteries are a good option because they won’t fail when you forget to water them. Many lead acid batteries die from being left to discharge too deeply. It’s necessary to recharge lead acid batteries periodically when in storage. And always fully charge your battery before storing it.
Half, you get to use half of your lead acid battery’s rated capacity. Drawing more than this will wreck it. So your 100 amp-hour lead acid battery is actually a 50 amp-hour battery. Bear this in mind when you calculate your battery storage requirements.
Death, a dead car battery often has enough life in it to run small loads like phone charging and faerie lights.
Lithium batteries are great but not perfect. Most ready-made lithium battery packs have internal battery management electronics as part of their built in safety systems. They can burn if overcharged or short circuited so the battery management system helps keep things safe. Lithium batteries also charge much more efficiently than lead acid so more of your solar power can come back out to play as usable electricity at night.
Lithium batteries come in two main types: lithium ion and lithium phosphate. Lithium phosphate is great for solar, it’s more abuse tolerant, and its inherent chemistry voltage plays nicely with traditional equipment like 12 volt inverters. There are easy ‘drop in’ replacements for 12v lead acid batteries that contain lithium phosphate and an internal battery management system. These are a great investment for luxurious years of care-free use. Lithium ion batteries are more common because they weigh less per watt-hour so they’re in laptops, phones, cordless drills, ebikes, and electric cars. At a nominal voltage of 3.7v per cell, they generally like to be stacked seven cells in a series to work well with 24v equipment.
Batteries will give somewhat more electricity when used gently. Pulling a lot of fast watts out of them will give you less overall electricity on that charge cycle; just like a person can walk further than they can sprint.
Step 7: Efficient Lighting
Part 4 Efficient lighting
Lamp shades and solar power are natural enemies; your hard won solar power is attenuated because a light bulb is too bright. Don’t block the light. Instead, use a light that won’t offend your eyes. 12v or 5v faerie lights are great options. As an added bonus they can run directly from a 12v battery or a 5v USB power bank without any intermediary electronics like an inverter. They put out enough light to fill a room and the individual LEDs are dim and dispersed enough that they don’t need a lampshade. Similarly, a dimmable LED lightbulb can fill a room with light while being so bright that it hurts your eyes. A smart lightbulb with a motion sensor is a nice option because it conveniently turns off when you’re not around.
Colour. Make your colours directly rather than clobbering your efficiency with coloured gels or fabric on a white light. LED bulbs come in different colours. Even better is RGB LED strips. These have controllers to adjust brightness and colour.
Lamp shades, yes the enemy. You may want light to shine through a motif and also light a room. To get more bang for your solar buck let more light through. Do not use an opaque material with small holes cut in it. Instead use transparent material with translucent shapes. Or at least make the opaque parts of your motif small and your openings large.
Reflection is a handy way of stretching your light. Use white or light coloured walls and ceilings to bounce your light around rather than absorbing it into dark materials.
Distance or rather closeness is your friend. If you want to light an object, put the light as close as possible to the object. Light gets a lot weaker with distance.
Space illumination can be done with points of light like a small spot light on a ‘disco’ mirror ball. Say you want to light a large area with minimal electricity. Rather than blasting everything with light, you can fill an area with a 5 watt party laser. This will throw thousands of points of light all around so people can navigate walkways etc. Another option is a rotating ‘emergency’ light. This will sweep the area with light. Both of these provide a hybrid between dark and light.
Edge lighting transparent materials is a great way of illuminating line images or motifs with minimal electricity. This involves carving a pattern into clear acrylic with a dremel or laser, then lighting the inside of the acrylic with a few LEDs. This is partly how modern LED computer screens work. https://www.instructables.com/Edge-Lit-Acrylic-Sign/
https://www.instructables.com/Edge-Lit-Mobile-Night-Light/
The-light-is-the-object style lighting like glowing eyes in a deer skull are a great way to illuminate an object with minimal electricity.
Step 8: Assembling Your Solar System
Part 5 Solar power and tying it all together.
Now we’re ready to build our solar power system.
There are a variety of different ways to build out your solar system with increasing levels of complexity. The systems covered here are small so we will forego some details like combiner boxes for multiple solar panels. This guide won’t cover electrical terms like parallel connection, series connections, Anderson connectors, solar MC4 connectors, wire stripping, ring terminals, crimping, soldering, marrette wire nuts, direct current, or alternating current, but these terms are worth looking up to better understand this section.
Charge controllers manage the flow of electricity from solar panels into a battery. Do yourself a favour and spend a little extra on a big charge controller (Victron makes nice stuff). Maximum power point tracking (MPPT), bluetooth programmability, 12v and 24v autodetection, and large amperage ratings will let you grow your system without having to keep upgrading your controller. Solar panels can be wired in series for higher voltage and less amperage, or in parallel. For camping, it’s handy to wire your solar panels in parallel. A partially shaded solar panel can shut down completely. And a partially shaded solar panel in series with others can drop your solar income to zero. So in an environment where shadows appear throughout the day in the form of napping dogs and people leaving their jackets on solar panels; it’s convenient to have your panels in parallel. This way the unshaded panels still work. But this also means your charge controller needs to handle higher amperage. Three big solar panels can put out close to 30 amps.
Some charge controllers have a built in load output and low-voltage cutoff to protect the battery. These will also often have short-circuit detection.
Beware of a common trap: plugging in a large DCDC converter or an inverter can trigger the charger’s short-circuit protector causing a cycling blackout. These devices have big capacitors inside with lots of inrush which looks like a short circuit. A way around this is to use a ‘soft starter’ temporary resistor circuit of some kind. Essentially this runs current to the downstream equipment through a several ohm resistor for a brief moment before connecting directly.
It is possible to feed solar power directly into a battery without a charge controller but you have to really know what you’re doing. This is a great way to get intimate with your system and a great way to have various kinds of disasters.
Low voltage cut offs seem to be fairly rare but at around $30, they’re cheap insurance against wrecking your battery by leaving something on all night.
DCDC converters change the voltage of direct current electricity. They are often over 95% efficient, cost effective, and serve a similar function to AC voltage transformers. DC to DC buck converters output a specific voltage less than the incoming voltage, for example 20~30v input converted to 13.8v output. DC to DC boost converters are similar except they boost up to a specific voltage. DC to DC buck-boost converters do both; these take voltages above and below their consistent output voltage. For example if you need a consistent 12v but your battery puts out more and less than 12v depending on the state of charge, a buck-boost stabilizer will give you 12v throughout.
DCDC converters are useful when your equipment has mismatched voltages. For example a 12v inverter and a 48v battery. Another example is a 5v USB phone charger that plugs into a car’s 12v cigarette lighter socket.
Wire Gauge is important to know about because skinny wires in the wrong place can get excitingly flammable. You need thick wires between the battery and the inverter because this is where the most electricity flows. Inverters are close to batteries partly because thick wire is expensive and partly because we want to minimize resistance.
So how thick is a thick wire? It’s all about the amps. Start with the absolute maximum load you could place on your system. For example, say you have a 300 watt peak load going through your inverter. This 300 watts is coming from the battery but remember that volts times amps is watts V x A = W, or watts divided by volts is amps W / V = A. So 300W / 12V = 25A. Call this 30A for headroom.
With this amperage we can look up the appropriate wire thickness with a wire gauge calculator like this: https://faroutride.com/wire-calc/ which gives us AWG 10 for a 2 foot length from battery to inverter. This calculator also gives us a recommended fuse or circuit breaker amperage of 50A.
Car jumper cables are a source of thick wire if you’re scrounging materials. Beware that not all jumper cables are created equal. They can range in size but most should suffice for loads under 500W
Camping inverters come in various sizes and two basic types. Modified sine wave inverters put out a sort of squared off alternating current. This is cheaper and maybe more efficient. It’s fine for lights and occasional electric motor use. Audio equipment may buzz a little or a lot on a modified sine wave and electric motors will wear faster. Pure sine wave inverters put out a nice smooth sinusoidal wave just like at home.
Step 9: Example Solar Systems
Part 5 1/2 A few examples
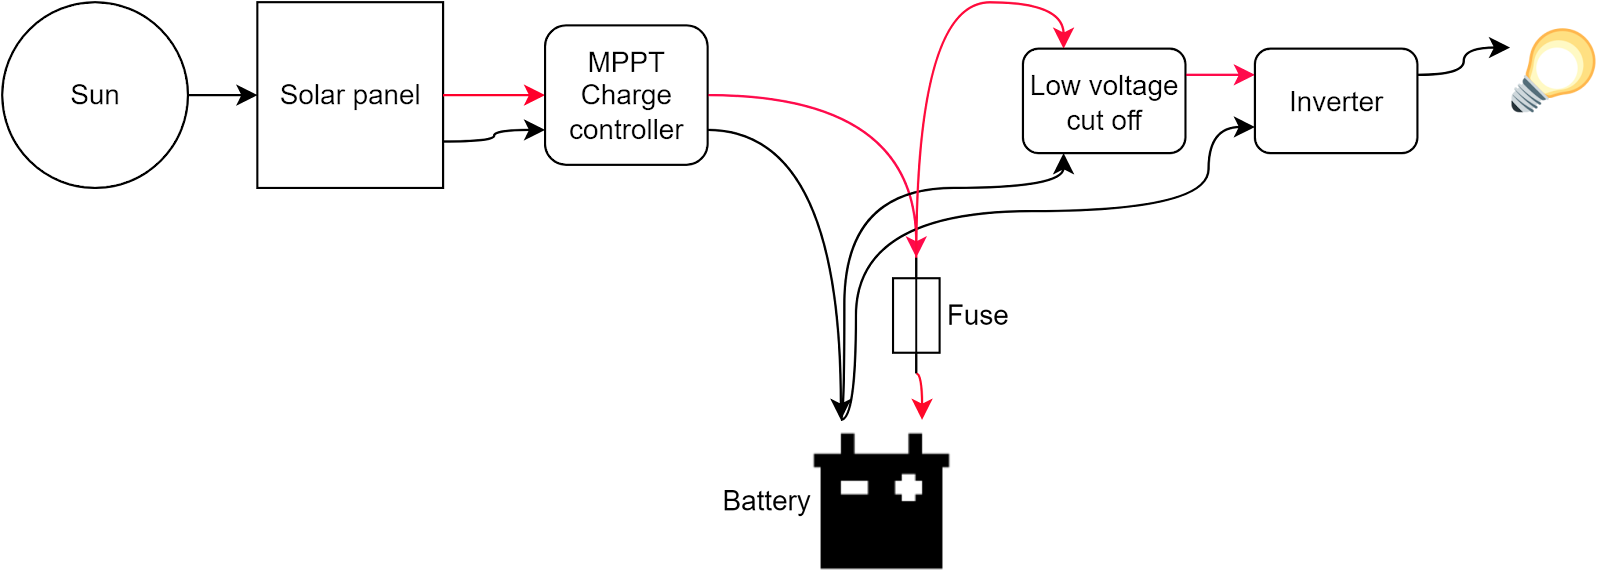
Example 1 The Classic AC: This is probably the most common camping rig.
Solar panel → 12v MPPT charge controller → 12v battery → fuse → 12v low voltage cut off → 12v inverter → 120v AC loads.
Start with your thick battery cables. Connect your battery to your (optional but highly recommended) low voltage cut off. Connect your low voltage cut-off to your inverter. Your inverter should turn on. You now have 120v alternating current to run your stuff.
Now connect your charge controller to your battery, and your solar panels to your charge controller. Keep your solar panel in full sunlight and you’re all set.
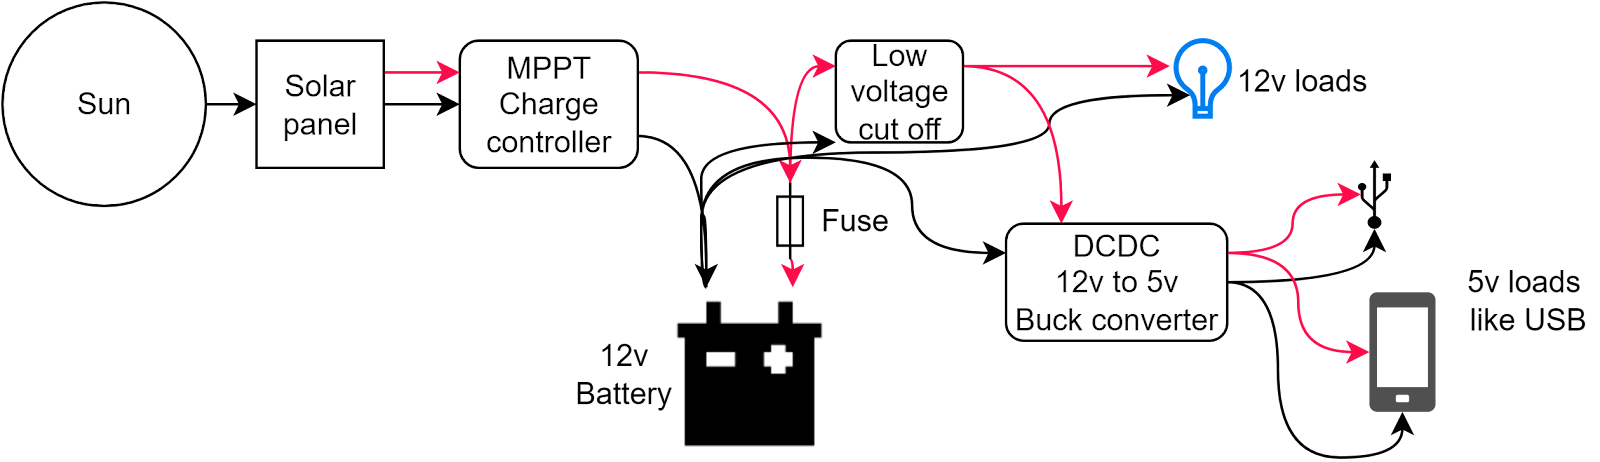
Example 2 The Mixed Voltage DC: This cost-effective rig is great for minimal camping loads.
Solar panel → 12v MPPT charge controller → 12v battery → fuse → 12v low voltage cut off →12v DC loads and →DCDC 12v to 5v buck converter (eg. a car USB adapter) →5v loads and USB loads.
Notice that this setup uses no inverter so it won’t run anything that plugs into a wall socket. It will run 12v lights and charge your phone.
Step 10: Electric Bike Hack

Part 6 Using electric bike batteries etc (AKA solar for almost free)
Thus far we’ve covered dedicated systems, but these often sit unused for most of the year. This is hardly a good use of money or resources. Let’s use what’s around and buy as little as possible.
There are many solar panels installed everywhere. Perhaps you can borrow some for a weekend. For minimal loads, a salvaged ‘dead’ car battery can run some faerie lights and charge a phone (with an adapter). Or perhaps you have access to an electric bike with a 48v battery or a drill with an 18v battery. The solar panel and battery are the expensive parts, so now you need a little equipment to make them go together.
Electric cars are huge batteries on wheels. They conveniently have a 12v battery and 12v system to run windshield wipers and such. We won’t dive into this here but it’s worth mentioning that many electric cars can pull about 1500 watts at 12v from their main high voltage battery. In practice, this means it is possible to run big sound systems and devices that pull peaks of more than 1500W as long as the average draw is under 1500W. The 12v battery can smooth out the electrical peak loads. Remember the 10% rule of thumb for music: 10% of a speaker’s maximum wattage is the average electrical load. So an electric car can run a 15 kilowatt sound system for days.
Let’s look at the electric bike.
Most e-bikes use a battery with a voltage somewhere around 36v and 48v. Most big solar panels are around 30v. Now most charge controllers go between a higher voltage solar panel and a lower voltage battery. This won’t do for a battery with a higher voltage than the solar panel. What we need is an MPPT boost solar charger that can match various higher voltages. Small ones of these can be had for about $100 from ebikes.ca in Vancouver. Next, we need a way to use the battery. You won’t find a 48v inverter at Canadian Tire but you will find a 12v inverter there. So let’s make 12v. An appropriate $30 DCDC buck converter will ingest 20v~60v and put out a steady 12v.
A simple electric bike battery will have a positive and negative connection and an on switch. Other batteries will have more connections and may require some probing with a voltmeter. This is a classic example of ease, cost, and quality: choose any two.

Step 11: Electric Car As Giant Battery!!!
Part 7 Electric car as giant battery!!!
You may have noticed that electric cars have large batteries. They also feature versatile fast and slow charging, and coincidentally they happen to also serve double duty as transportation infrastructure. At the time of writing (2022, Canada) there are not a lot of electric cars that make it easy to get electricity back out of the car. The Inoniq 5 and Ford Lightning are about it.
That said, you can get about 1500W of electricity out of most any electric car by using a 12 volt inverter (yes electric cars have a regular 12v battery in them too). Electric cars charge their 12v battery using a DCDC buck converter often refereed to as an LDC. Here's how to suck the juice back out:
1) Connect a 12 volt inverter to the car's 12v + positive battery terminal like any other car. The car may have a 1/4 inch terminal for this.
2) IMPORTANT: Include the current sensor in the circuit. On a Kia Soul and maybe Hyundai Kona this is a 1 inch black device near the negative battery terminal. This current sensor tells the car to deliver more electricity to the 12v battery. Without it the 12v battery can drain. You may need to clamp the negative inverter cable to the chassis ground or somewhere beyond the - negative battery terminal. (See pictures)
3) Turn the car 'on'. You may need to press and hold the brake pedal while you turn the car on.
4) Check for proper connection / traps. With a 1kw load (like a kettle) on the inverter, check the 12v battery voltage. It should be around 14v. If it's closer to 11v or 12v, the car isn't putting out enough electricity from the big traction battery. A clamp-on current meter is useful for reading the electricity coming from the big battery and going out to the inverter. The amperage into the 12v battery should be the same as, or slightly more than the electricity going out to the inverter. If you have bypassed the current sensor, the car may charge the 12v battery intermittently but not at the exact same rate as the outgoing electricity.
Bonus fun: You can run a 15,000W sound system with a 1,500W average supply because sound systems tend to use an average of about 10% of a speaker's rating. The 12v battery will act as a buffer to smooth out the peaks of electrical demand and the car's LDC (voltage converter) will keep the 12v battery charged.
Step 12: Summary
Part 8 Summary
- To size your system, first ask What do you want to do and for how long? Answer in watt-hours.
- Volts x Amps = Watts. Watts x Hours = Watt-hours
- Heating and cooling are electrically expensive.
- Lithium phosphate batteries are a good investment. Sealed lead acid batteries don’t need water.
- Store batteries with a full charge.
- Light directly without lamp shades.
- Use coloured LEDs for coloured light, not coloured gel filters.
- LED lights only! Don’t use incandescent lights or incandescent Christmas lights.
- Solar systems comprise of a solar panel, MPPT charge controller, battery, low voltage cut off (recommended), inverter (sometimes), DCDC voltage converter (sometimes)
- 12v faerie lights on a 12v battery don’t need intermediary electronics.
- Save $ and resources by borrowing an installed solar panel, use a ‘dead’ car battery for small loads, use a boost charger and buck converter on an electric bike battery.
- A common trap: Short circuit protection can engage when plugging in an inverter or large DCDC converter or other things with big capacitors inside. Use a ‘soft starter’ temporary resistor circuit of some kind. Essentially this runs current to the downstream equipment through a several ohm resistor for a second or so before connecting directly.


