

Introduction: 3D Octopus Sculpture Chalk Art


I made this three dimensional octopus sculpture for a chalk festival, and though I did not place in the contest, I had a lot of fun creating the piece! Throughout this instructable I have some great pictures of my art and descriptions of my process. I also have some much needed advice on attending your own chalk art festival! So please read on and enjoy :)
I wanted to do something super creative! I thought about using the professional chalk artists method of making a 2D form look like a 3D form based on how the artwork is angled, but I simply did not have the time or the space to work with that idea.
So I decided to make a sculpture out of simple materials and finish the piece by drawing a 2D ocean on concrete at the actual festival. I read my festival guidelines carefully to figure out the dimensions of the square I would be drawing in and how wide and tall I could make my figure.
With this information I created a base to work on out of cardboard boxes. I measured them carefully to match the area I would be drawing in the next day. Then gathered my materials to begin sculpting.
Materials Needed:
Several large stacks of newspaper
One large inflatable ball
Several large rolls of masking tape
Multicolored soft pastels
Paper towels and rags for blending
Step 1: Making the Form: Newspaper & Masking Tape


The sculpture process is really pretty simple, as I was going for something easy and less time consuming. I originally thought I was going to do paper mache, but when I thought about how heavy the pieces would get and how much time I would need for them to dry I decided to just use newspaper and masking tape only.
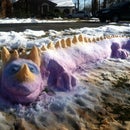
I began by using a large inflatable ball as the base because this is always easier than trying to make a perfect circle out of pieces of newspaper. I used a few octopus reference photos that I found online and started adding newspaper and masking tape in small sections. This is all free form and based on the reference photo. Nothing specific is measured, it's just following the forms in the photos and molding the newspaper to the best of your ability. It's basically just free handing in sculpture form! The only rule I had to follow for the festival was to not allow my piece to go higher than 3 feet or out of the square space! So I was measuring a little as I went to make sure I stayed within the parameters of the contest.
I did the entire back of the head and face first. I spent most of my time sculpting his eyes and face because this is the most important part to making the art piece recognizable as an octopus and not something else. I would step back from my sculpture often to make sure it looked even and recognizable! Once the entire head was done to my liking I moved on to the tentacles.
I actually completely free formed the tentacles without a base to go off of. I just kept adding paper in sections and taping them down, I would do this until I got the form I wanted. I spent a lot of time making sure I liked where the tentacles were being placed and the direction they were flowing in so that my artwork was aesthetically pleasing and not just random.
The tentacles can get heavy as you reach the top of the form, so I had to ball up extra newspaper and stuff it into the bottom of the tentacles until they stayed upright. A lot of newspaper is necessary anyways since this piece will be outside and I did not want the wind affecting my artwork. As I was getting close to finishing all the tentacles I made sure to take pictures and to view them from a good standing point. I changed the placement of my tentacles several times in order to make the octopus seem as though he was actually coming up out of water.
When I finally got all of the octopus complete and in place, I then needed to cover all of the areas where newspaper had shown through. I used several rolls of masking tape to hide any spots and to make sure that the sculpture held up really well since this will be moved and carried a good distance at the festival!
Step 2: Creating Beautiful Color: Pastels & Blending


Next I got my pastels and went to work! Soft colored pastels work the best, as the sculpture is still a little weak without a paper mache finish so some areas can cave in if you push too hard. I had to be super gentle and slowly start adding color onto the face of the octopus. I started with the light areas and worked toward the dark areas, this way if I made a mistake it was easier to cover up. I used a good amount of strokes during my drawing time and used paper towels or rags to blend the colors well. I followed my reference photos as best I could for shading and lighting, though I used my own color scheme that I felt would pop better against the ocean floor I was going to draw at the festival.
Each section of the octopus takes awhile to do, but the main head took a few hours. Then I just worked my way around each tentacle until I was satisfied with presentation and coverage of all the newspaper. You have to be super careful drawing while holding sections of the sculpture in place, because the pastel will wipe right off onto your hands. It's easy to mess up an entire area like this, so I had to constantly watch where my hands were going. That was the main let down of using just masking tape and newspaper instead of finishing the sculpture with paper mache, but the whole process took a lot less time and in my opinion was truly worth the hassle. Just keep in mind that going to the festival, the entire sculpture had to be put in a large box and covered with plastic so that the pastel would not bleed onto the car or onto the other pieces of the octopus!
Step 3: Bringing the Creation to Life: Pastels on Concrete & Placement


It was pretty hard getting the pieces of the sculpture to the festival because of pastel bleeding, but because I was extra careful most of the pastel stayed on the octopus! I would probably use a fixative next time to help keep all the color in place! Once I got to my location and found my square, I laid out my pieces as I had practiced at home. I then took a white chalk and traced around each piece of the sculpture so I would know where to fill the pavement with color. You only have a few hours to make a chalk illustration in a festival so cutting time where ever you can is important!
I then removed the pieces so I would be able to draw in the space. I used a mixture of soft sidewalk chalks and pastels to draw the ocean. This is a lot harder than it seems bc the concrete eats up the chalk since it is so textured. I brought plenty of pastels as a back up! I used rags for blending and also used my fingers where I could but since the concrete is so rough this can really hurt! I wouldn't advise doing it too often! Once I had my chalk ocean finished I placed the sculpture pieces back onto the square. I then added some final touches such as shadowing underneath the tentacles and head so that the octopus actually looked as though it was coming out of water! I took my photos and called it a day only about 30 minutes before time was up.
My advice is if you are going to be in a chalk festival, bring knee pads! They literally saved me from so much agony. Bring lots of water and snacks, because you will be in the sun and as simple as drawing with chalk sounds, it is hard work. You need a lot of muscle to hold yourself over the image to draw, especially if you have other contestants right beside you. You should be respectful and try to stay out of their drawing space! I did not place at the festival, but I must say I had a good time making my artwork. My hope is that you may see another Instructable one day of me finishing the Octopus with fiber glass and using him as an awesome addition to my house somewhere :) For now he lives safely in my attic. Thanks for reading this, and I hope you are able to make a great project through my photographs and guidance!

Third Prize in the
Papercraft Contest 2017


