

Introduction: 3D Printed Cake Topper


Add some personality to your next cake by creating a 3D printed cake topper with your favorite or original design. This project started when I was asked to take a 3D jewelry pendant that I created of the old EPCOT logo and turn it into a Cake Topper for an EPCOT Themed Wedding.
Step 1: What Is Needed


123Design:
This is a great easy 3D modeling tool to use for many basic modeling tasks. Using the Web version you can do alot of the basic and if you want more options, you can use the downloaded version. And the best of all... Its Free!
3D Printer or 3D printing Service:
If you own a 3D printer, then you can print this item right at home. But if you are like me you havent made the plung just yet, you can use one of the many online 3D printing services. For this Example I used Shapeways.com
3D Model of the object you want as a Cake Topper:
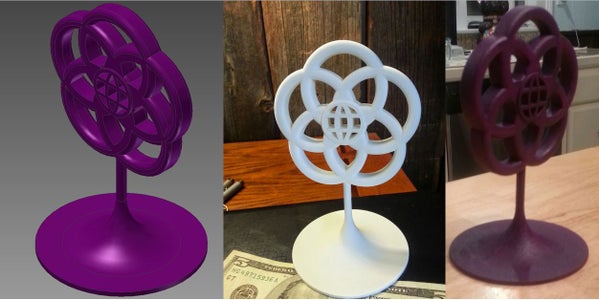
I used a 3D model that I had previously created of the old EPCOT logo and a pedestal Base. You can search Thingiverse, the other models available on 123Dapp.com, or create your own 3D model for your Topper and we will add the pedestal base in the next step.
Here is the EPCOT Logo I used.
Here is the Pedestal Base I used.
NOTE: If possible, use a model that is hollow on the inside but with decently thick walls to reduce the 3D printing costs.
Step 2: Combine the Models

Next, I combined the 2 Models. I did this using 123D Design and will explain the rough steps below but you can use whichever 3D modeling application you are comfortable with.
1) Launch 123D Design (either Online or Desktop Version)
2) Start a new Model (if using the Online version, this happens automatically)
3) Now using FILE > INSERT place the Pedestal, place the pedestal model in the grid area
4) Then using insert, place the second model.
5) Move the second model using the MOVE toll so that it is located Directly over the pedestal.
6) Re-Size the pedestal using the SCALE tool to make it an appropriate size relative to the second model.
7) Using the COMBINE tool, combine the two models to make them 1 solid.
8) Fiinally, use the SCALE tool to get the model to the final desired size.
Note: the final size of my model was about 5.5 inches tall, by 3.5 inches by 3.5 inches
Step 3: Print It


Now that you have the model created, you can print it.
If you have your own 3D printer, you can use that to print it. I dont have one so I use Shapeways to print my items for me.
Open the Model in 123D Design
File > 3D Print > Order a 3D Print
Follow the instructions on the Screen.
It will give you a few options on what company you want to use to print your item. I use Shapeways but feel free to try them all out.
Once your model is loaded in the 3D printing company's website you can see the prices and choose which material you want. I had mine printed in Detail Plastic.
In about 2 weeks it will show up at your Door.
NOTE: if your print is very expensive, try to hollow out the model (sometimes called Shell). Just make sure the wall thickness is large enough so the model will be strong enough.
If this print is already the color you want then You Are Done!!! If not, its time to paint the print.
Step 4: Paint It

Painting you part can be alot of fun. You can use whatever colors you would like and really be creative. For mine, I just wanted a solid dark Plum Purple.
You have multiple options when painting the item. Brushing will work great and all you to easily use multiple colors. Spraying the Paint is probably the easiest way to get paint into all of the nooks and crannies.
I used a $10 harbor freight airbrush kit with Latex house paint. I watered it down to almost 50/50 with water and did multiple coats.
After the Second coat, I made a mixture that was about 25% water to 75% paint that I brushed on. This gave a thicker coat to reduce the number of coats that would be needed. You just need to be careful not to leave brush strokes and to not leave any drip marks.
I did about 3 sprayed on coats any 1 brushed on coat. The final coat was sprayed on to get a nice even color.
Finally I gave it a light clear coat from a spray paint can just to seal it.
In the end, it looks almost as if it was dyed and not painted. A really cool effect. if you use 100% paint, it will look more shiny and smooth.
Note: If spraying the 50/50 mix, use very very light coats. Too thick of a coat will cause drips that will ruin the end product. If you see drips, use a paper towel to remove them.
Now your done! Show off you new Cake Topper.

Participated in the
Formlabs Contest

Participated in the
Tech Contest


