

Introduction: 3D-Printed Cell Phone Case


Just as there are many places to buy a cell phone case and a variety of cases to choose from, there is a variety of methods one can use to construct their own. This Instructable will focus on the engineery realm of 3D Printing.
You will need:
- A phone
- Any will do.
- A computer
- You hopefully have one which you are reading this with.
- AutoCAD
- or any similar drawing program. If you have no such program, you may check out this article to find a suitable free one (instructions not included).
- A 3D-Printer
- If you do not have access to one, find someone who does. I am sure that someone will let you use one, although probably not free.

Step 1: Research

Any innovative assignment is best started with brainstorming and research. Look at your phone, Google "cool phone cases", and think about what your design will be. Remember to balance form and function: you most likely want something that will look cool and keep your phone safe!
Also, check out Thingiverse to see what other people came up with for designs, and maybe even upload your own once you are done! If you are lucky enough, someone may have provided the base of your phone case for you on Thingiverse, saving you the work of making the basic shell of the case.
Step 2: Dimensioning

If you start from scratch, it is important that you know the dimensions of the phone you wish to cover, and as precisely as possible. You can use calipers to get these dimensions, or just Google "[your phone model] dimensions" to find this information.
Draw out your basic design and dimensions to make sure you know where every hole and button is. Make note of what you can and can not cover on the phone. This is your blank canvas.
Step 3: Creating the Prototype

Once your attack plan is clear, open your drawing software. Start with the basic rectangular dimensions found in the last step, length and width. This rectangle represents your phone.
Next, outline the rectangle with the distance of the desired width of the phone case (0.2 inch recommended). This rectangle represents the outside of the case.
Extrude the inner rectangle to the width of the phone. Extrude the outer one to the desired case width. Drag the phone up by however much room you would like your phone to have underneath it in the case.
Step 4: Holey Moly!

Now that you have a basic shell, it is time to look back at the dimensions and create holes that will leave your camera and buttons available (depending on their width and the width of the shell, you may need to create a stylus to push buttons, as I had to). Just like with the case, start with a rectangle (or circle) and wait until later to extrude it. Make the holes a little bigger than what the actual dimensions of the things you want to leave uncovered are.
Once you have the desired shapes, draw reference lines on the shell (you may need to rotate the shell so you can draw on different surfaces... Just keep the ortho on)! Place your holes on these lines and extrude them. As long as the extrusion is as long as or longer than the width of the case, you are set!
Next you need to subtract them. Basically you drew a shell and a cylinder or prism, but you need a shell and a hole. Use the SUBTRACT command to take the holes out of the shell. I like to make sure it worked by using the SHADE command.
Step 5: SAVE!!!!!!!!

Now that you have a basic phone case custom-fit for your phone, save it as its own file and use it as a template. Make sure you are editing a copy of this template, so if you make mistakes or change your mind you can go back to it. You could also just copy and paste it within the same file. Using the template, you could make another case later. You could even share it on websites like Thingiverse for others to use! Maybe you could start taking offers from friends... $$$
Step 6: Customization

After the basic phone case has been created (or downloaded from Thingiverse), it is time to put your own spin on things. However, before going too far, I recommend printing a prototype to see if any holes need to be enlargened, and if the phone fits snugly in the case. If you find you need to enlarge a hole, just draw a prism or cylinder beside it and subtract it again. If the phone case seems too big or small, SCALE it by a little and see if that helps.
Once you have a design that fits, you can add whatever customizations you want.
- For text, use this method (Multiline Text)
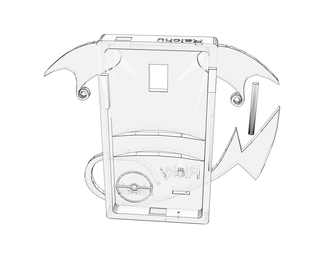
- For characters (like my Raichu), you can copy an image off of Google into AutoCAD and use the SPLINE feature to carefully trace it (remember to ctrl-z any quick mistakes!)
- For any design that spans multiple sides of the case (like Raichu's ears), the MIRROR command is useful
At this point, anything is possible! Get creative! Just, not too creative...
I hope I helped! Thanks for viewing! Enjoy the awesome case I am sure you will make! :)

Participated in the
3D Printing Contest


