

Introduction: A Tasty Coffee Liqueur


After reading a few google postings and other Instructables about making liqueurs, I decided to try it for myself. This really is a simple recipe (borrowed from brawns214) with a bit more description of tactics and things I've learned about coffee from being a barista for 3 years.
Step 1: Basic Ingredients

The great thing about this process is that there is a lot of room for flexibility of ingredients. You can create a wide variety of flavors by adding your favorite spices to the mix.
Here are the important components to a great coffee liqueur:
Great, strong, whole bean coffee. I went to my local coffee shop (La Costa Coffee) and picked their French Roast. I bought a half-pound, but think you could manage with about a quarter pound. If you do not have a coffee grinder, buy the coffee right before you use it. Ground coffee only keeps about a day, whole bean only a week, so plan appropriately. It needs to be ground just a smidge more coarse than espresso grind, however, if you are wary, espresso grind will be just fine.
Everclear or other grain alcohol. Everclear is readily available in the U.S. Be sure to use the highest alcohol content you can find. Most people in the states will only be able to find 151, but if you are lucky, you may be able to get the 190. Both work just fine, the only difference is the alcohol content in the final product. You will need 1 cup of alcohol.
Turbinado sugar. I'd recommend any kind of raw sugar before white sugar. Turbinado sugar is just another name for raw cane sugar. It adds a great flavor to the final product. You will need a 1/2 cup.
Vanilla Extract. Add depending how much vanilla flavor you would like. Omit if you do not like vanilla. I added about 1 1/4 teaspoons. Some people add vanilla beans, other spices, or cinnamon sticks, but I have not tried these so cannot vouch for them.
Tools necessary:
Coffee grinder with adjustable grind setting (or have your coffee pre-ground).
Moka pot, espresso maker, or french press. Moka pot is recommended, with espresso maker as a second.
Measuring tools.
Small to medium sized saucepan.
Heat-resistant mixing bowl (I used a glass Pyrex container).
Air-tight bottles
Step 2: All About Coffee Beans

The beans are the most important part of this liqueur. Chose beans you like the flavor of, even if they are not dark roast, because this will be the flavor of your final product. I chose the darkest roast I could find, which in this case is French Roast. Try to buy your beans right before you use them. Lots of recipes recommend powdered coffees or canned ones (like Folgers) but I think you should avoid these if at all possible. And never put your beans in the freezer! This ruins their quality. Your coffee beans should slightly glisten with oil, if not, you have an old (or inferior) product, so be sure to check!
Step 3: Making Your Coffee

You will need about a liter of coffee for this recipe. I would recommend using a Moka pot or espresso maker, however the Moka pot will take significantly less time. My Moka pot only makes about 1 cup every batch, so it took about 8 batches to make enough coffee.
If you have never seen this crazy contraption in the photo, rest assured, it is available in most home-goods and cooking stores. The bottom reservoir is filled with water. I boiled hot water in an electric kettle before filling the reservoir each time and this cut prep time in half. You fill the water to just below the pressure valve on the side.
Coffee grinds go in the middle portion. You do not need to pack it tightly, just scoop it in until it is full.
Coffee needs to be ground about espresso coarseness. Do a test run first to see if the grind needs to be adjusted. If the water has a hard time coming out, make your grind more coarse. If the coffee appears too light or tastes weak, make your grind less coarse.
Place it on the stove and watch. The stove should be at medium heat.
Step 4: The Coffee

This is what it looks like when your coffee is almost ready to be pulled off of the stove. Pull it off of the heat as it is bubbling up. If you don't, you risk boiling the coffee, which will negatively affect it's flavor. If you aren't sure if you did it right, taste it. Pour the coffee into your heat-resistant container while you brew your next batch. Do not keep the coffee on a warmer or re-heat it. Just allow it to cool.
Step 5: Let It Cool

Here is my coffee container hanging out next to my moka pot on the stove. I'm about halfway there.
Step 6: Bottles

I'm self-admittedly cheap. You can buy bottles with air-tight seals at cooking stores and Bed Bath and Beyond, but these cost about $6-10 each depending on the size you purchase. I'd love to have been able to use the wine-sized (750ml) bottles, but being cheap, I opted for Grolsch bottles.
You can buy Grolsch at your grocery store or local BevMo for about $6-8 for 4 bottles, plus you get to drink a few delicious beers in the process.
To clean them, I recommend boiling them in a large pot for a few minutes, but in reality, a good cleansing under the faucet would do. The Everclear is a high enough alcohol content to discourage bacterial growth. I ended up using 2 1/2 Grolsch bottles for this recipe.
Step 7: Adding the Sugar

Mix your 1/2 cup of turbinado sugar with a 1/2 cup of water in a small saucepan. I used a medium-sized one, and as you can see, it was a bit of overkill. Stir it frequently with a spoon or whisk. You will notice the color darkening and the texture changing. This will take several minutes so be patient. When it gets very syrupy, pull it off of the stove and have a taste. Good and sweet? Great. If it tastes burnt, it is burnt, so start over.
Mix the sugar syrup and your coffee. This is where you add the vanilla. I added 1 1/4 teaspoons, but you can add more or less to taste. Let it cool completely. I cannot stress this enough. Everclear evaporates at a higher temperature than your average alcohol, so you need to make sure the mixture is not still hot.
Add 1 cup Everclear to the mixture and have a final taste. Good, huh?
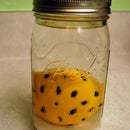
Step 8: The Hardest Part

This is where you bottle your mixture and say goodbye to it for 2-3 months.
Fill your bottles and cap them. Ensure the caps are snug and air-tight. Most "experts" recommend leaving your liqueurs on a shelf for 2-3 months to allow the taste to fully develop. Can you drink it earlier? Of course!
The liqueur over time will develop a layer of "crud" that will need to be filtered out. You can do this a few days after making it. I used a metal coffee filter, but these same experts recommend filling a regular strainer with cotton balls and pouring the mixture through it. Why cotton balls? The thickness blocks the particles while allowing the fluid to pass through. When they get clogged you can easily toss them and add new ones, whereas straining through a dishtowel will require many dishtowels and laundry later on.
Return to the bottles, then let sit for awhile. A few months later you'll have a great drink to enjoy with friends and family, or a cheap Christmas gift to distribute!


