

Introduction: Aduino I²C 2-Way Communication


Inter-integrated circuit (I²C) communication is a common protocol with wide support. If you want to use all the robot parts on the market, you need to know how to talk to them. In this lesson I'll show you some what is I²C and how to use it.
In this tutorial, you will learn how to do 2-way I²C communication between only two Aduinos. I²C can expanded to connect many devices, as we'll explain at the end.
Marginally Clever Robots makes lots of awesome robots. Please tell your friends and like this tutorial so we can help more people.
Step 1: What You Need:

We assume you have the following parts:
- two Arduino UNOs
- some male to female wire
- some male to male wire
- one rotary potentiometer
- one bread board
Step 2: How I²C Works

I²C is a communication protocol which allows you to communication among circuits like micro-controllers and certain sensors. It only uses two wires (so efficient!). The first wire is the clock wire, often written as SCL in the documentation. the second wire is the data wire, often written as SDA.
The devices along the I²C bus can be either "master" or "slave". Only the master(s) controls the voltage on the clock wire, while the masters and slaves can both manipulate the voltage on the data wire. By carefully taking turns all the devices on the network can share information.
In order to send information to the right place each slave has a unique address number, much like every phone has a unique number.
When I have seen I²C devices they have documentation that say "this circuit expects to receive N bytes of data that mean ABC and will send back M bytes of data that mean DEF." If the device you want to buy doesn't include this information then don't buy it.
For more details about the internal workings of I2C communication, check out these links:
Step 3: Setting Up
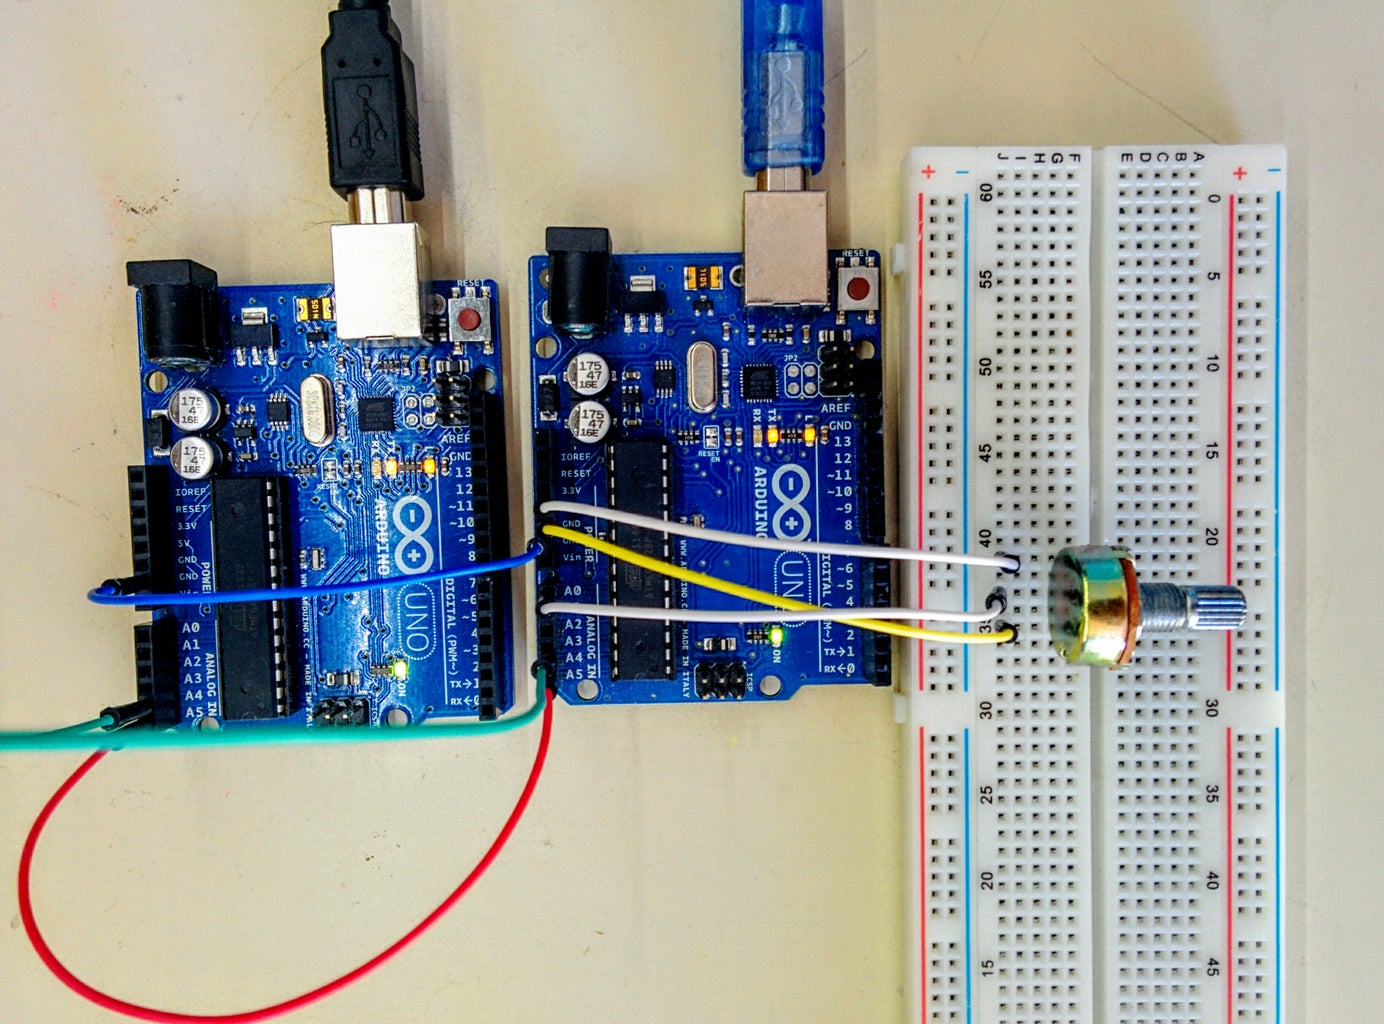
The devices in the photograph above use pins A4 and A5 for I²C communication. A description of the I²C pins for each type of arduino and the Wire library is here:
https://www.arduino.cc/en/Reference/Wire
The master setup looks like this:
#include <Wire.h>

void setup() {
  // note that begin() has no parameter.
  Wire.begin();
}
The slave setup looks like this:
#include <Wire.h>

void setup() {
  // note that begin() has a parameter.
  // Any number from 0....127 will work.
  Wire.begin(1);
}
If you wanted a second slave on the this network, it would need any address except #1, because that's already used. This means the devices on a network can only be added and removed by carefully planning. Many devices that use I²C will have a PCB with either dip switches (little light switches) that can be flipped to change the address. Cheaper models will have bare contacts. To flip those switches the bare contacts have to touch. This is usually done by being bridging the gap with some solder.
Step 4: Sending Data

The master has to say to whom it is talking, then send the information, then say "I'm done."
void loop() {
  Wire.beginTransmission(1);
  Wire.write("hello, ");
  Wire.endTransmission();
}
The slave only has to send information. Everyone assumes the slave is talking to the master.
void loop() {
  Wire.write("world!");
}
Wire.write() has three versions: one for a single number, one for strings, and one for blocks of data. You'll have to tell Wire how long is the block of data.
Step 5: Receiving Data
Both slave and master can use
Wire.read()
To get a single byte of data from the network, no matter who sent it.
Wire.read() is a blocking operation - your Arduino won't do anything else until a byte is read. If there is no byte to read, it could be waiting a long time! To avoid this problem, there is also
Wire.available()
Which will return the number of bytes waiting to be read.
Putting the two together,
while(Wire.available()) {
  char c = Wire.read();
  // do something with c
  // maybe count how much we received,
  // do something when we get the whole message.
}
// do other stuff while we wait for the whole message.
Step 6: Request / Receive
You've already got everything you need to run I²C networks, but there's one more feature I want you to know, and it's kind of tricky so please bear with me. In fact I'd say this is totally unrequired but I've included it to be thorough. Maybe to show there's many ways to do the same job, and some are better than others.
You already know that in C code there are methods like setup() and loop(). You can also create your own methods and call them by name. Did you know that you can send a method name as a parameter to another method? This is often used for something known as a callback. In this case, we're going to tell the Wire library (I²C) what method to call when a slave receives data from the network.
// a master is calling and requesting something.
void requestEvent() {
  // definitely send something back.
  Wire.write(2);  // one byte as an example.
}


// a master has sent something.
// Might not be requesting anything.
// Might not be all the data that was sent (yet)
void receiveEvent(int bytes) {
  int i;
  for(i=0;i<numBytes;++i) {
    char c = Wire.read();
    // do something with c.
  }

  // maybe send something back
}


void setup() {
  Wire.begin(1);  // slave address = 1
  Wire.onRequest(requestEvent);
  Wire.onReceive(receiveEvent);
}

void loop() {
  // do nothing!
}
a few notes here:
requestEvent() does not receive a number saying how many bytes the master expects. That is not helpful.
As far as I know these events are interrupts - they happen as soon as they can, no matter what is going on in loop(). If the timing and the code is just right it could seriously mess up whatever loop is doing. It would be hard to diagnose why it is messing up because it would be hard to recreate the conditions that caused the problem.
So as I said, while these tools are available to you, I don't recommend them.
Step 7: Two Way Communication
Now let's put it all together.
Master code:
#include <Wire.h>

#define TO_MASTER_SIZE 3
#define TO_SLAVE_SIZE  4

#define START_NODE   1 // The starting I2C address of slave nodes
#define END_NODE     2 // last node to probe +1

#define NODE_READ_DELAY 100 // Some delay between I2C node reads

byte messageToMaster[TO_MASTER_SIZE];
byte messageToSlave[TO_SLAVE_SIZE];

void setup() {
  Serial.begin(9600);
  Serial.println("MASTER");

  Wire.begin();  // Activate I2C link
}

void loop() {
  for (int address = START_NODE; address < END_NODE; address++) {
    sendToSlave(address);
    readFromSlave();
  }
  delay(NODE_READ_DELAY);
}

void sendToSlave(int address) {
  // message is 0123
  for(int i = 0; i < SEND_SIZE; i++) {
    messageToSlave[i] = (byte)i;
  }

  Wire.beginTransmission(address);
  Wire.write(messageToSlave, TO_SLAVE_SIZE);
  Wire.endTransmission();
}

void readFromSlave() {
  // if data size is available from nodes
  if(Wire.available() == TO_MASTER_SIZE) {
    for (int i = 0; i < TO_MASTER_SIZE; i++) {
      messageToMaster[i] = Wire.read();  // get data
    }
    int fromAddress = messageToMaster[0];
    int value = ((int)messageToMaster[1] << 8 ) | (int)messageToMaster[2];
    Serial.print("Slave ");
    Serial.print(fromAddress);
    Serial.print(" says ");
    Serial.print(value);
  }
}
Slave code:
#include <Wire.h>

// Change this unique address for each I2C slave node
#define NODE_ADDRESS 1

// matches values on master side.
#define TO_MASER_SIZE 3
#define TO_SLAVE_SIZE 4
#define NODE_READ_DELAY 100

byte messageToMaster[TO_MASTER_SIZE];
byte nodeReceive[TO_SLAVE_SIZE];

void setup() {
  Serial.begin(9600);
  Serial.print("SLAVE #");
  Serial.println(NODE_ADDRESS);

  Wire.begin(NODE_ADDRESS);  // Activate I2C network
}

void loop() {
  delay(NODE_READ_DELAY);

  if(Wire.avaialable() == TO_SLAVE_SIZE) {
    readFromMaster();
    sendToMaster();
  }
}

void readFromMaster() {
  for(int i = 0; i < TO_SLAVE_SIZE; i ++){
    nodeReceive[i] = Wire.read();
  }
  Serial.print("Master says ");
  for(int i = 0; i < TO_SLAVE_SIZE; i ++){
    Serial.print(nodeReceive[i]);
  }
  Serial.println();
}

void sendToMaster() {
  int x = analogRead(A0);
  messageToMaster[0] = NODE_ADDRESS;
  messageToMaster[1] = (x0>>8) & 0xff;  // the top byte of x
  messageToMaster[2] = (x0   ) & 0xff;  // the bottom byte of x
  Wire.write(messageToMaster,TO_MASTER_SIZE);

  Serial.print("Sensor value: ");
  Serial.println(x);
}
An interesting point is that anyone on the bus (the network) can listen to any communication going both ways. In theory one could add a silent device whose only job is to monitor the network.
Step 8: Final Thoughts

It is possible for a single I²C network to have more than one master but it is extra tricky - the masters have to negotiate between each other to avoid talking over each other, which leads to confusion.
The next most common protocol that I've seen is SPI. We'll write a tutorial about it soon.
Did you know? Vending machines use a protocol called MDB (multi-drop bus), which is very similar to I²C.
When you build something with I²C, please send us a link. you can tag us @marginallyc on twitter or follow @i-make-robots on instagram.
Please like, subscribe & share. Thanks for reading!


