

Introduction: Adventure Road Trip


EDIT: I made a video out of my latest trip to the Gulf Coast:
Step 1: It's a Wild World...


First thing's first. You should be listening to Woody Guthrie right now.
Ok, now that that's taken care of, a note on the logistics:
Being able to do a road trip seems like a luxury to most. You either have the time, or the money. Not both. I've done a lot of planning in advance to be able to have both the time and money to do these trips:
Time: The best way to find time for these trips is to place them in between two significant endeavors. Every trip I've taken has either been between school-job or job-job. I've always been in a transition phase and never been able to use vacation time in a permanent job to take a trip like this. Obviously this lends itself to young people - students and recent graduates who might be doing seasonal or temporary work and will transition between jobs often.
Money: Being low cost has always been one of my highest priorities on these trips. The first trip, to the Badlands, was nine days long, and each of the four of us spend $120 all in. That means gas, food, lodging, park entrance fees. Everything. That's an average of less than $14 per day. Being able to split gas was a huge advantage, but if you're doing a solo road trip you'll be covering all of that. The solo trip I took out West was 6 weeks, 8,000 miles, and cost just short of $2,000, all in. This probably seems like a lot at almost $50 per day, but most of that went towards gas. Also consider that includes all of my living costs during that time. That means if I hadn't been on the trip, in that time I probably would have spent around $1,200 on rent, food, entertainment, etc. I delayed income and put up $800 and had the adventure of a lifetime. This Instructable will explain how to do a big trip on a small budget.
Step 2: Planning and Research


Planning for a road trip takes a good amount of planning (that's half the fun!) but not in the way you might think. It's not like a normal vacation where you might pick destinations ahead of time and make hotel reservations along the way so that each day you know how far you have to go and where you'll sleep. Most of the planning and research for these trips is just related to knowing where the must-see spots are. It's important to have a rough timeline, but nothing rigid. For example, for my recent trip to the Gulf Coast, I started by doing a couple of hours of research on the best natural areas, best camping, best hiking. I looked at pictures and reviews and have a general idea of some spots that I want to stop along the way. Second, I plugged destinations into Google Maps to begin structuring the most economical route. That's about it! Keep it loose and be open to changes along the way.
If you're thinking about seeing multiple National Parks, pick up an America the Beautiful Annual Pass. For $80, you get access to all federally managed recreation areas, as well as discounts at many campgrounds. Normal entrance fees for an annual park can be $20-$30, so this pays for itself right away.
Some good resources:
-Google Maps, of course
-National Park Service, for finding federally managed land
-Outside Magazine, for trip ideas and routes
Step 3: Packing


How much you pack is really up to you. If you're doing a short trip, and are expecting good weather, I would say less is more. You can get away with as little as a sleeping bag, a milk jug of water, a good flashlight and knife, and some maps. You can get food and water along the route. This type of packing list definitely lends itself to unexpected adventure. Conversely, if you're going to living out of your car for longer than a week or so, or are in an environment with tough weather, giving yourself some basic comforts is great. When packing, break the necessities down to food, water, and shelter, then add extras toiletries and camping gear. Here's a sample packing list:
Food: You're just not going to eat like you do at home, but don't try to survive off of granola bars and trail mix. You'll feel much better if you continue to get a balanced diet - you just can't accomplish it in the same way. It's harder to store and prepare, so here are some tips for eating well: If it's a long day of driving, I'll stop at Subway. At least a couple times a week I would get a $5 footlong and load on as many veggies as possible. It's cheap, healthy enough, and a lot of food. Second, canned chili and soups are great. Look for the healthier options, and you can even heat them up right in the can over a fire. It's a good way to get a hot meal in. Third, stop at small farmer's stands along the way. You can get a ton of food for almost nothing, and it's all the best that money can buy. Just be prepared to eat any fresh food within a couple of days. Now you can fill out your diet on those trail mixes and granola bars.
-Camp stove
-Fuel
-Mess kit
-Small dish bin
-Dish soap and sponge
-Cooler? Maybe. I found that keeping it cold was near impossible, with melted ice soaking my food. Not to mention it took up a ton of space in the car. If you do bring a cooler, make it small and just keep the essentials.
Water: Never put yourself in a situation without water. You should always have at least two days worth at all times. Like gas, fill up every chance you get.
-Purifier (filter, uv light, or other)
-2 to 5 gallons of water storage. I've found that a single 5 gallon jug is harder to pack, but 1 gallon jugs work great
-Water bottle
Shelter: Your shelter is anything that keeps you warm and comfy. Sleeping in your car is a major luxury and lets you get away with camping in wayyy more places. (I'll go into this more in a later step) I also bring a tent for backpacking spur trips.
-Car
-Tent
-Sleeping pad
-Sleeping bag
-Pillow
Other:
-Backpack
-Toiletries
-Books
-Camera
-Maps
-Emergency vehicle kit
-First aid kit
-Small chair
-Flashlight
-Knife
-Ropes
Step 4: Making Your Car a Home


I love this part. Organizing it all takes a little creativity. More than two people can get pretty crowded - the advantage of going solo is that you can take over the whole car. An office in the passenger seat, bed and storage in the back...it's up to you.
There's a great Instructable on converting a van into a camper. Even if you don't go the whole nine yards, you can pull what you like - having slept in some pretty cold places, I love the idea of using window sun screens as insulation. Just pick them up at goodwill, cut to size and pop in the windows at night.
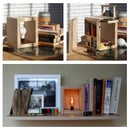
Some organizational system is necessary. I've always dreamed of doing the full conversion to wood shelves, but have never gotten around to it. Until then, I use small stackable bins so that everything is easily accessible. I use separate bins for toiletries, camping supplies (lighters, knives, paracord, etc.) and personal items (camera equipment, books, etc.)
Here are a couple things that might be worth investing in:
-Memory foam mattress topper makes a great mattress for the back of the car. I folded it in half to fit and used an old sheet to make a giant pillow case for it.
-Cigarette lighter - outlet converter is an essential if you're bringing computer/phone/camera or anything else you need to charge.
Here are a couple other useful projects:
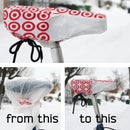
-Road Trip Laundry
-Flower Pot Heater (never use a flame in a small enclosed space unless you are sure you have proper ventilation)
Step 5: Taking Off

Being a midwesterner, my destination is usually quite far from home. I usually taking interstates to get in the general area of travel, then take county and state highways, which offer more scenery and stops. Some things to keep in mind:
Navigating:
-The interstate system is laid out in a grid
-Odd numbered highways run north - south
-Even numbered highways run east - west
-Miles are marked west to east to west, and south to north, starting from 0 at the border of each state.
-Exits generally correspond to a mile marker (a few states use a numerical system for marking exits)
-2 digit highways go through cities, 3 digit highways go around them
-Carry a comprehensive road atlas in addition to a GPS/smartphone, and rely mostly on the atlas. It'll help you notice more parks/attractions along your route and is a good skill to learn
Conserving Gas:
-Keep tires inflated
-Remove any roof racks or cargo boxes, if you don't need the space
-Obey the speed limits - another advantage to choosing county and state highways is the speed limit is usually 55 mph. This is right around the best speed for maximizing gas mileage.
Step 6: Spending Time

As much as I take pride in the long periods I've gone without a shower, I find it helps to maintain a general schedule:
Every Day:
-Brush your teeth and throw some water on your face
-Eat a good meal
-Take a vitamin and drink a Nalgene of water
-Organize car and throw out any accumulated trash
Every Week:
-Take some form of bath or shower, whether it's in a rest stop bathroom, swimming in a river, or a proper, coin operated shower.
-Wash and dry clothes
-Contact friends and family
Step 7: Where to Sleep?


This is one of the coolest things that I've discovered: you almost never have to pay for a campsite. If you're in the Western half of the United States, you can follow almost any dirt road and it'll lead to a small pull-out and stone fire ring. Usually you can find traces of old beer cans. I was driving up the Pacific coast looking for a campsite one afternoon. Every campground I came to was full, and they cost around $30/night! Finally I turned up an old, cracked road and about two miles inland, came to a little pullout among Redwoods (shown in the green picture). It was free, beautiful, and isolated. All three pictures were taken at free camping spots.
It's always good to have multiple options. Here's a few others that you can explore:
-Federally managed campgrounds, like BLM or National Park campgrounds are usually the most bang for your buck, and you can usually get half off or camp for free if you have the Annual National Parks Pass. Avoid campgrounds like KLM. You'll hardly find yourself "out in it" if you're squeezed between 30 foot RVs.
- Backcountry is a great option - usually free in National Parks. You'll have to hike in with your stuff, but that's the best way to experience the Parks.
-Rest stops along interstates offer a place to stay free for the night. Usually you'll have heated bathrooms and vending machines, and sometimes even Wi-Fi and a visitor's center. A good option if you're in between long days of driving.
Step 8: Finding Adventure


Now you're out there, what do you do? The same budget that applies to gas and food also applies to activities, so as nice as guided sea kayak and horseback riding sound, you can't do it all. Luckily, most of the time, you won't have to worry about a thing. When you're driving across country, through National Parks and small town America, adventure usually finds you (as you'll see in the next step). Adventure is really about the exploring, discovering the unexpected, and pushing your boundaries - and none of that costs money. If you have a passion for something specific, like rock climbing or surfing, do some research in advance, looking for the best kept secrets across the country, and seek them out. If you're like me, talk to locals and find out what they like to do.
Radium Hot Springs in Colorado is the best example I can think of: a friend of mine and I heard about a primitive hot spring along the Colorado River. We decided to go looking for it, but the directions we got were of the "take 200 paces due north. pass the gnarly tree..." type. After lots of wandering and wondering, we found the Hot Spring. Turns out it wasn't too secret - we just got bad directions. But it isn't marked on maps or by roadside signs, so we would have otherwise never known about it. We spent the day soaking the warm springs and cliff jumping into the Colorado River as groups of tubers floating the river came and went.
Step 9: But What If...


Things will happen. I was looking for a shortcut to Great Sand Dunes National Park back in 2011. We found a dirt road, (mud if I'm honest), that looked like it could take us there. A couple miles in, we rounded a sharp corner and slid into a ditch. The wheels spun and spun. We called AAA. A tow truck would be there in an hour. We played cribbage for 2 hours, then took matters into our own hands. We jammed rocks into the mud under the tires and I push the car with my back against the ditch. Eventually we were out. We never did see the tow truck. The point is, when you put yourselves in these situations the unexpected will happen. That's a good thing! Just be prepared to handle anything that goes wrong. I like to carry a few things for events like this:
-A survival kit
-A vehicle manual for troubleshooting and vehicle survival kit
-First aid kit and training
These are in addition to your normal camping supplies. Put them somewhere they won't get misplaced, like the spare tire compartment (along with the spare tire - do not get rid of that) Also, remember to keep a family member or friend updated on your whereabouts.
On my latest trip, to the Gulf Coast, my car officially broke down 10 miles outside New Orleans. Even in this worst-case-scenario, I was able to get my car looked at (to confirm that it was beyond saving) scrap it, and get a train and bus ticket to get home within a couple days.
Step 10: Go!

Alright, that's all the advice I have to give. Thanks for listening to my stories, and hopefully I've inspired a few people to take trips of their own. If you have any questions or additional advice leave a comment!


