

Introduction: Alfred V.1 - Alexa Voice-Controlled, IoT, Bluetooth, Servant Robot Using Arduino and Raspberry Pi


In this tutorial, I'll be showing you how to make Alfred - the Arduino servant robot that uses Alexa-powered voice control on Raspberry Pi over a Bluetooth connection. It sounds really complicated, but it's a great way to learn about microcontrollers, electronics, circuits, bluetooth, Linux, the internet, and programming. Also, it's a great way to learn about something while:
1) not being entirely bored
2) making something that you can show off to people and make them think you're smart
Additionally, unlike other tutorials that use voice control there's no port forwarding required (you don't have to open up your computers to the internet and hackers), and you don't have to pay for services (the voice control and software are all free).
Here's a video demonstration of my robot - https://goo.gl/photos/3Kbz2AJfaNP7e5wk8
Step 1: Assemble Parts


Step 1: Assemble parts
We're going to need:
- Some motors - to move the robot
- An H-bridge (something to control the speed and direction of the motors)
- Something to give the motors instructions (an Arduino - aka a little computer)
- Something to connect to the main computer via Bluetooth (a Bluetooth module)
- The main computer (that can host the voice-recognition software and has Bluetooth connectivity)
- Microphone for the computer
- Speaker for the computer
- Monitor and keyboard for the computer (optional)
What I Used (I'm a fan of kits because they're easy to use and come with cool stuff I normally wouldn't buy):
- Canakit Raspberry Pi starter kit - https://www.amazon.com/CanaKit-Raspberry-Complete-Starter-Kit/dp/B01C6Q2GSY/ref=sr_1_1?ie=UTF8&qid=1493036783&sr=8-1&keywords=canakit+raspberry+pi+3
- Elegoo Smart Robot Kit - https://www.amazon.com/Elegoo-Ultrasonic-Bluetooth-Intelligent-Educational/dp/B01M2Z9ZTV/ref=pd_cp_504_3?_encoding=UTF8&pd_rd_i=B01M2Z9ZTV&pd_rd_r=JH44VHJWWNZEE3PWC26N&pd_rd_w=gpS3c&pd_rd_wg=kPIlt&psc=1&refRID=JH44VHJWWNZEE3PWC26N
- An old TV and hdmi cable I found in my basement
- An old keyboard and mouse I found in my basement
- My portable speaker and an aux cable (looks like a double-sided headphone cable)
- My microphone - a blue snowball (I use it to record YouTube videos)
- A ball caster - https://www.amazon.com/LinkSprite-Ball-Caster-Metal/dp/B01A08RDJ2/ref=sr_1_1?ie=UTF8&qid=1493037582&sr=8-1&keywords=Ball+caster
Total Cost minus monitor, keyboard, mouse, microphone, and speaker: $146
What you could use (I didn't buy these parts - I bought kits, but these are all the parts of the kits that I used - it should be a bit cheaper, but I also haven't tested these parts out)
- raspberry Pi 3
- Hdmi cable
- Power cable
- 32 gig microSD
- Aux cable
- Portable speaker
- Snowball Microphone
- Monitor
- Keyboard and mouse
- Arduino board
- Expansion board
- Hc-06 module
- 2 Motors with gearbox
- H bridge
- Lipo Batteries and charger
- Ultrasonic sensor
- Micro servo (I only used 1, but this pack of 10 is at a great price)
- Acrylic Chassis for robot
- Nuts and bolts
- Wheels
- Ball caster
- Jumper wires
Total Cost minus monitor, keyboard, mouse, hdmi cable and aux cable:
Tools:
- a ruler
- A drill (optional)
- A hot glue gun
- Access to a regular computer (optional)
- A small screwdriver for philips head screws
- A small screwdriver for flathead screws
- A little hex screw thing
Step 2: Assemble the Robot


Honestly, the Elegoo smart car is a good kit for complete noobs, which is why I bought it, but the instructions aren't that great and there are a lot of modifications that need to be made to the hardware and Arduino code that it comes with.
1. start charging the lipo batteries. They should take about 40 minutes to charge, and while they're doing that, we can Assemble the robot
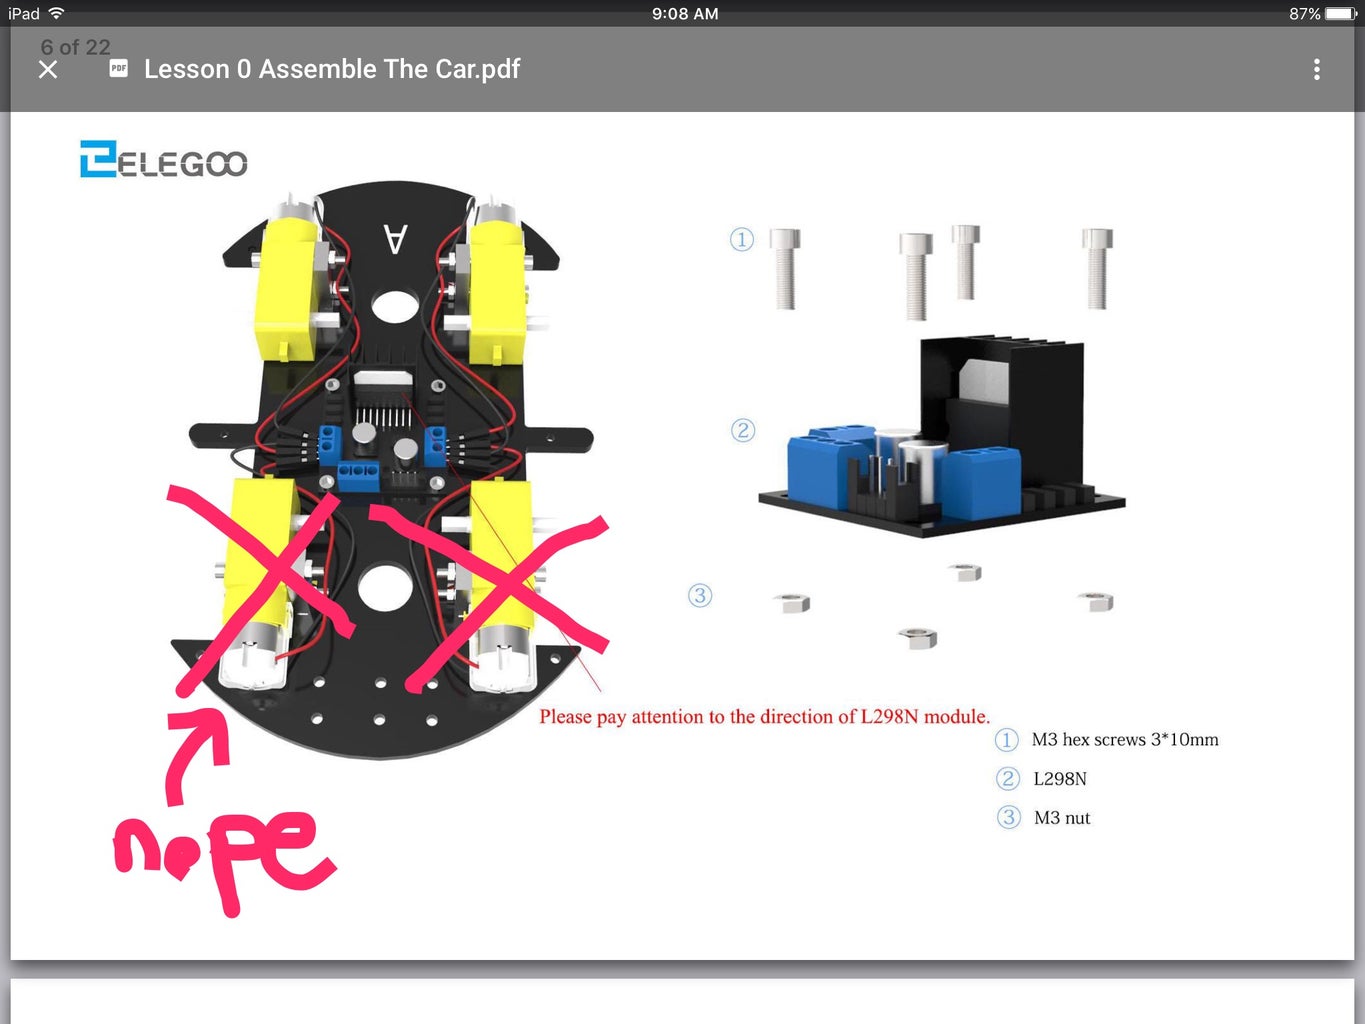
2. Screw the H-bridge on the bottom of the robot
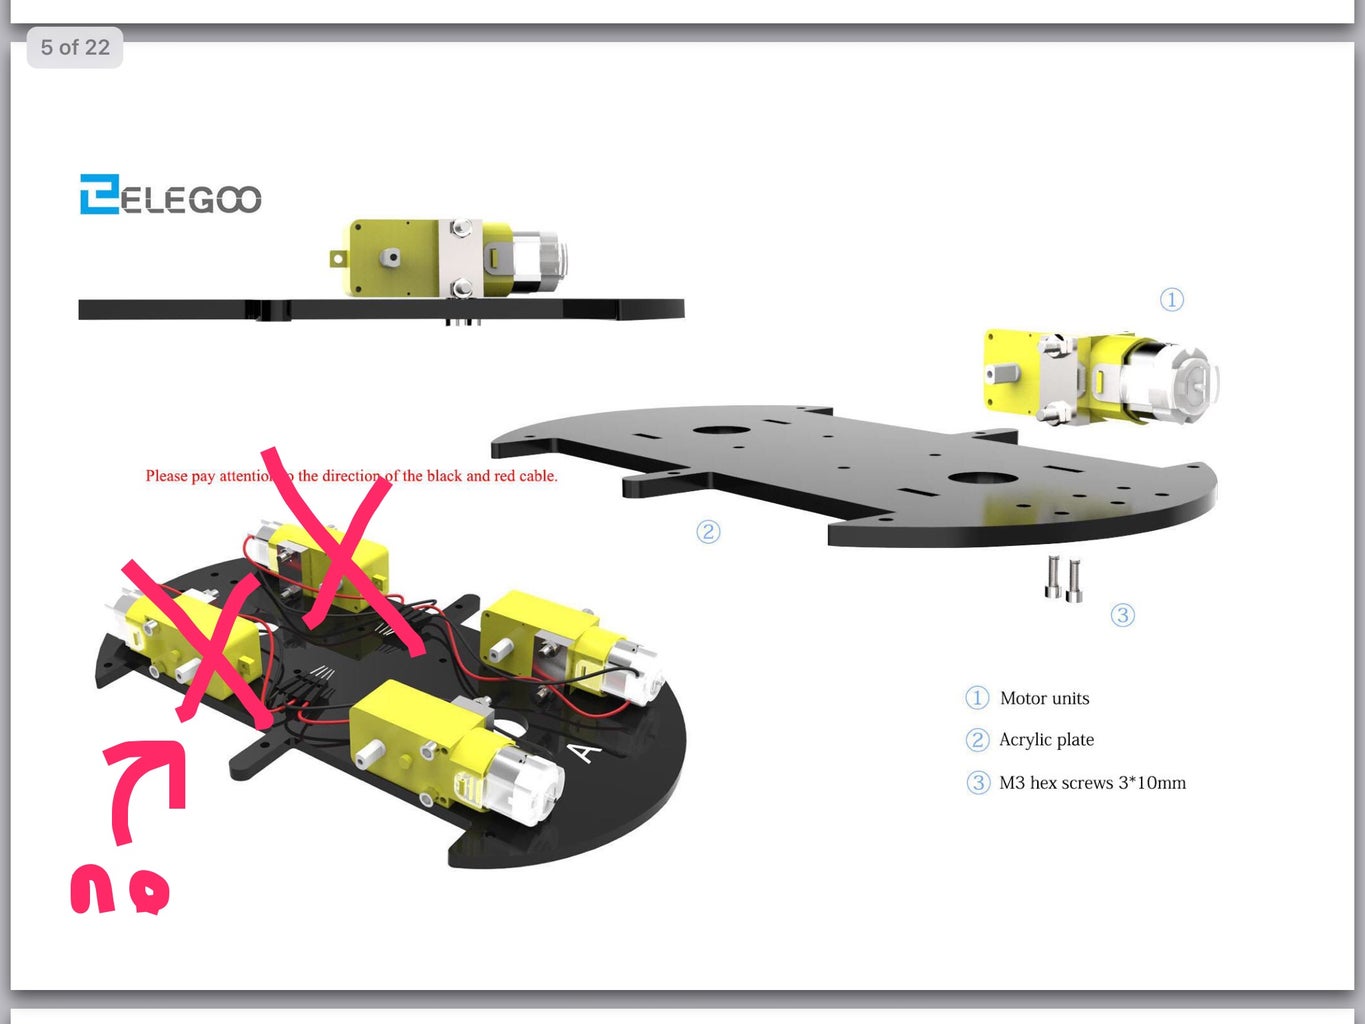
3. Screw the motors on the back of the chassis on the bottom of the robot
4. Take your ball-caster. Put it on the acrillyic on the front side of the robot and take a sharpie to mark the two screw holes. Take a drill with a small drill bit and SLOWLY drill through the holes. Then take your screws and screw on the ball caster on the underside to the chassis
5. Screw the Arduino onto the top part of the chassis
6. Add on the expansion board
7. Screw on the battery pack
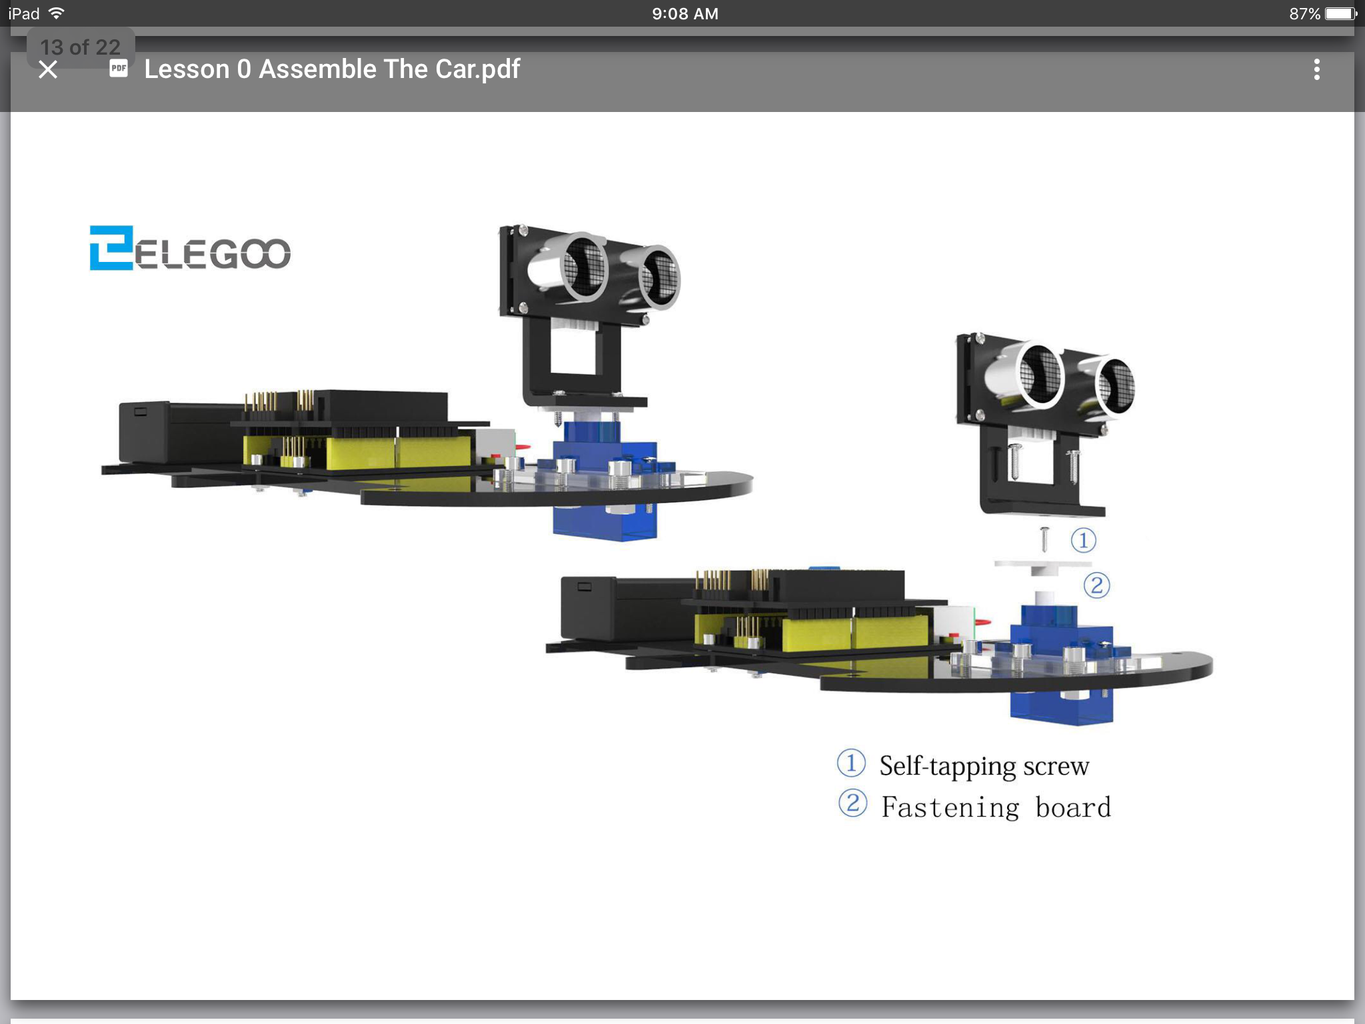
8. File or sand the part where the microservo goes a bit
9. Then put in the servo and screw it in place
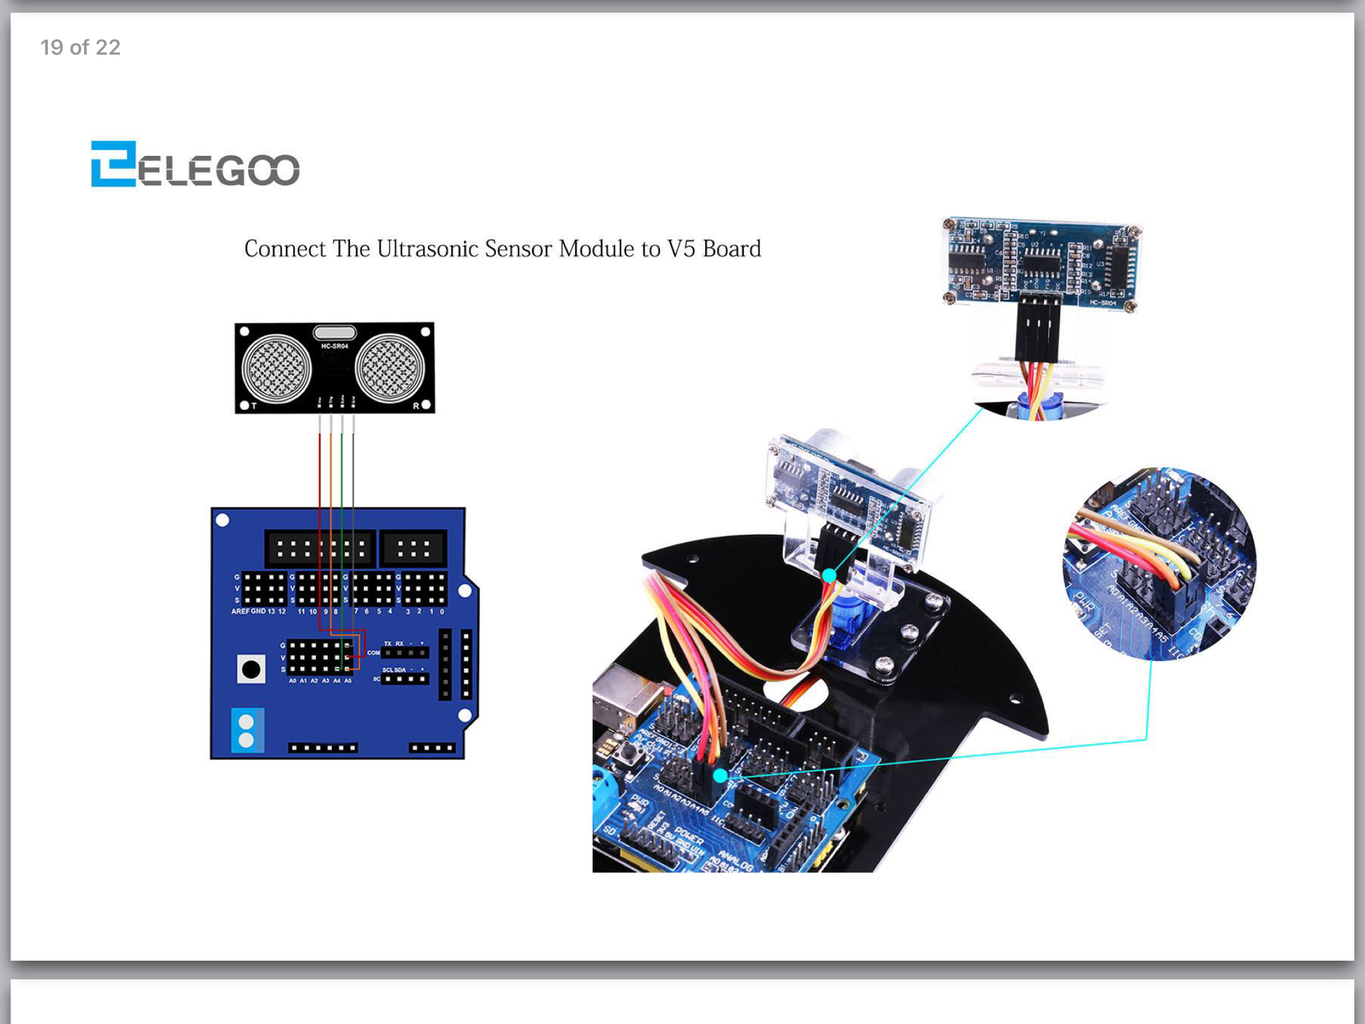
10. Attach the ultrasonic sensor onto the acrylic piece
11. Screw the acrylic piece onto the servo horn
12. Attach all the wires as shown in the elegoo smart car PDF
13. Screw everything together
14. Add a dab of hot glue to every nut to make them stay in place, also add a dab of hot glue to the brackets keeping the motors in place
Step 3: Program the Arduino


Before we do anything with voice control and Bluetooth, we need to make sure that our Arduino works and can take commands through what is called a Serial Port (basically we need to program an Arduino to move its motors when we send it a signal over the USB cable).
1) Download the Arduino IDE (basically it's the official software that you use to program Arduinos) - https://www.arduino.cc/en/Main/Software
2) Open it up and select uno board and com port 4 in the tools menu (or whatever is available)
3) Download this code - https://www.mediafire.com/file/297q4be1eg53rm8/BluetoothTest.ino
4) Upload it to your Arduino
5) turn on the battery on your robot
6) open up the serial window
7) type in f or b or r or l and press enter and see what happens
7.5) test out some of the other commands like g or d or n or v or t. Read the comments next to the code and see what they do.
8) to stop the robot from moving type s and press enter on your keyboard
9) if it works, congrats you're good!
10) if it doesn't, try and google your problems - troubleshooting is a large part of programming
Step 4: Setting Up the Raspberry Pi

Before we can control the Arduino wirelessly, we first need to set up the Raspberry Pi to function as a computer and run the scripts (programs) we need for it to work.
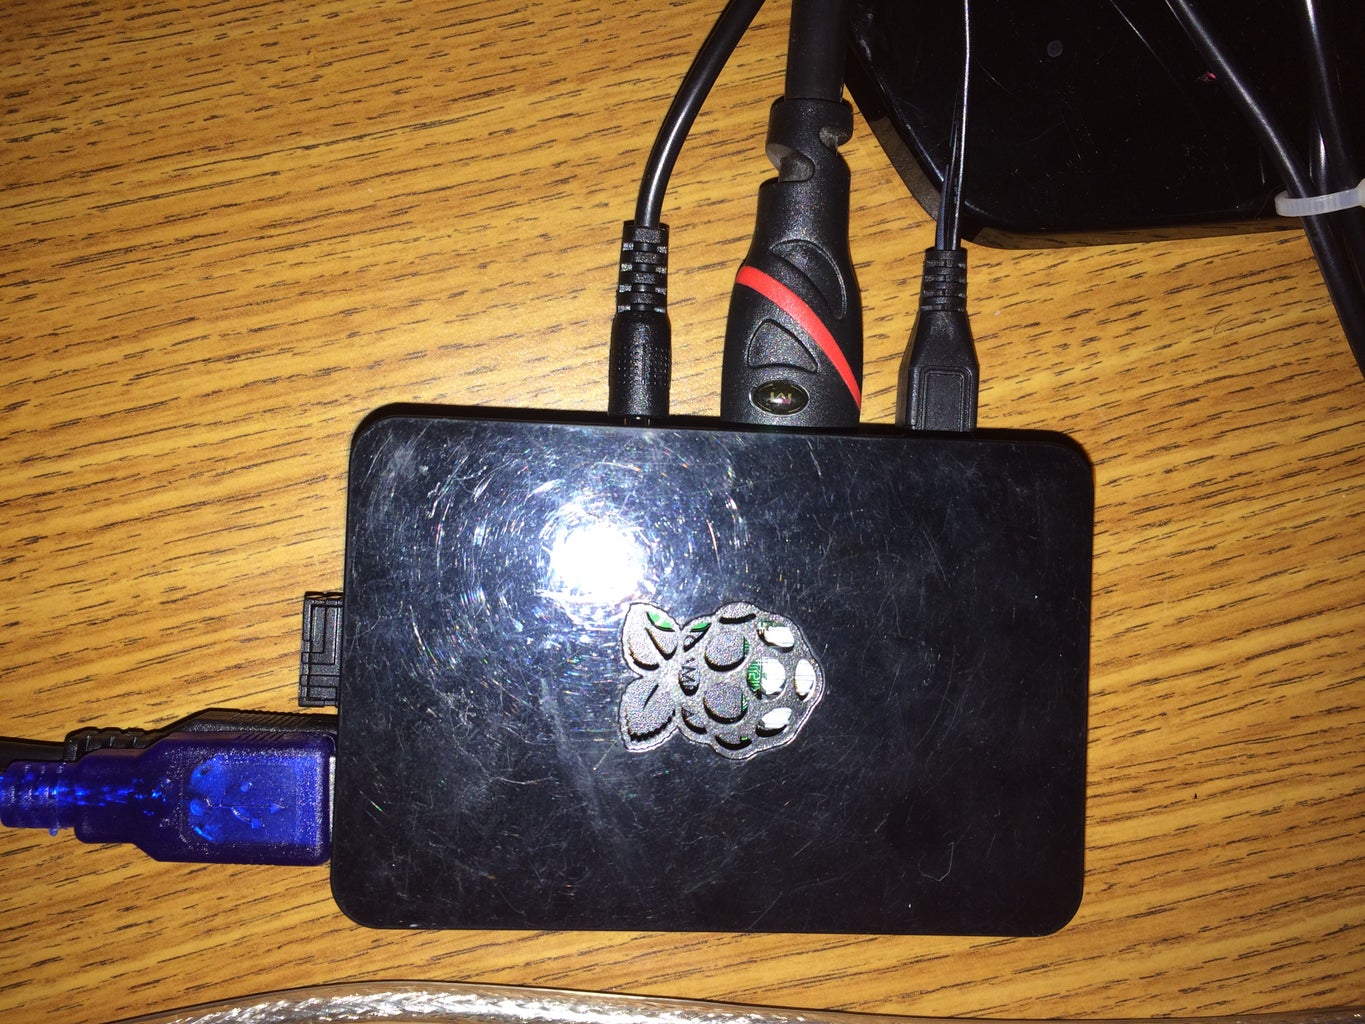
1) Take out your Raspberry Pi 3. If you bought the Cana kit, just follow the instructions to get it up and running. If not, just follow along.
2) Take your microSD card and Download NOOBs on it using this guide (if you bought the Cana kit, then it's already preinstalled): https://www.raspberrypi.org/help/noobs-setup/2/
3) plug in your speaker, keyboard, microphone, etc. Then once you're on the desktop, open up terminal (the black box on the top left) and type in the following commands:
4) type in sudo apt-get update -y
5) once your Pi is done updating, type in sudo apt-get upgrade -y
6) Once you're done upgrading, load up your web browser
7) navigate to this web page and use this as a reference
Step 5: Add Alexa to You Raspberry Pi


Now we're going to install what's called the "Alexa Sample App" on your Raspberry Pi. Essentially, Amazon released a version of Alexa to Amazon developers, and we're going to download it onto our Raspberry Pi and use it for our voice control. You might have heard of another version of this called "Alexa Pi", but as of know it's fairly glitchy for our operating system and has a lot of latency (it's slow) - no offense to everyone working on AlexaPi. Anyway, in order to run it and install it we're going to use this guide: https://github.com/alexa/alexa-avs-sample-app/wiki/Raspberry-Pi
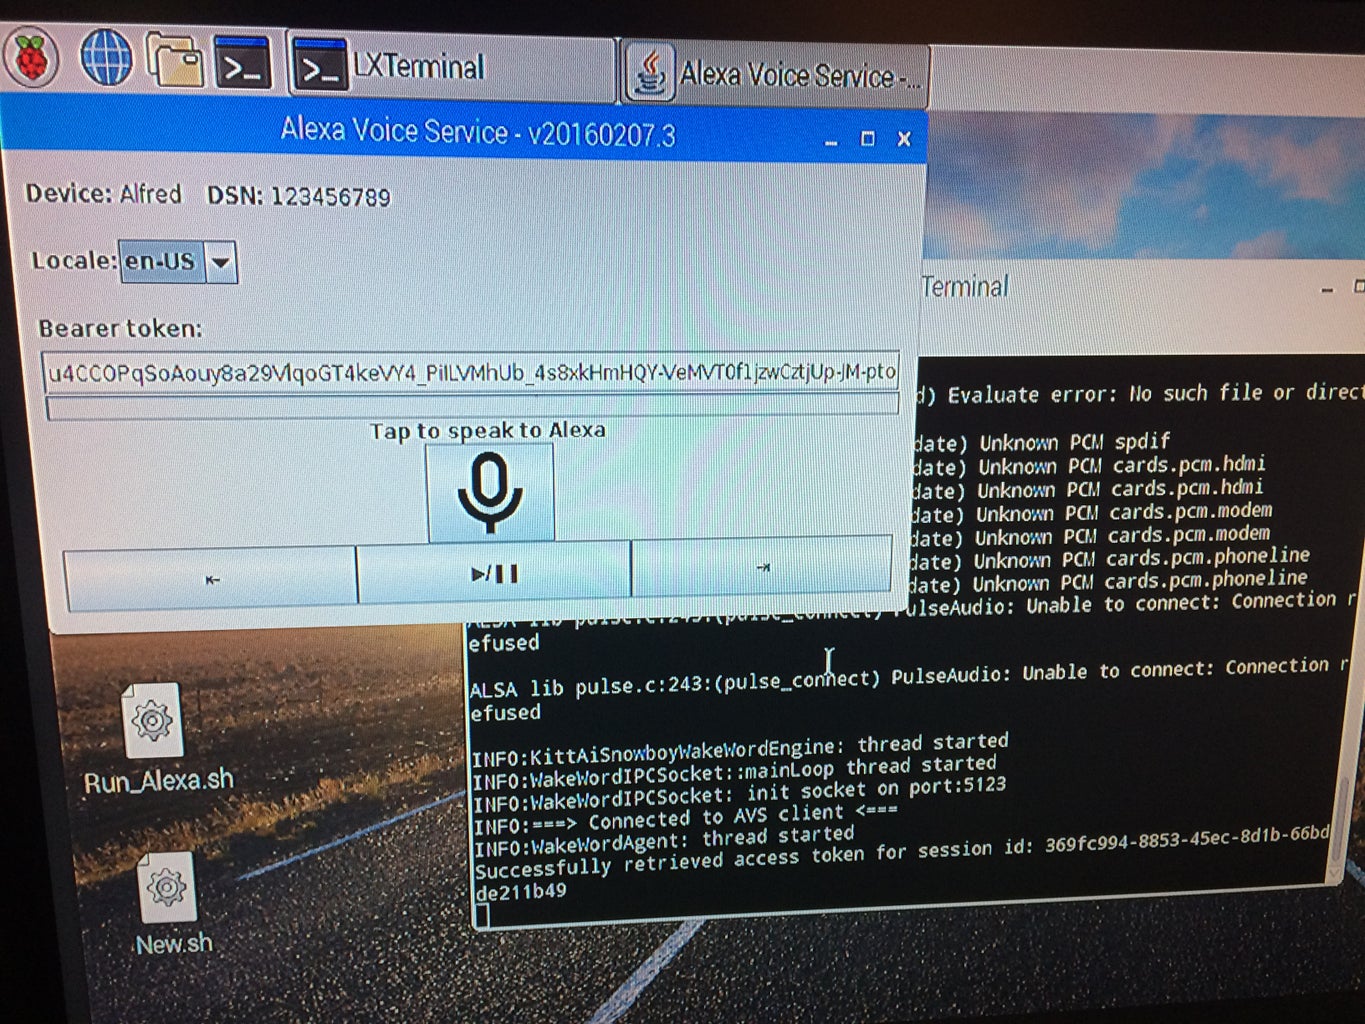
1) The instructions are fairly good, so just follow them: https://github.com/alexa/alexa-avs-sample-app/wiki/Raspberry-Pi
2) once you get Alexa to work properly, go in the terminal window for the wake word (kitt_AI) and Press the control key and the c key. Then do this for the Java terminal window and for the companion service terminal window.
3) Now Download this file on your Raspberry Pi:
- https://www.mediafire.com/file/emvd5zusx7bwpa0/Bg_Alexa
4) it should be in your downloads, so to move it to your Desktop go into terminal and type in: mv /home/pi/Downloads/Bg_Alexa.sh /home/Pi/Desktop/Bg_Alexa.sh
5) now type in your terminal sudo chmod +x /home/pi/Desktop/Bg_Alexa.sh
7) now double click the file on your desktop and click open in terminal and wait until Alexa is back
8) Congrats you now have a voice assistant on your Raspberry Pi and a little script to automatically launch it
9) if you want to shut it down, just go into terminal and Press the control key and the c key
Step 6: IFTTT: Customize Alexa to Get It to Control Things Over the Internet


Now you might be wondering: Alexa is cool, but how do I make it do what I want? (Aka "talk" to the Arduino). Well, there's this service that we're going to use called "If This Then That" - it's a free website that connects to the Alexa and to whatever else we want. However, there's an issue. Even though we're using this website to connect to Alexa, how is this website going to connect back to our Raspberry Pi and then to our Arduino? Normally, when things on the internet want to connect to each other they do so by finding each other's IP addresses (where they are located on the internet) and set up a connection to send information to each other.
HOWEVER, in order to do this, your Raspberry Pi has to be "seen" to the public - to the Internet. In technical language, this means that you have to open up a port on your router (called port forwarding). The issue with this is that it creates a hole in your firewall that is difficult to secure if you don't know much about network security (and if you have a cheap router). Therefore, instead of sending information DIRECTLY to the Pi, we're going to email the information and have the Pi listening to a certain email address. So when the Pi receives a certain email, it'll trigger a line of code that will "talk" to the Arduino.
Here's how we do that:
1) Make a gmail account that we will only use for our Raspberry Pi - https://www.google.com/gmail/
2) Use this gmail account to sign into IFTTT - https://ifttt.com
3) once you make an account, go onto "my applets"
4) create a new applet. Then click on the "this"
5) you'll get to a page with a bunch of different services. Type in Alexa and click on it.
6) Connect to your Alexa with your Amazon developer account
7) then select "specific phrase"
8) for the phrase we'll type in: forward
9) click next, then click on the "that"
10) type gmail and click on it
11) put down your Raspberry pi's gmail
12) Make the subject the name of your robot (I typed "Alfred")
13) Make the message: f
14) save your applet. Make 4 more applets for backward, right, left, stop, and any other functions you want
Step 7: Putting It All Together


Now we're going to download the scripts that set up the Bluetooth connection and the script that "listens" to the email, reads the message, and spits out the Bluetooth commands. Credit to Casey Trader (https://youtu.be/QrXLGIFXNXY) for supplying the bulk of the code for this. I modified it quite a bit, but I borrowed the imap part of the script from him (basically it's the client that listens for the emails and takes their info).
1) Download these two scripts:
- https://www.mediafire.com/file/r9pwq0392l0giak/connect
- https://www.mediafire.com/file/fo3m572sby3ebfz/Robot
2) move these two scripts from your downloads folder to your desktop folder using mv /home/pi/Downloads/connect.sh /home/pi/Desktop/connect.sh
mv /home/pi/Downloads/Robot.py /home/pi/Desktop/Robot.py
3) then make them executable using: chmod +x /home/pi/Desktop/connect.sh
chmod +x /home/pi/Desktop/Robot.py
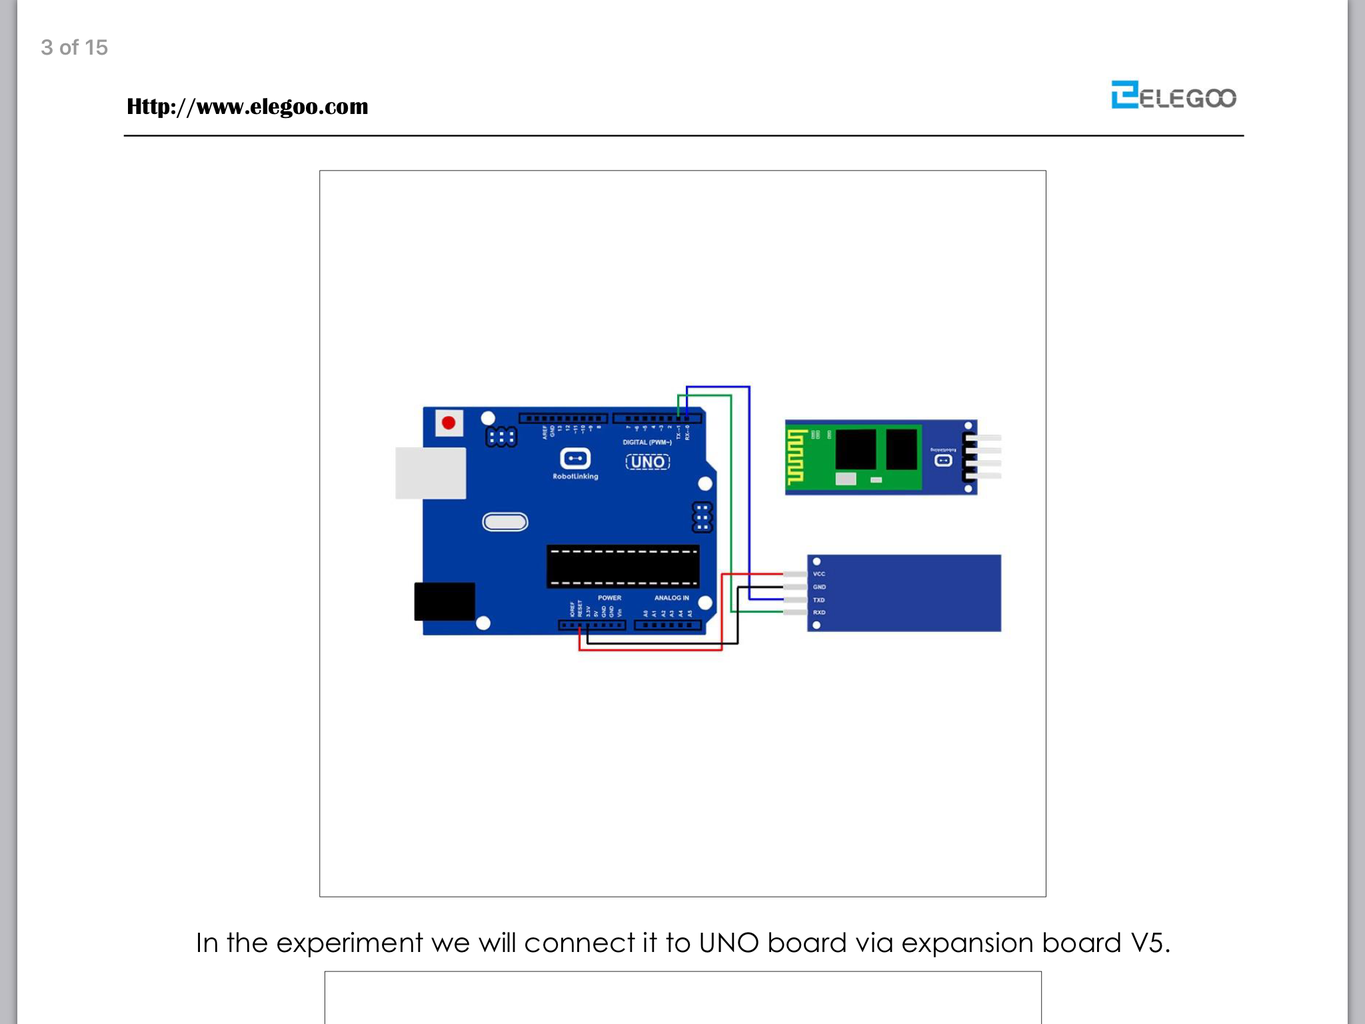
4) then put your Bluetooth module in your Arduino like in the diagram (DONT PUT IT IN BACKWARDS) and turn on your robot
5) then install a few packages (programs) on your Raspberry Pi by typing in this command: sudo apt-get install bluez bluez-firmware bluetooth Python-serial Python-bluetooth
6) Pair with the HC-06 (the Bluetooth module): type in bluetoothctl, then type power on, type agent on, type discoverable on, type scan on, find the MAC address of the Bluetooth device (it's a couple of numbers separated by semicolons), type pair xx:xx:xx:xxx <- where that's the MAC address, then type in the PIN number (usually it's just 1234), then type trust xx:xx:xx:xx:xx, and then type quit
7) right click connect.sh and open it in text editor - replace the word MAC_ADDRESS with the HC-06 Mac Address. Then save the file
8) right click Robot.py and open it in text editor. Then put your email address in the username and your password in the password area. Additionally, where it says "subject" set it equal to whatever you set the subject equal to in IFTTT. Then Save the file.
9) now click on connect.sh and open it in terminal
10) then click on Robot.py and open it in terminal
11) run Alexa by opening up BG_Alexa.sh in terminal
12) once Alexa is running, say "Alexa, trigger forward", wait a few seconds and watch it go.
Step 8: Congratulations!

You've now built something that can impress people and learned a bit about Linux and arduino's and the internet in the process. Try modifying the Arduino code and adding more phrases to IFTTT to make the robot do more. Also, I'll be making a version 2 in the near future that is less laggy (because it won't use IFTTT or email, which is what's slowing down the whole process).
Note: this instructable is still incomplete, and I'll be adding more explanations, and detail (including 3D models and a short YouTube series in the future).
Extra Note: there's a way to also control this robot through your smart phone (hint: it uses email).

Participated in the
Robotics Contest 2017

Participated in the
Microcontroller Contest 2017


