

Introduction: Extrusion 3d Printer With 300mmx300mm Heat Bed With Pre-configured Marlin and Controlled Via Wifi


I had a Reprap printer with the standard 8 inch bed but it became to small as many projects just got bigger and bigger, I needed something bigger but was not going to pay the rip off prices so decided to build my own which was not cheap but still better than paying the full price, I used most of my Reprap parts for the upgrade, Firstly i needed a new frame and decided on 1.5 inch aluminium extrusion so brought 3x8 foot lengths from Amazon, 2 would have been fine but got 3 in case of mistakes.We tried a 360w which was the most powerful we found on amazon but the main capacitor exploded so we plugged it in to a ups and found out that the heat bed alone was drawing 420w so we searched Ebay and found a 600w 12v power supply on Ebay which ships from Hong Kong via air mail although a pc psu would have done the job we wanted a compact unit. DO NOT GET A RAMBO V1.2 BOARD WITHOUT A USB STATIC PROTECTOR AS WE FOUND OUT - (ESD). (it blew the communication port) info on this is all over google.Also you will definitely need a relay as the board puts out a max of 15amp, the bed draws 30amp. we found both the bed and relay from the same supplier on Ebay.
The aluminium came from ebay in 3 x 8ft lengths, only 2 were needed but we ended up with 3 to allow for mistakes.
bolts used were mainly 3mm for securing the nema 17 stepper motors although much of the printer was put together using standard bolts and hex bolts.
6x 8mm slide rod, 350mm 2 length's for the Z axis, 2 for the x and 2x 400mm for the Y.
2x 8mm drive rod (350mm length) and 400mm with - Lead Screw and Brass Nut, 4 Start with 2mm pitch, so 8mm of linear movement per rotation.but of course over 400mm can be used for taller printers.
4 x couplers were used although 2 could be used but we used 2x 5mm to 8mm for connecting the 5mm motor shaft to 8mm smooth rod so no friction was caused through the extrusion and 2x 8mm to 8mm couplers for the main z axis drive rod. we tried 2 at first which caused huge slippage problems, we ended up drilling holes in the couplers and rod and using split pins, as shown in one of the pics.
The motor drive cogs were 20 tooth rather than 16,2 were used for this printer.1 on the Y axis and the other on the X.
The drive belts were 6mm standard Reprap belts, we used 3 x 2 meter belts to be safe but 5 meters with 2x2x1 belts would have been fine.
The display was a Geeetech 12864 LCD display with sd card reader controller with adapter 3D Printer,Reprap MendeL from E bay for under $20 but you need to switch to Repetier 0.92, not 91 as it is not listed unless using Marlin.
The limit (micro) switches. 5 were used, x min, x max, z min, y min and y max, as the Rambo board accepts up to 6 switches and 1 extra for bed leveling we took advantage of this. we did how ever have problems when we fired up the printer and the switches turned out to be the reason motors did not move things around so if you have none moving motors in one direction then check your switches, was an easy fix.
The corner brackets, the big strong looking ones in the pics turned out to be weak and broke easy, search Thingiverse for the others shown in pics, the ones with a solid side.
The plate under the heat bed was 2mm 12.3 by 12.3 inch steal plate but had to be replaced as was not thick enough, when the bed was calibrated it would bend corners up so bear that in mind when selecting a metal sheet.
The bearings are from E bay. 4x 4PCS LM8UU 8mm Motion Linear Ball Bushing Ball Bearing, these were for the extruder housing and 8x SC8UU SCS8UU 8mm Linear Motion Ball Bearing, 4 of these were placed under the heat bed base and 2 for each side of the frame on the z axis.
when building the frame, before attaching the uprights, be sure to check that the top of the frame is level or when attaching the Y axis rods, they will not be straight and when it comes to calibrating the bed you will find that you can not as one corner will always be off, we added a proximity sensor to over come this as we made that mistake.
We found that the Z axis had not enough voltage to both motors which caused one to stutter, we got around this on Repetier firmware version 0.92 that we could mirror image the Z motors to another port, so we used the second extruder port, then every thing worked fine.If your going to use two motors plus a second extruder then maybe get two lower voltage Nema motors so they can be used both on the Z axis on the board, i would not know what voltage to get for this.
We tried several types of springs but most were to weak, lots of vibrations caused not so good prints so make sure you have sturdy ones, about 20mm in length and 5 or 6 turns at max.
Firmware, they say Marlin is the best but we found Repetier to be more simple to use and can import config files from other printers as i did from a Prusa i3 to my newer bigger version of the same thing. All plastic parts are available on Thingiverse.com
Repetier Firmware <<<< link to firmware.
Or an alternative firmware, Marlin This one is the 2015 version downloaded from Github and is not configured.
Below is an already configured version of Marlin for this project. The sd card needs be 2gb or under, the dual z axis output has also been altered so 2x z axis motors can be used from the z axis and no need to be mirrored on E1 which would mean that 2 extruders are able to run although this would have to be enabled via marlin firmware and re uploaded, all safety futures have been turned on. The thermistors are 100k NTC 3905 and EPCOS. Motors are already calibrated,providing the same motors are used as in this project.
Rambo main board driver, for pc and Arduino IDE <<<<<< link to the driver software and Arduino Library's, Examples
Also needed is Arduino IDE, below is the link to get it.i found the best version was 1.0.5.
Info about Rambo V1.2 boards burning out without the ESD patch.DO NOT IGNORE THIS BIT! I did and it cost us a whole new board.
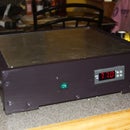
300mm x 300mm Heat bed This company we got our bed from, we contacted this guy (Jim) several times, always happy to help and advise,Send him an email from the above link if your unsure of whats needed,mention that you need a board and relay or tell him what you have and ask for whats needed. He will send you a link to buy both or reply with advise . He does 12v and 24v beds. You will need a relay with this board unless its some really high end board as it will burn out your board, draw rate is 30 amp, the bed alone blew a capacitor in a 360w transformer, ended up with a 600w. it was not cheap but still wanted small, it took 8 days to arrive which was sent via airmail and not wait 3 weeks if your lucky container from china
600w power transformer- 12v x 3 outputs
Other parts used.
Motors, Nema 17. 2Amp. part number. 17HS16-2004S Amazon link
about 15 M3 50mm bolts and nuts
pack of 25 of each should do-M3 6mm, 10mm and 12m bolts again with nuts of both type.
many 5mm, 10mm and 50mm M4 bolts with lock and standard nuts. If in the states then Ace hardware stock these and are cheaper than the main stores.
Lithium Grease.
Relay is a 30amp plus available from the same guy who does the heat bed.pins from left to right, pos, heatbed, neg, heat bed.
3 x MF63zz Mini Metal Double Shielded Ball Bearings (3mm*6mm*2.5mm) 2 x flanged and 1 non flanged or 3 non flanged should work. these are for the Z axis drive belt.
4x Leveling Extruder Springs for Reprap Prusa Mendel 3D Printer, 20mm length and about 5 to 7 turns.
2 x 5mm to 8mm couplers.
8mm to 8m couplers.
Cable wrap.
4 x between 5mm and 10mm x 3mm thread standoff nuts, We used these on the bed leveling bolts, we JB welded the bolts upside down on the lower plate coming up through and used the standoffs with a socket to level the bed as needed, saves using an alan key (wench) and and pliers. Araldite with do the same job as JB weld.
hope this helps someone with ideas for their printer.
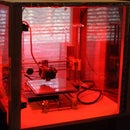
MAKE SURE ALL PRINTS ARE DONE IN ABS OR OTHER HEAT RESISTANT PLASTIC-PLA CAN NOT TAKE THE HEAT FROM A BUILD CHAMBER - I FOUND OUT THE HARD WAY.
The base is 20x18 inch's square
...and yes, for three people who knew nothing about 3d printing prior to Jan 2015, This was a bitch to build, no designs, make it up as we went along and totally no idea.... but it worked, Total cost = no idea but probably more than if we just brought the whole thing, but we built it so that counts more :) The main person for this build was a 70 year old woman who did the construction and mechanics with no plans,just thoughts from her head and then did it.

Step 1: Update


So, we were able to print sorta ok but with to much movement and to much hard work trying to level the bed witch ended up resulting in a bent lower bed plate and warped heat bed, we decided to strip the bed and take it to a fab shop and have them cut out 2 plates @ 3.2mm thick and 12 .1/4 inch square (ally)
We re drilled the holes for the heat bed corners and bearings in the lower plate.
I am in the process of adding auto bed leveling with a proximity sensor, the marlin firmware and this page will be updated for this as well as a install video.
We ended up changing firmware to marlin after all, setting up motors for calibration turned out to be harder than we thought using repetier and marlin had all figures displayed with easy to use videos on calibration and also repetier was not all that easy to set up with auto bed leveling and despite being hooked up to 5v, several types and brands of servos kept burning out,
Octoprint.
i installed Octoprint on a raspberry pi and the printer is now on my wifi network so is fully wireless, no need for a pc as the raspberry takes over, great if you want to attach a camera to do time lapse videos, i can if i like now control my printer from my local town or even from another country if i really wanted to, when i go out and the printer finishes its current job it can email me to let me know so i can shut it down. to install octoprint download the full Raspberry Pi iso image from the below link, Octoprint can be used through a pc if wished through a web browser by typing http//octopi.local but to do this, software called bonjour by apple is needed or use angry ip scanner (free to download and use) to find out the ip address of the raspberry pi and use that in the address box.
CHECK OUT TOMS GUIDE, ONE OF HIS VIDEOS IS ABOVE, DETAILED VIDEOS INTO JUST ABOUT EVERYTHING WITH 3D PRINTERS FROM FIRMWARE BASICS TO ADVANCED TO AUTO BED WITH STEP BY STEP GUIDES AND MORE.


