

Introduction: Arduino Based Hourglass


This is a project that is functional and working so that anybody can make a real one. I had made the same circuit using attiny2313.
https://www.instructables.com/Attiny2313-Based-Electronic-Hourglass/
This was a little complex circuit to teach younger kids, considering the programming of the attiny chip and soldering all the LEDs and connecting them. So I made another one using arduino it will be easier for kids of grade 3 and above. Yes, I teach as a hobby.
Supplies
Nothing more than your hands, a computer and an internet connection.
Step 1: Truth Table

The truth table for the circuit can be seen in the adjoining figure. I have planned to connect the LED's in a way so that single pin can be used for the top and bottom triangle. You can understand the circuit in the next step.
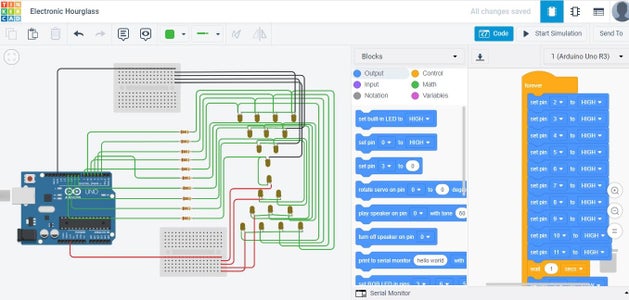
Step 2: Circuit

Circuit is simple single pin is used to control 2 different LED's. Make sure the VCC is always connected to 3.3V. Connecting it to 5V makes both the LED's to light up and defeat the circuit's purpose.
Basic step: When pin is high one LED glows and when pin is low other LED glows.
Step 3:


Using the Above 2 steps start connecting the LEDs to the arduino.
For programming no complexity in loop function are used. Only straight program with delays are used.
Basic step: When pin is high one LED glows and when pin is low other LED glows.
Finally it is done. All working. Check the video for the functionality.

Participated in the
Teach With Tinkercad Contest


