

Introduction: Arduino - SSR-25 DA Solid State Relay and DS3231 RTC Automatic Timer Lamp


Hello world! Today i made a code to automate your solid state relay as a timer with a DS3231 RTC clock and arduino.
I made this project to automate a lamp for a growing room for example, so it is used for growing periods. Between 4:00 and 22:00 for grow period during day and 16:00 to 10:00 for grow period during night.
In the video i set 17:59:45 as a time. which you can set in the code at
setTime(17, 59, 45, 20, 10, 2017)
In the if statement at void AutomaticProgram() I set the value for the relay to be HIGH to 17 and the value for the relay to be LOW to 18 These values i set for the video demonstration. Change these values to the ones you want to use. Remember you can only use hours, or you need to change the code to also be able to read seconds and minutes. So you can only use a value between 0 and 23 using 0:00:00 to 23:00:00 will not work.
The code is very easy to understand, it simply reads the value "hour" and ignores everything after 17 as you can see in the video. The output in the serial monitor is the following below: 17:00:00 so those are hours:minutes:seconds But the Code only reads 17. The rest of the output, so :00:00 is ignored in the code
You will need 3 libraries.
DS3232RTC.h Download here: http://github.com/JChristensen/DS3232RTC
Time.h (included in arduino libraries)
Wire.h (included in arduino libraries)
I noticed some people run into a Compiling error with Time.h
the fix for them was to use TimeLib.h Library.
Follow the following step for the Schematic, code and parts list.
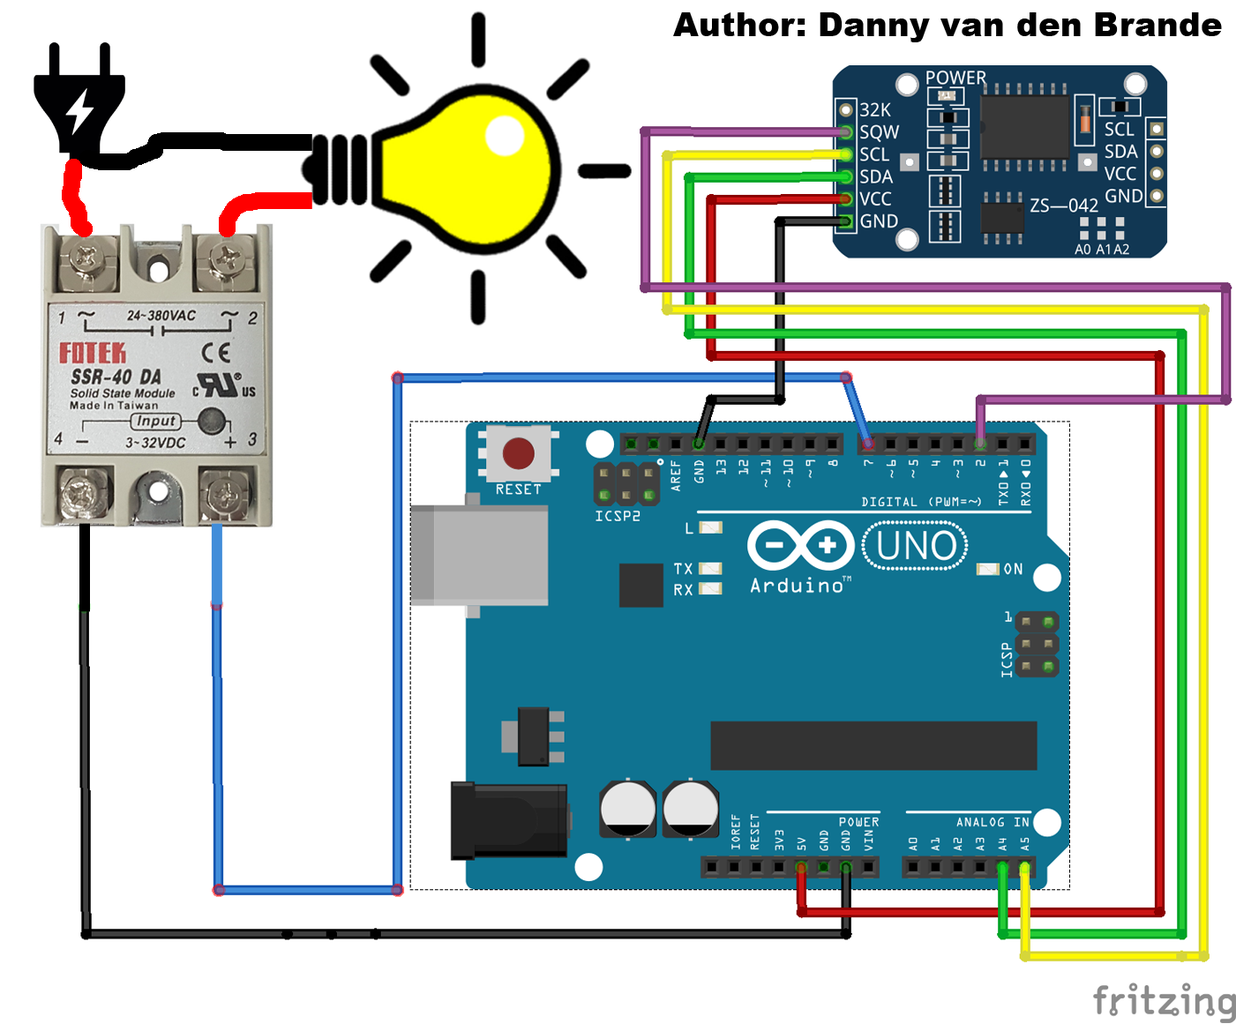
Step 1: Schematic, Code and Parts List.
Set up your time at these 2 lines below. After that comment them out.
the RTC will remember the time, if you do not comment out these lines the rtc will reset every time you upload.
setTime(17, 59, 45, 20, 10, 2017); //Hours / minutes / second / day of month / month / year
RTC.set(now());
Wire it up like the schematic and upload the code to the arduino.
Parts list.
- Arduino uno.
- Jumper wires MM/FF/MF
- Solid state relay SSR-25 DA
- DS3231 Real Time Clock RTC
- Lamp with cable (optional, relay also shows if ON or OFF with a led)
Good luck!
Follow me for more! Thanks!
Subscribe to my youtube channel!
Buy sensors at my website!

Step 2: The Code.
First we add the libraries.
#include "DS3232RTC.h" //Get library here http://github.com/JChristensen/DS3232RTC
#include "Time.h"
#include "Wire.h"
Then we create the datatype integer to read the value from the hours.
int val;
Next in void setup() we set the solid state relay pin to 7
at line 14 you can set the time for the RTC.
You only need to do this once!
The format is:Hours / minutes / second / day of month / month / year
After setting time upload the code.
On the next upload you need to comment out line 14 and 15 shown below.
setTime(17, 59, 45, 20, 10, 2017);//Hours / minutes / second / day of month / month / year
RTC.set(now());
The rtc will remember the time, if you do not comment out line 14 and 15 after setting the time, the RTC will reset every time you upload the code.
void setup()
{ Serial.begin(9600); pinMode(7, OUTPUT); //relay1/////////Uncomment both lines below when you want to set the time /////////AFTER SETTING TIME COMMENT the lines. setTime(17, 59, 45, 20, 10, 2017);//Hours / minutes / second / day of month / month / year RTC.set(now()); setSyncProvider(RTC.get); // the function to get the time from the RTC if(timeStatus() != timeSet) Serial.println("Unable to sync with the RTC"); else Serial.println("RTC has set the system time"); }
At the function void loop() we set the functions digitalClockDisplay(); and AutomaticProgram(); to run forever
void loop()
{ digitalClockDisplay(); AutomaticProgram();}
At the function void AutomaticProgram() we set the if statements to run the automatic program between 2 values/hours.
in this example we used the value (hour()); from the function voiddigitalClockDisplay(void){
The if statements simply read the first value of the output in the serial monitor.
So in this case if 4 oclock in the midday is the value that hits, the Solid state relay will turn HIGH/ON and turn on the LAMP/Group/Or whatever device you like.
If the value = 22 the solid state relay will turn LOW/OFF. Default is low.
void AutomaticProgram()
{   //we are using hour as a value the rest is ignored.
    val = (hour()); //Grow/Day - Groei/Dag between 4:00 and 22:00
    if ((4 == val))
    {
    digitalWrite(7, HIGH);
    }
    else if (val == 22)
    {
    digitalWrite(7, LOW);
    }
    else
    {
    digitalWrite(7, LOW);
    }
}
At the function void digitalClockDisplay(void) { we send the values to the serial monitor.
You can uncomment all of these and send them to the serial monitor if you like i just chose to use hours());
as a value to read, the rest will be ignored as you can see in the serial monitor it prints out 4:00:00 for example
but the code only reads the first value which is hours()); the rest :00:00 is ignored.
void digitalClockDisplay(void)
{
    // digital clock display of the time
    Serial.print(hour());
    printDigits(minute());
    printDigits(second());
   // Serial.print(' ');
   // Serial.print(day());
   // Serial.print(' ');
   // Serial.print(month());
   // Serial.print(' ');
    //Serial.print(year());
    Serial.println();
}
At the function void printDigits(int digits) we print the digits to the serial monitor.
You can change line 66 from : to . or , or whatever.
void printDigits(int digits)
{
    // utility function for digital clock display: prints preceding colon and leading 0
    Serial.print(':');//line 66
    if(digits < 10)
        Serial.print('0');
    Serial.print(digits);
}
Thats it! good luck!


