

Introduction: Arduino and Morse Code


It could be said the Morse Code is all but dead.
It has not been a Licence requirement for Radio Amateurs here in the UK since 2003 and many other countries have removed the compulsory Morse component from their Amateur radio licence requirements. But, because of the way in which Morse Code works, the signals get through where more modern methods fail especially in some parts of the World.
And what if we have some kind of apocalypse (not zombies) and there is no Internet and no phones any more? Morse code uses simple(ish) technology and therefore would be the first form of communication to be put into use. Even if none of that ever happens, I think that it would be cool to learn. I am not a Radio Amateur and No, I cannot do Morse code myself, yet. But I would like to learn.
There are probably a large number of places around the World where you and I could get some kind of tuition, but at the end of the day it is practice that makes perfect and that will be done in your own time at your own speed.
Morse Code dits, dahs, words and sentence spacing are based on only a few simple rules.
- Morse is based on units of time
- 1 unit length = a dit
- 3 units length = a dah
- 1 unit of length between dits and dahs
- 3 units of length between characters of a word
- 7 units of length between words in a sentence
- And obviously the combinations to make letters and numbers.
Step 1: Requirements:
I have found help in places like Instructables that convert text into Morse and maybe make sounds from a speaker or flash a LED.
I decided to create my own Morse Code practice tool with an Arduino.
My requirements were:
- To be able to enter text in the Serial Monitor and display the dots and dashes required.
- To be able to enter text in the Serial Monitor and illuminate LEDs showing dots and dashes.
- To be able to use a Morse Code Key (or button) to practice.
- To be able to hear the dots (dits) and dashes (dahs) through a speaker.
- To be able to see using two LEDs (or an RGB one) for the dots and dashes.
- To be able to define the single time unit used, so that I could slow it down for practice.
- To have some kind of visual feedback in the Serial Monitor when I am practicing.
- To include the most common phrases used in Morse Code like SOS = Distress and QSL = I acknowledge.
Not a long list but..............
Step 2: The Build

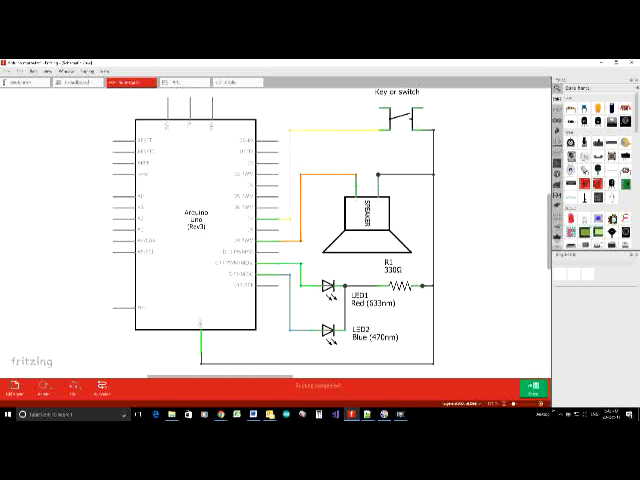

The Parts List:
- An Arduino.
- A breadboard.
- An RGB LED although I could have used two different coloured LEDs.
- A 220ohm resistor.
- A speaker.
- A Morse Code key, because I was serious about actually learning myself.
The Build:
- Resistor to GND and cathode of the LED
- Arduino pin 11 to Red anode
- Arduino pin 12 to Blue anode
- Arduino pin 9 to positive of speaker
- Speaker negative to GND
- Arduino pin 7 to key/switch
- Key/switch to GND
Step 3: The Code
The code took a long time, a lot of trial and error, and a serious amount of laughter and Vodka.
Unfortunately, the main section of code that does all of the work, organising the dits and dahs, getting their lengths right and actually making sense of everything, is nearly five hundred lines in length.
Much too big for a single sketch, so I went online and found out how to create a library.
I basically abstracted away all the real working code and made it available through a handful of object commands.
What I didn't do is re-write the code in an obscure way, mainly so that myself or possibly you could edit it if the need arises.
Rightly or wrongly, I did not use the Morse Decoding Tree, I used an array for the characters etc. In my mind, that was only a small part of this little project and I knew that arrays would do the job anyway.
All code, the library and sketches are well commented to help with understanding what is going on.
To use the library, download the zip file in this Instructable.
This contains the library and three examples to play with.
To install the library Go to Sketch/Include Library/Add .ZIP Library and locate the downloaded zip file on your computer
Step 4: Using the Example Sketches
Although most of the code is tucked away in its library, there are three example sketches to load into your Arduino.
There is almost nothing to change for your own use other than the time unit of the dit and turning things on and off.
Basically it is self contained and ready to go.
Sketch 1: MorseCodeFromSerial:
Go to File/Examples/MorseCode/Examples/MorseCodeFromSerial
- This allows you to enter words and sentences into the Serial Monitor.
- The monitor will display the Morse equivalent of your text.
- The LEDs will flash which can be turned off at line 54.
- The speaker will beep which can be turned off at line 53.
Sketch 2: MorseCodeWithKey:
Go to File/Examples/MorseCode/Examples/MorseCodeWithKey
- This allows you to use your key or switch to enter Morse Code.
- The monitor will display the Morse equivalent of your text.
- The time unit can be modified at line 61.
- A single LED will flash which can be turned off at line 68.
- Only one LED is used here because there is no way of knowing what you are entering before you complete it. The speaker will beep which can be turned off at line 67.
- There are other outputs that can be turned on or off in the same area of code as above.
Sketch 3: MorseCode:
Go to File/Examples/MorseCode/Examples/MorseCode
- This sketch combines both sketches above.
I hope that you get some enjoyment out of this.
I am now going to practise some Morse Code:)


Participated in the
Audio Contest 2017


![Tim's Mechanical Spider Leg [LU9685-20CU]](https://content.instructables.com/FFB/5R4I/LVKZ6G6R/FFB5R4ILVKZ6G6R.png?auto=webp&crop=1.2%3A1&frame=1&width=306)


