

Introduction: Assembly Table With Storage


One of the nice things about building a new larger shop was the ability to add a dedicated work table. In previous shops, this work was all done on my out-feed table. Although the out-feed table is a very nice work area, it also meant that every time I wanted to use my table saw, I needed to clear the out-feed table off and make room.
What follows is my collaboration with Mark (mtairymd) who worked out all the plans per my design specifications. It has a torsion box top with a replaceable surface, solid wood base, and some nice storage capabilities for things like layout tools and fasteners.
Note: I'm also building a cutting table for my wife's quilting room at the same time as this assembly table. The construction is exactly the same, only some of the dimensions are different. So, some of the pictures are actually from her table and not mine but, it just goes to show that this table could be used for a multitude of reasons.
The build is documented (materials, drawings, etc.) in the instructable. I also filmed the build. The first video shows the initial table build.
Storage is key for my workshop. This video shows the five drawer cabinet that I added to one side of the table. I've also included the organization of the drawers which is shown in the last steps of this instructable.
Step 1: Tools/Materials

Tools:
Note: There are lots of different ways to accomplish tasks in woodworking. The list below is what I used but, could certainly be done in other ways.
- Table Saw
- Jointer
- Planer
- Band Saw
- Track Saw
- Router and Flush Trim Bit
- Festool Domino
- Brad Nailer and Air Compressor
- Drills
Materials:
- 8/4 Alder
- 3/4 MDF
- 1/4 Hardboard
- 1/2 Baltic Birch Plywood
- 4/4 Walnut
- Drawer Pulls
- Full Extension Drawer Glides
- Casters (optional)
Step 2: Top Level Drawing


Although you will be building to this drawing, it’s important that you take actual measurements from your build so that any error created isn’t compounded throughout the remainder of the build (Relative Dimensioning). All dimensions are in inches unless noted.
Step 3: STEP File


A STEP file is included for those that would like to look at the details of the Assembly Table.
Attachments

Step 4: Legs


The legs are 4" x 4" square and 30" long and constructed from solid Alder. Alder was chosen because it's an inexpensive hardwood which will work great for shop furniture.
Normally, I would laminate two 4" x 2" pieces together to get my 4" stock for the legs. However, my lumber had some hidden flaws in it that I needed to cut around. This meant that I laminated four 2" x 2" pieces to get my 4" x 4" legs.
Step 5: Rails


The top rail is 2" x 3" square and each is 32" long. Any flaws that existed were stabilized with epoxy and turned to the inside where it couldn't be seen whenever possible.
The bottom rail is 2" x 2" square and is 32" long. Note: the plan calls for a 3/4" x 3/4" rabbet to accept a 3/4" bottom shelf (discussed later). I didn't do this as I wasn't sure what I was going to do in the bottom. Ultimately, I came back later and added 2" x 2" cleats for this support and added that bottom shelf.
Step 6: Base Assembly


The top rail is positioned to be flush with the tops of the legs as this will assist in supporting the top as well as attaching the top. All the rails are set back about 1/8" from the front edge of the legs for aesthetic purposes. The bottom rail is positioned 4" up from the floor.
Joinery is all accomplished with the Domino XL. Refer to the Entry Level Bench posted a few weeks ago for more details on this process.
Step 7: Top (Torsion Box)


The torsion box top is made mostly from MDF. MDF was chosen because it's very stable and flat. Typically, MDF is not a very strong material but, when constructed in this honeycomb type configuration, it becomes extremely strong.
There is a 3/4" layer of MDF as the bottom layer. This is used because it's a good flat surface to work from. Be sure to not get glue on this surface while building the rest. You could also consider waxing this surface first to prevent glue from sticking to it. From there, an MDF box is assembled around the outside perimeter ensuring that it's square as you glue and brad nail the pieces in place. This perimeter should be a little smaller than the bottom sheet, we'll flush trim that later.
Next, the long pieces are inserted and glued down again ensuring that these are square and evenly spaced. It's important that all the strips are cut to exactly the same width. I cut several extras just in case.
Next, several shorter strips were cut to use for the remainder of the honeycomb pattern. These were also evenly spaced but, offset slightly to allow for every other row to be slightly off line with the previous row. This allowed for easy access to brad nail the pieces in. I also used a spacer block to align each piece as it went in. This ensured that it was evenly spaced and square.
Next, the 3/4" top skin is glued and brad nailed to the grid pattern. Leave a little over hang on each side and then flush trim to be flush with the sides.
Next, flip the entire assembly over and glue and brad nail the original 3/4" MDF layer in place. If you used wax on your surface to prevent glue sticking, ensure that this side faces out as glue won't stick to it. This is the bottom of the table anyway and won't interfere with anything.
Step 8: Top Trim and Installation


Cut a piece of 1/4" hardboard to the approximate size of the torsion box. Leave a little oversized as it's easier to flush trim this piece once it's installed. Secure the hardboard with 3/4" wood screws. Do not glue this board down. This will ensure that you're able to replace this top as needed in the future.
Next, chose a hardwood of choice and attach around the outside of the torsion box top. These were attached with 1 1/4" wood screws that were countersunk below the surface and then the holes were plugged with custom made face grain plugs. This will add durability to all the edges of the top.
Apply a finish of choice. General Finishes Arm-R-Seal was used on this project.
Lastly, pilot drill holes through the top rails in the base - 2 on each side.
Set the top on and center on the base. Secure the top to the base using 3" Spax screws.
Step 9: First Stage Complete

The basic table is now complete and ready for use. I actually used this surface to construct the rest of this build.
Step 10: Bottom Shelf

A piece of 3/4" plywood was used for the bottom shelf. Notches were cut from the corners to go around the legs and attached to the 2" x 2" cleats mentioned earlier. The plywood was attached using 1 1/4" wood screws.
Step 11: Drawer Case


The drawer case is exactly the width of the opening on one end of the table and 18" deep. Although the plans call for this box to be 32" wide, it's important that you measure your actual piece to account for any error or deviation from the plans. This is known as relative dimensioning and it's important that your measurement comes from your actual piece rather than the plan.
The case is made from 3/4" Baltic Birch plywood. The sides each received a 3/4" rabbet on each end to allow the top and the bottom to fit in those rabbets. The top and the bottom were attached in those rabbets with glue and 1 1/4" wood screws. There is also a 1/4" rabbet cut in the back of all the plywood pieces to allow for a 1/4" back panel to be installed. The back panel was installed using glue and 3/4" brad nails.
Step 12: Drawers


Five drawer boxes were constructed that split the cabinet space evenly. Full extensions soft close drawer glides were used for installing the drawer boxes. Note: The thickness of a full extension drawer glide is 1/2". To get the appropriate width of your drawers, you need to measure your case opening and subtract 1" from that dimension. This is where small errors in the construction can add up and you could have drawers that don't function properly or not at all.
If it wasn't clear from the description, this video provides a quick overview of a drawer build.
Step 13: Drawer Installation


Once the drawer boxes were installed, walnut was milled to size and installed on the drawer boxes. I would suggest using the same species hardwood that you selected for the torsion box edges but, it's not required. The drawer pulls were located and pilot holes drilled. These holes were used to secure the drawer fronts until 1 1/4" wood screws could be inserted from inside the drawer boxes.
Note: 1/16" spacer was used to ensure proper spacing. between the drawer fronts as I move up the cabinet installing them. Drawer pulls were installed.
Step 14: Drawer Organization


As this is the primary work location in my shop, storage and organization here are mandatory for me. As a general rule, I count steps in the shop and those tools that I use most frequently get a home the closest to my primary location. Once an area for a home is chosen, I then work on the actual storage solution.
The top drawer uses Kaizan Foam to inlay each tool that I wanted at each location in this drawer.
For the second drawer, I made a grid pattern out of 1/4" leftover plywood using 1/2 lap joints and used CA glue to secure into the drawer. This is a quick, easy, inexpensive way to organize any storage drawer to fit your needs. Below are a few similar drawers I did a while back.
Hardware Drawer
Creating a simple grid in a drawer to store items.
Drill Bit Drawer
Some additional storage ideas to help organize drawer space. This one utilizes an additional sliding tray within the drawer.
The remainder of the drawers are currently empty. As I'm still working out my work flow in the new shop, I should know what will live in these drawers after a couple projects have been completed and I find myself walking about the shop to get the next tool or item. It's always nice to have a little room to grow!
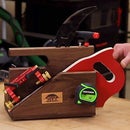
The remainder of the bottom area around the drawer cabinet could be used for just about anything you'd like. Additional cabinets, lumber storage, dust collection, etc. I chose (for now) to install my air compressor and hose reel there. These are only temporarily mounted and the space could be altered in the future if the needs or wants change.
Step 15: Casters

As a final touch, casters were added to allow the bench to be moved around the shop. Follow the manufacturer’s instructions for installation.
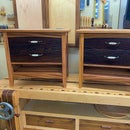
Step 16: Final Pictures


As you see in these views, I was able to come back and add some hardwood trim around the case. The trim is 1/8" thick Alder cut to the width of the plywood case and installed with 3/4" brad nails.
I'm super happy with both the functionality as well as the looks of this project and look forward to many years of use!
Step 17: Closing

I am extremely excited to have this table in my shop and to move my primary work away from my out-feed table.
The plans by mtairymd were absolutely fantastic and easy to follow. I was able to work through this project as we developed the plans so, slight errors or changes could be made on the fly. We live on opposite sides of the country so, sometimes things get lost in communication. There was actually very little of that on this project!
Because of the changeable hardboard top, this table should outlast me in the shop. Also, with so much room still open in the bottom, additions or changes are easy to make as my needs or wants change.
Total build time was about 3 days and total cost was around $300.
Thanks for viewing!
Some links are affiliate links so making a purchase helps support my work.

First Prize in the
Organization Contest


