

Introduction: Augmented Reality App for Beginners


This tutorial will show you how to make an augmented reality app for beginners. We will use Unity3D and Vuforia's ground plane detection to make a marker-less AR app for Android or IOS. We will go through adding a 3D model to Unity and moving it around with a mobile joystick. This method will also work with any other free 3D model that you can find.
Step 1: Will This Work on Your Phone?

First of all we need to make sure your phone supports Vuforia’s ground plane detection so make sure your phone is in the list of supported devices.
https://library.vuforia.com/articles/Solution/Vufo...
The only thing you will need as far as software is the free version of Unity. If you don’t already have it go to Unity3d.com and click get Unity. Now I am using version 2018.2.0, if this version is no longer available go to older versions of Unity and download 2018.2.0.
During the installation process make sure to install the packages for IOS or Android depending on what type of phone you have and make sure to install Vuforia support.
Step 2: Start a New Unity Project.

Start a new Unity project and delete the main camera. At the top menu bar go to game object, vuforia and add an "ARCamera".
Before anything can work we need to enable Vuforia so go to file build settings, switch platform, XR settings, and enable Vuforia Augmented reality support.
Click on the "ARCamera" game object and in the inspector click Vuforia configuration. At the bottom enable device tracking and change tracking mode to positional.
Add a ground plane stage and a plane finder from the same Vuforia menu that you got the camera from.
On the plane finder change the dropdown menu to interactive, uncheck duplicate stage, and drag the ground plane stage object into the empty anchor stage slot on the plane finder.
Now we need to add our joystick so on the top menu go to assets, import package, cross platform input.
In the newly added standard assets folder, go to prefabs, and drag the mobile single stick control prefab into the scene.
Delete the jump button. Right click in the hierarchy and add a UI, event system.
Lastly on the joystick root game object click to add a component, and add a canvas scaler. Change its dropdown to scale with screen size. On the Joystick script change the movement range to 25.
Step 3: Create a Toggle.
Now the default behavior of the content positioning behavior is whenever we click on the screen the ground plane stage gets repositioned. This includes when we click on UI objects like buttons or joysticks so that is not what we want. Since Vuforia currently doesn’t allow editing the the content positioning behavior to correct this issue we could either write our own from scratch, or for the sake of this tutorial we are just going to create a toggle that turns this functionality on or off.
Right click on the joystick and create a UI, toggle. Expand everything and change the colors or the text if you want.
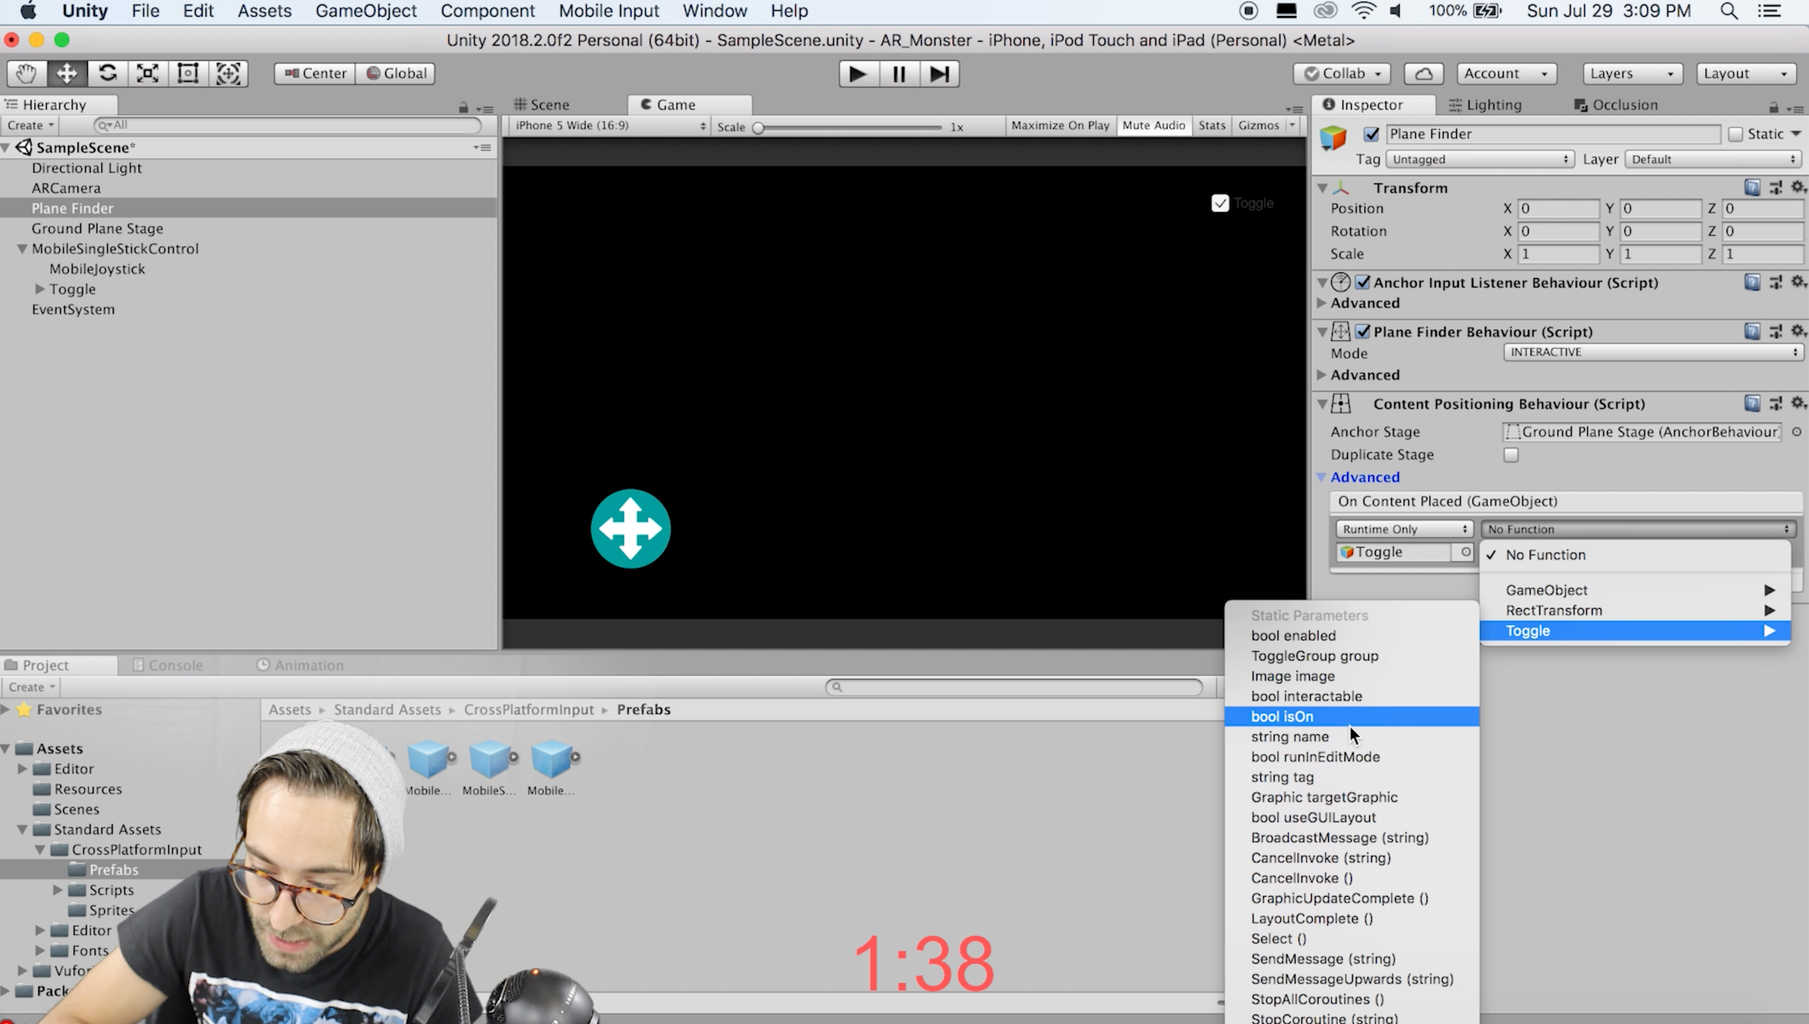
On the on value changed section of the toggle add the plane finder and make it set the game object active based on the value of the toggle. Now once the object is placed in the world we should probably turn the toggle off so go to the content positioning behavior and drag in the toggle to the on content placed even and set the toggle to off.
Step 4: MONSTER!

Go to window, general, and add an asset store window.
Search for “character monster” and sort by free, grab the first result and import that one.
Drag the monster prefab under the ground plane stage making it a child. Set its position and rotation to zero. Set its x y and z scale to .1.
Go to the animator and delete everything but entry. Drag in the walk and idle animations from the animations folder of the monster.
In parameters section click the plus button and add two triggers “walk” and “idle”.
Click each animation and add a transition to the other one.
Click each transition and add a condition, put in walk for the first one and idle for the second one. Uncheck has exit time and drag all the sliders to 0 on each one.
Now we want each animation to loop so click on each animation and navigate to its clip. Click edit on each one and check loop time.
Step 5: Controlling Our Character.

Right click in the assets folder and create a C# script called "CharacterController" and add this:
using System.Collections;
using System.Collections.Generic;
using UnityEngine;
using UnityStandardAssets.CrossPlatformInput;

public class CharacterController : MonoBehaviour {

	private const float speed = .1f;

	private Animator anim;

	// Use this for initialization
	void Start () {
		anim = GetComponent<Animator> ();
	}

	// Update is called once per frame
	void Update () {

		//move character from joystick input
		float x = CrossPlatformInputManager.GetAxis ("Horizontal");
		float y = CrossPlatformInputManager.GetAxis ("Vertical");

		if (!x.Equals(0) && !y.Equals (0)) {
			transform.eulerAngles = new Vector3 (transform.eulerAngles.x, Mathf.Atan2 (x, y) * Mathf.Rad2Deg, transform.eulerAngles.z);
		}

		if (!x.Equals (0) || !y.Equals (0)) {
			transform.position += transform.forward * Time.deltaTime * speed;
			anim.SetTrigger ("walk");
		} else {
			anim.SetTrigger ("idle");
		}
	}

	public void PlaceCharacter () {
		transform.localPosition = Vector3.zero;
	}
}
Step 6: Let Me Explain.

First of all we have a constant float defined at the top, so if you want your monster to move faster or slower just change that value.
This script is going to get added to our monster so we can do something like "GetComponent<Animator>()" in order to get a reference to this monsters Animator (that way we can play the animations from code).
We with then get the x and y movement of the joystick from the cross platform input manager and save them each in a variable.
Then we use those two variables to turn and move the monster according to the joystick input.
If the monster is moving we will play the walk animation and if it is not moving we play the idle animation.
The last function we have is so that we set the monsters local position back to zero every time the ground plane gets repositioned. So with the way our app is set up now, Vuforia will reposition the ground plane stage every time we click the screen. Our monster can move around the stage so we must set its position back to zero, relative to the stage every time it is repositioned.
Step 7: Finishing Touches!
Finally we just need to add our CharacterController.cs to our monster. So go to the root transform of the monster prefab in the hierarchy and click on it. This will pull it up on the inspector to the right. Click add component and search for the character controller script. Add that.
We also need to make sure our PlaceCharacter function actually gets called, so go to the plane finder game object and click on it.
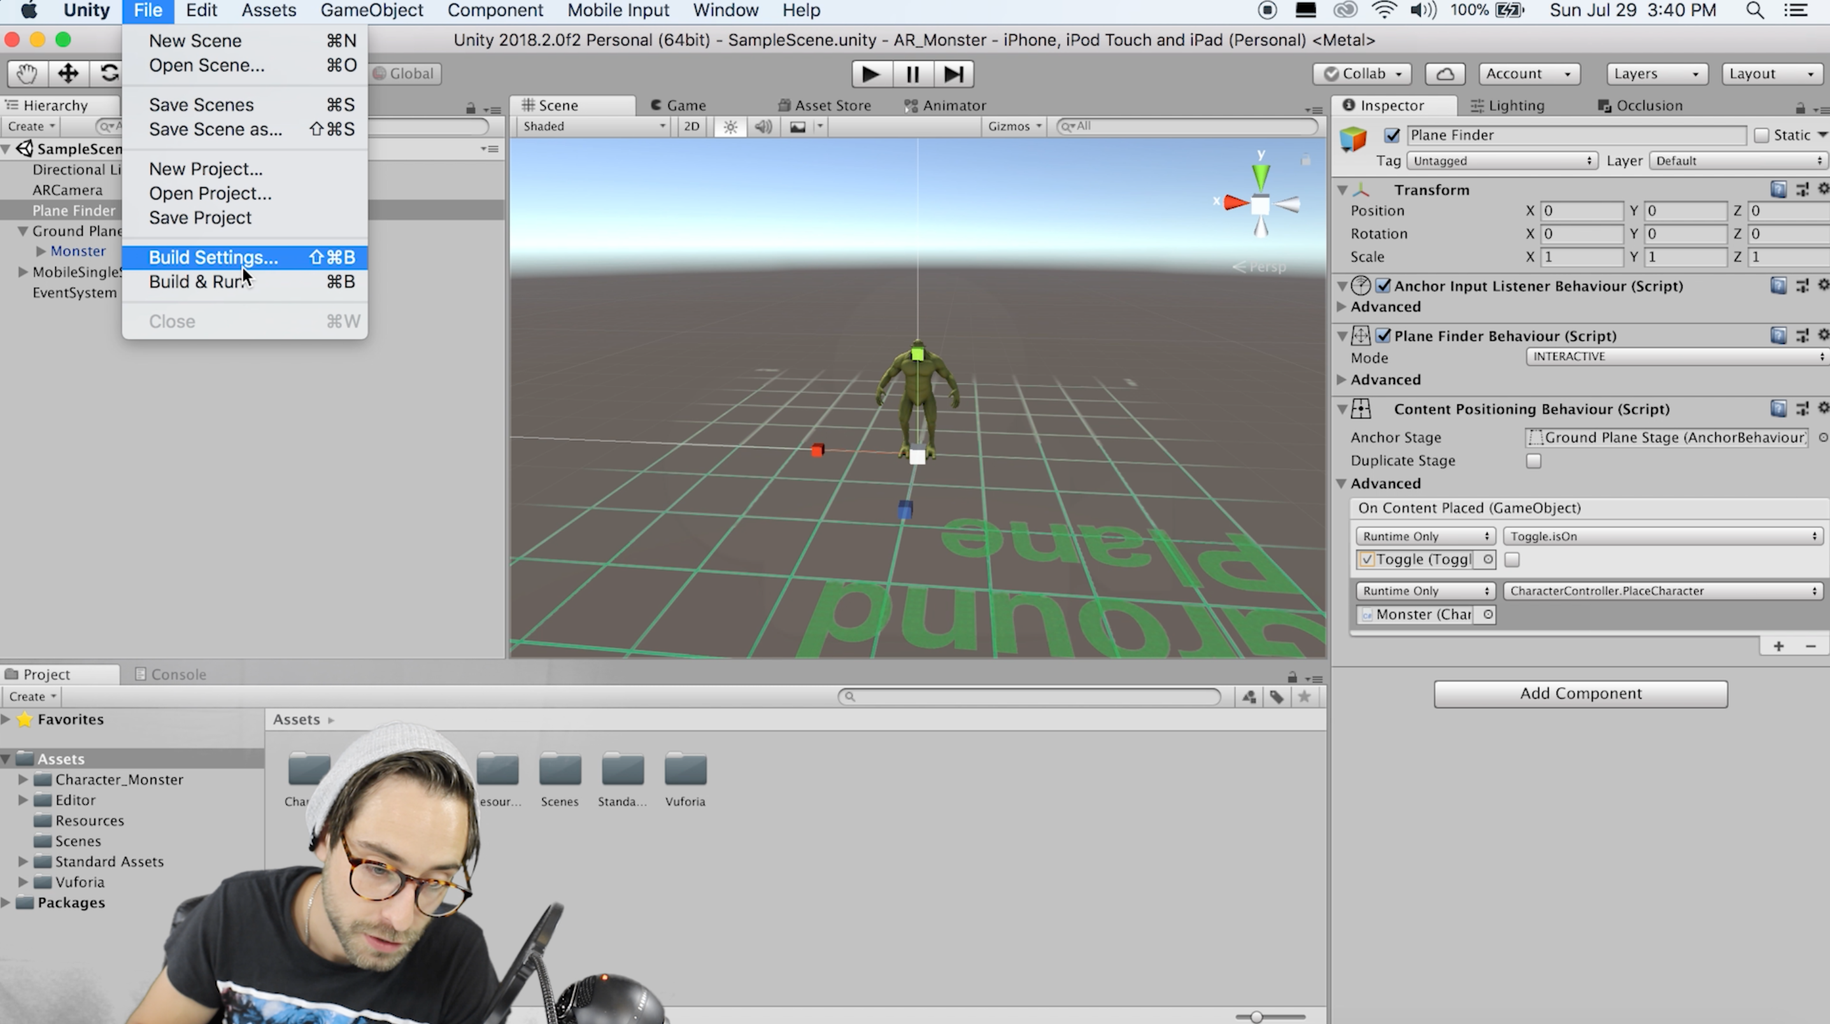
In the inspector there should be an advanced section that you can click to expand. There is a Unity event there called "OnContentPlaced." Add a function to that by clicking the plus button. Drag the monster into the empty slot there, choose the character controller script, and finally choose the "PlaceCharacter" function.
Step 8: Let's Get It on Your Phone.

If you are on Android or IOS click file, build settings, and go to player settings for your respective platform. In both cases make sure to put in something for the bundle identifier (in the form "com.YourName.YourAppName"). Also make sure you have some message in the camera usage description field.
If your on Android uncheck Android TV compatibility and changed your minimum build target to Nougat.
Either hit build and run, or hit build and install the .apk with ADB or Android Studio.
If your on IOS hit build and then open up the resulting folder in XCode. Sign up for a free Apple developer account (if our don't already have one) choose your team and hit the play button to get it on your phone!
Let me know in the comments if you guys have any questions!

Participated in the
Game Life Contest


