

Introduction: Backlit Analog Wall Clock


I walked into my classroom a few days before the start of our school year and I found the wall clock on the floor shattered into about fifteen pieces.
At the time of this Instructable we are about three quarters of the way through the year. I still don't have a new clock. And yet! Pretty much every day. Multiple times a day! I look up to that spot to see the time.
Did I order a new clock through the school? No.
Do I need a new clock? Ehhh...... at the very least it would stop me from looking like a fool in front of my students every day.
I could order a new clock and it might come in by the end of the year. OR...... I could make my own clock and see if this type of build could be a good project to utilize with my students.
I chose the latter. This Instructable covers that build and what I would do if I were to use this as a class project.
Supplies
Materials
-3/4" Plywood
-1/4" Plywood
-1/8" Acrylic
-Wood Glue
-Super Glue
-Magnets
-Clock Kit
-LED Strips
-Wire
-Battery Kit
-Wall Hanger
-Solder
-Sand Paper
Tools/Equipment
-Laptop with CAD/CAM software
-Laser Cutter
-CNC Router
-Power Drill
-Soldering Iron
-Sander
-Bandsaw or Jigsaw
Step 1: Project Video
If you like to watch instead of read the video covers the entire build process of this clock in under 10 minutes.
Step 2: Overview
To begin I started thinking through what I would allow my students to do for a project like this. Designing and making a clock out of the scrap material from around our shops for myself is a completely different animal than having a class of ten or twenty students building one all at the same time.
If I'm going to use this with my students the project needs to be economical and repeatable. Set-ups need to be quick and simple and the materials need to be easy to acquire and uniform. Before I even began thinking of a design I set myself some parameters.
Project Parameters
Made out of plywood or construction lumber
Use CAD and CAM software
Skill set of mid year freshman or sophomore
Take less than 5 days of work (thinking about a day of work in the form of 90 minute class periods)
With all of that set I did what I'd have my students do, use the internet to find cool ideas for inspiration. I found plenty of designs that I know my students could do pretty easily, things like flat boards cut into a circle with numbers engraved in some fashion on them and a clock kit attached on the backside.
Knowing what that simple clock face type of project would look like in my class (its basically a version of a CNC sign project I run from time to time) I decided to go a little bit more complex with my design and see how that might work for a class project.
I found several examples of backlit signs that I liked. I decided to go that route and instead of just a sign turn it into a clock.
Step 3: Design
If I were to do this as a project in one of my classes the next step I'd have my students complete would be to create a few concept sketches. Mostly, so they don't just get stuck on using the very first, half thought through, idea that pops into their heads. Some students can run with their first idea and it turns out great, most students try their first idea and realize they should have been more open to listening to their teacher's suggestions before diving head first into a flawed design.
I skipped sketching ideas to save some time and jumped straight into designing on my laptop. I teach CAD with Fusion 360 for all of my classes. Before starting my 3D model on the computer I measured the wall clock from my other room as reference. I didn't want to make my clock much, if any, bigger than the one I had before. The clock measured 12" in diameter and 1-5/8" thick.
Using those dimensions as a guide I came up with this for the back portion of the clock which will house all of the electronics and clock components.

The battery packs I plan to use are left over from another project. I didn't measure the battery pack until after I had most of the back design done. Once I did I realized I would need more than the 1/2" deep pocket I could create with the 3/4" plywood I planned on using. I created another ring to add a little more depth to the back part and provide room for the clock mechanism and the battery pack.
After about four different iterations of designs for the clock face I landed on the idea of having our school mascot at the center and having numbers or tick marks around the outside to indicate the time.
Clock Face with Numbers

Clock Face with Tick Marks

Fusion Tips for Laser Cutting
Export Sketch to DXF Format
At this point I'm going to mock up these designs with cardboard using our laser cutter. To run these clock faces on the laser I needed to export them to DXF format. To do that in Fusion 360 you need to:
1) Find the sketch you want to use in your browser
2) Right click on needed sketch
3) Select "Save as DXF"

Renaming Items in the Browser
If you teach with Fusion, or really any CAD software, I would definitely recommend teaching and making it common practice to have your students rename their sketches, features, and components as they create them. This way when they need to go back and find something or rework a portion of their model (which they always do) they (and you) don't have to search through 100 different sketches to find the one they need.
In Fusion 360 its really easy to rename an item in your browser.
1) Left click on the item to select it
2) Pause for a second
3) Left click the item again.
4) Type the name you want your item to have
5) Press "Enter" on your keyboard

Multiple Sketches for One Part to One DXF
Sometimes, you may have a part of your design that you want to export as a DXF but you created it by using multiple sketches. In that case the quick, simple fix is to:
1) Activate the component your sketch is in from the browser
(Sometimes you may need to have the entire design activated depending on the order you produced your parts)
2) Create a new sketch on the face/design you want to export
3) Use the "Project" tool to project all the edges, lines, and features of the face of that object you need.
(You can activate the "Project" tool by hitting the "p" key on your keyboard.)
4) Finish your sketch
5) Rename your sketch (I usually rename it to something like "laser sketch")
6) Export that sketch as a DXF file

TO THE LASER!
Step 4: Mock Up
I always like to make an extremely cheap version of my designs before I move onto the more expensive material. In this case I used some corrugated cardboard to mock up the back of the clock and the two clock faces.
For the parts of my design that are thicker than a single piece of cardboard I just break up the model into several slices and glue it all together.
Mock Up of Back Part


This part should work as designed and easily holds all the internal components for the clock.
Besides a little charring from the laser, both the clock faces turned out pretty well! I didn't like the font for the numbers from Fusion so I changed that up in our laser cutter software before cutting it out.
Number Version

Tick Mark Version

I thought the clock faces turned out looking pretty cool, but I did find one mistake I made. The tops of the numbers/marks on the faces overlap the ring from the back part.

Because I'm making the pirate head and the numbers/marks backlit by LEDs that overlap would really throw off the look I'm going for with this clock.
I decided to move forward with the tick mark version. I went back into Fusion 360 updated the model to not overlap on the back ring and moved onto getting set up to run on our CNC router.
Teacher Talk:
This is definitely a step I would want my students to do, BUT.. we always get so bogged down in the laser cutter process. The time it takes with my current setup to have the students export all of their sketches to DXF, set up those files in our laser cutter software and then run the parts takes way to long. We may only get through one, maybe two students per 90 minute block. So, I may just do a more extensive CAD check with each student and skip over the mock up step if I use this in one of my classes.
If anyone has any tips on going from Fusion 360 to laser cutter to help me make this process more efficient I would gladly accept all recommendations!
Step 5: CNC
As much as I would like to have a one stop shop software for design and CNC programming, I've yet to figure out how to get Fusion 360 to work with our CNC router. I'm sure there is a usable working NC file extension I can use but I've tried several up to this point, including the language/extension provided by the maker of our CNC routers and I've never been able to get the process to work.
If anyone has any tips or suggestions to help me figure out Fusion 360 to our CNC router please send them my way in the comments or in a message.
Because of that we do all of our CNC programming of toolpaths in a software called Aspire. Overall, it's not the worst thing in the world to teach my students how to work between two different software programs to complete a project and I can use the same DXF files I exported earlier to set up my toolpaths in Aspire.
The CNC programming aspect of these parts is pretty straight forward. The only operation I had to do some real work on was the clock face. I decided to add a lip and holes for magnets to the back side of the clock face. To complete the work on the face there was going to need to be toolpaths that ran on the font and the back of the material which can cause issues if features from one side to the other are not aligned.
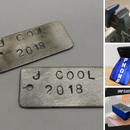
I decided to create a couple of locator holes that I could use dowel rod pins to make sure my part stayed properly positioned during both front and back processes. It had been awhile since I had tried something like this but overall it worked pretty well.
Back Side of Clock Face

Front Side of Clock Face

Running all the parts took about 30 minutes in total, most of that was the setup and changing of tools. The longest toolpath was the pocket for the back part of the clock which will house all the electronic components, which took about twelve minutes with a 1/2 inch end mill.

Once all the parts were cut out from the sheet of plywood and the tabs and frays were sanded clean they came out looking like this:

The biggest issue I ran into was the warping of the plywood which caused the depth of my toolpaths to be inconsistent. This is an issue we run into pretty frequently in our shop because we have to buy our material in bulk for a chunk of the school year instead of just purchasing right when we need it. Some cuts were too shallow, others too deep, and a few came out in the "Goldilocks Zone."

I don't think this isn't a big issue for me. When this is assembled and up on the wall you won't really notice those inconsistencies much, if at all.
I glued up the back and the middle ring to get the depth I need,

put some weight on the clock face on the off chance that may help flatten it out a little before I assemble it,

and I went and ran all of the acrylic parts that will be installed on the clock face.

Time to move onto lighting this clock up!
Step 6: LED Circuit
This is absolutely my weakest area of personal skill and in teaching. Soldering and working with electronics in this way has always been a struggle. Even simple things like this take me twice as long as they should. All I wanted to rig up was some small sections of LED strips to provide the light to illuminate the acrylic.
My first thought was to test fit all the components together with aligator clips to make sure I have the setup correct before soldering. I tried this idea for about 10 minutes and it turned out to be more of a mess than being useful.

I abandoned the alligator clips and laid out the parts as I best as I could in the back housing.

From there I worked through soldering the LED strips together piece by piece, checking to make sure the LEDs worked after almost every step. The struggle was real during this phase of the project.
Figuring out a repeatable method for soldering the small connectors of the LED strips to the wire was the challenge. I ended up having the LED strip laid out on a scrap piece of MDF as I pressed the wire down on it with the tip of the soldering iron.

The connections are definitely not the prettiest but they are functional.

Teacher Talk:
I would absolutely have my students set this up with alligator clips before they solder. I may not have them try to fit in the whole circuit with the clips into their clock/sign but I would have them lay it out on one of our work tables for testing. Of all the skills and tools we go over in class, electronics is the area that the fewest of my students have any experience with. Having them physically see how their components need to be connected has really helped them understand how the electricity is flowing in their circuit.
Any other teachers out their that have cool project or maybe a good resource they would be willing to share to help me improve my own soldering skills and that I might be able to use in class I would greatly appreciate the advice.
Moving on to final assembly
Step 7: Assemble
Before I went any further with putting this clock together I wanted to see how the acrylic looked with the backlit effect. I orginally was just going to make all the plastic inserts blue, but I cut out a couple of other colors to try and accent the quarter time marks. Without any further work done I think it looks pretty cool in the dark.

The biggest things I noticed when the acrylic was placed in the clock face was you could really see where the battery pack was at under the face of the clock and that the adhesive paper that was on the back of the plastic gave off a inconsistent effect on the lighting. I'm not going back to rework the LEDs to hide the battery pack, so I'm going to live with the bottom half of the pirate not being as bright. I did take the paper off the back of all the pieces and I thought it looked much better.

All that is left is the stick all these parts together. I originally thought about finishing the clock with a coat of white paint or a clear coat but decided against it. I thought the look of the bare plywood would draw more attention and allow the students to see what their clock might look like if they made one.
To install the clock kit I needed to drill the hole in the center of the clock face. Which was simple enough.
I used super glue to attach the magnets to the back ring and back of the clock face. I also used super glue to attach the plastic to the wood. This isn't the best option as I generally get some discoloration from the superglue on the acrylic plastic. If anyone has a better method for gluing plastic to wood without losing quality I'd accept the help on that too.
Put it all together and BAM!

Step 8: Is This a Shop Class Project? (For the Teachers Out There)
With the design I chose and methods I used to complete this build, I definitely wouldn't use this project for one of my freshman/sophomore level classes. I think it would just take too long. The average student I have, at the course level I wanted to use this project, just wouldn't have the needed skills to complete this without a decent amount of help from myself and a lot more time than I have to work with in my curriculum.
This project probably took me around five or six hours of actual work to complete. Using my standard rule that students would need at least twice as long to finish an activity than it took me. Instead of the five 90 minutes class periods I thought this might take, I bet my students would need at least ten to complete this project. That equals a month of school or about half of a quarter for us. Waaaayyy tooo long!
However, I can see using this in an upper level class, like my senior engineering course or if I ever get a third level manufacturing class. This would be a fun project I could use for those students to reintroduce them to all the stuff they have already learned throughout their time in my classes. I'd stick it in at the beginning of the year and cover safety, CAD, CAM, machine set up, and project planning.
For my underclassmen/introduction courses I think I can see using a simplified version of this project. Probably in the form of a single layer clock. I could quickly teach my students how to use the CNC router and let them cut out their own circle or design. They could use the laser cutter to engrave or cut out letters and numbers on their clock face. Then, just like this project, we could slap a clock mechanism on the back and voila, a pretty cool project I could actually run in a class of about 20 students.
A couple of things didn't work out as I hoped. The biggest issue was the warping of the plywood. I was hoping the magnets that I included would help with that, but the ones I had around were too small. If I used more magnets or bigger one in the design I think it would have worked better. Another sticking point for me was the clock kit. The one I used works fine but it is pretty generic, cheap, and flimsy. If I had more time I would have liked to 3D print some clock hands with a pirate theme to them.
Step 9: Glamor Shots
With the lights off this clock, in my humble opinion, looks awesome!
Ohhhhhh....

Ahhhhhhh.......

Pretty............

If I had more time for this build I would absolutely create this out of some nice hardwood, maybe a cool looking cherry. Other items I would address would be adding in an exterior switch that would allow me to turn the LEDs on and off without having to take the face of the clock off. And lastly, either purchase or figure out a way to illuminate the hands of the clock so you could still read the clock in the dark.
Overall though, I like the way this clock turned out and I no longer have to look like a moron to my students by pointing at a clock that isn't there.
Step 10: The End Bit
Thank you so much for checking out my project. I truly appreciate people taking time to view my project! Please feel free to take this project and turn it into something better than what I have here. If you do let me know in the comments below or shoot me an email.
Subscribe to my fledgling YouTube Channel Here for more shop class projects.
If you teach shop class of some kind, I've started a little website to document/compile shop teacher content/curriculum. I'm really just getting started with it but I hope to be posting much more to it soon. If you want a more official lesson or project plan/class overview of this project it will eventually be on my website. Find it at Shop Class Builds.
Find me on Instagram @shopclassbuilds
Again thank you for taking time out of your day to scan through my project!

Runner Up in the
Clocks Contest


