

Introduction: Basic Installation Instructions for DIY Wood Fired Oven Kit.


Apologies in advance, i still have some details and photos to add to this instructable... will fix up soon,
Until then, enjoy : )
Here are some basic instructions for installing my DIY pizza oven kit.
I have designed this kit so that it is easy to customise, all the hard design and time consuming work has been done for you and you get to do all the fun stuff.
Try to be original with your finished design, you dont want it to look the same as your mates one do you?
You can do anything to finish your oven, adobe, bricks, tiles, natural stone, colored render... just keep in mind weather the finished material will be waterproof, will you need to design a small roof into your structure? or build one over the oven? or will you coat render or bricks in a waterproofing clear resin?
Unlike other kits out there in the market, this kit uses all top quality materials, dont fall for kits using cheap knock off fire bricks... they will not hold the heat for long and you will be disappointed when you pull uncooked loaves of bread out of them.
Once you have finished your oven installation please e-mail me some pictures to add to this for inspiration for others : )
Please read my write up on the last step "Thermal properties of common masonry materials" for good information about thermal properties of materials you may be using to finish your oven.
This also includes why i dont recommend people to build "earth ovens" and why i recommend that you should use more modern materials for construction of a WFO.
A bit about these kits:
Base: 1200mmx1200mm x200mm weight around150kg excluding fire bricks.
Base is constructed from vermiculite concrete with reinforcing steel, fire bricks are recessed into the base and seated on a bed of sand.
Vermiculite concrete has high insulation values along with being light weight, this will keep your fire bricks nice and hot for many hours after the fire has gone out and also be a lot easier to move into place.
When you receive your base just lift out all the fire bricks (apart from the front 5) move it into place and re-seat all the bricks into place using a trowel to make a nice flat surface with the sand... if your not happy with the flatness of the surface pull them up and do it again... you will not get another chance once the dome is on top.
If there are small lips etc do not worry too much, with use of the oven they will flatten out over time from ware from sliding the peel in and out of the oven.
Reinforcing bars protrude out of the sides of the base to use for handles to lift it, 2 strong people can move it but best to use 4 people to minimise any chance of damage to yourself or the base.
These bars can either be cut off with with a angle grinder or hacksaw or just left in place if building a larger structure.
Vermiculite concrete is quite a fragile material so be careful with it.
Although it is fragile it has high compression strength, a few tons sitting on top of the edges will not be a problem as long as it is supported from underneath.
If the base is twisted and cracked or chipped it heals easily with mortar.
For a simple structure for the vermiculite base to sit on i suggest using cinder blocks, they are cheap easy and fast to install... i recommend making a minimum 70-100mm concrete slab for the base to sit on if using this method, the vermiculite base is not designed to be structural.
Picture attached of an example of what you may choose.
Dome:
Internal cooking surface 800mm, internal dome height 400mm, door opening 480mm W x 280mm H,
Dome is precast in 4 pieces, this allows for easy installation as one person can lift a section without to much trouble.
It is constructed from refractory cement, basically giant cast fire bricks.
The sections are just lent in place allowing for a dry joint, this allows for expansion points when the dome is heating and cooling, the exterior of the joins are mortared up with refractory mortar to lock the pieces in place making it so they cannot slip out of place during heating and cooling.
The dome sits back far enough for you to construct a front arch on the oven from either bricks or stone... its up to your preference of how you want the oven to look.
Remember to make the arch slightly larger than the oven entrance so there is a recess for the door you make to rest against.
Please view the firing step, it is extremely important not to heat the oven up too fast the first time, the dome pieces may crack and /or spit out chunks.
Insulation:
A Crematic blanket (3.5mtr x mtr) is provided with the kit, this is more than enough for a good layer, please view the installation step but feel free to do it differently if you feel the need, more can be provided on request if another layer is required.
Just keep in mind to try to overlap any cuts you make.
Render:
Cover with chicken wire, i prefer to use the stuff with larger holes as it is much easier to work with, i can swap to smaller hole stuff if requested.
Chicken wire is put on in a similar method to the crematic blanket (veiw step)
Enough render is provided for a 4-1 mix, 4x sand 1x cement, this will give you a nice strong render (stucco) for a first layer...this first layer will be your (scratch coat) i suggest scratching it or doing it roughly so the following layer can lock into it.
Now you will be ready to customise your oven, have a play on google images and have a look at other design finishes...
Coming soon:
Building a door for your oven. (Done, please view my other instructables)
Natural stone WFO/smoker/BBQ project. (natural stone is slow to build with... could be some time)
Step 1: Base Installation


When you get your kit, after removing all the sand/cement and dome pieces you will be left with the base.
First remove all the fire bricks from it and much of the sand they were sitting on, this will make it a lot lighter to carry and put in place.
Be careful with the fire bricks, they are fragile and chip easily.
The front bricks are permanently in place, do not try to remove these.
Once you have your base seated in its new home fill the sand up to the bottom level of the front bricks, make the layer even the whole way around, you can use a tape measure to get the correct height at the far end.
Using a flat trowel i have found to be the best tool for this job, take your time and use an even pressure over the surface.
Next start placing all the bricks in, this takes me 2 or 3 try's to get it good... if its not quite right pull them up and start again.
Once they are in there is no going back, its important to get them as good as you can.
Try to resist the urge to bang them down in place, you want them to all be placed consistently.
Any slight edges are not a worry, your pizza peel will ware them off in time.
Gaps between the fire bricks will also be filled with ash from your fire, the surface will be pretty mint after a few party's.
Once they are all in nice and even, sprinkle more sand around the gaps on the edges, this will lock them all in.
Now you are ready to start putting up the dome.
Step 2: Erecting the Dome.


Now its time to erect the dome.
Start with the rear corners, put one in place... it should just stand by its self but wedge a piece of wood or something on the inside so it cant fall over.
Then lean the 2nd piece against it.
You can use the lines of the fire bricks to get the center and get it even on the fire brick surface as seen in pictures.
Remove the piece of wood, they will stand up fine by them selves.
Its probably after 12pm by now, it would be a good idea to crack a beer at this stage.
Then move onto your front pieces, put the first one in place and hold it up with that stick and then put the 2nd one up.
Now remove the stick.
If they are not lining up that well you may need to pack a couple of pieces up as bricks are often not a perfect flat surface.
Just use a trowel or something and lift the bits that you need to and slip in bit of stone to hold them in place.
you can see the packers i have used if you look closely in my pics.
Remember, you are focusing on getting the internals lined up, not the externals.
Once you are happy with how they are sitting its time to move onto the next step.
Step 3: Pointing the Dome.


If you are using a 100mm flue, it is best to put it in place at this stage.
If you have a strait piece of flue i suggest screwing or riveting (stainless steel) a couple of cut metal edges to it to stop it slipping downwards.
If you are building a brick flue or some other marvelous creation you can do it later.
Now you want to use the high temp mortar that came with your kit, 2ltrs is provided but 1ltr should be enough for this step.
You can use the rest on other parts of your oven if you need it... its handy to have for the rest of your project.
The aim of the game here is to get all the pieces locked in place.
This stuff sets quite fast, i suggest grabbing a measuring cup and doing it in 2 batches of 500ml at a time.
Slowly add water and mix in in a plastic container or whatever you have handy.
500ml of dry will only need around 130-150ml of water, it might look to dry at first but keep mixing and it will soon become mortar.
Get it to a consistency that will just stay on your trowel, if it is too runny add a little more dry to it.
Start at the bottom and push it into the gaps with your trowel, the edges of the domes are curved, you want to make them a flat surface.
I find working upwards is better than downwards, but do what you feel comfortable with, just get them filled.
Do the inside bottom and top edges of the entrance too.
You could do the inside of the dome if you are small enough to fit in but it will most likely just flake off after a few years anyway so i would not bother.
If you have a flue in, get it all in around it and seal it up.
Once you have finished, you should notice some of the first stuff you put on start cracking... if you have any mortar left in your punnet keep working it into these spots... but dont worry about it, these lines are intended to crack during the expansion and contraction that happens during heating and cooling.
Probably time to crack another beer now if you haven't already : )
Step 4: Crematic Blanket Insulation.


First off, safety.
This stuff is not good on the lungs or on the skin... is a lot like old pink bats.
I suggest gloves, full sleeve top, pants and a dust mask.
Basically follow pics for how i have installed.
3.5mtrs is provided.
Wrap it around long ways... that's 2.5mtrs length, cut it vertically when in place until you reach the curve of the dome, do this at each dome join and fold them over.
Cut a hole in the left over piece for the flue and throw it over the top.
Feel free to do this differently if you like, just maker sure you try to overlap any cuts you make... this will keep the high temp heat in and not allow your render coat to become a heat sink.
Step 5: Chicken Wire Reinforcing Mesh.


This is put on in much the same way as the blanket.
Your kit would have been lashed down with small wire, use this to pull the chicken wire tight in front of the main entrance.
The wire i use is the larger hole mesh, i can provide smaller hole mesh on request... i find the larger hole stuff much better to work with and makes curves better so this is what i provide.
Pull it all nice and tight so that it holds the blanket nice and snug.
If you have a different way of applying this wire layer go for it, this is what works best for me.
Step 6: Render (stucco)


This is where you can start doing your own thing, do some research on the net on render mixes or feel free to ask me some questions about mixes.
A lot of different people have different preferences of what to do at this stage.
I have provided with the kit enough 3mm sharp sand and cement to do a 4-1 (sand-cement) mix for your first layer.
I can also provide silica sand (from golden bay) and white cement if requested... this is ideal for a final layer if you want to add a coloured oxide
Here's what i have done.
As i made a ton of prototypes creating this dome, to make a oven with a great functional shape i had quite of lot of refractory domes for scraps.
I crushed up a couple and used them for my first layer of render.
This mix is 4.5 parts crushed refractory to 1 part cement.
When you apply the first coat push it in real good so it can wrap around the reinforcing mesh, once you have an even layer, if it is not quite rough like mine in the pictures give it a scratch so that the next layer has something to lock into.
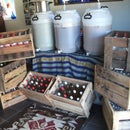
Step 7: Optional Secondary Insullation.


Here is a secondary way of insulating, this will help the oven hold heat for a long time.
I plan to do a lot of baking once the initial fire has been put out and ashes removed.
Use bottles just like bricks and build it up like in pictures, the air gaps in the bottles hold the heat.
I just used a standard mortar mix 5-1 for this.
Once the bottles were built up i just gave it a final render coat.
This oven will be square and voids filled with a mix of vermiculite and old concrete rubble from around the property.
Step 8: Front Arch Form.


Provided in your kit is a sheet of 3mm mdf to build an arch for the front like in pic.
You may choose to make it a different shape depending on how you want your finished oven to look.
Here is an example of the one i have built for my oven.
Pretty self explanatory how to build it, just ask if you need some help.
Just remember to leave a recess for your door that you build to lean against, so build this arch form slightly bigger than the entrance opening.
The arch form i have built here also has a slight taper, the front of the form is about 4mm larger than the rear, this will make it easier to slip the door in.
You can use a lot different materials to make your arch, from wine bottles, bricks, stone to adobe and tile creations.... its up to you, let your imagination run wild : )
The completed oven instructable coming soon.
Step 9: Firing for the First Time.


Firing your oven for the first time is an extremely important step to follow closely.
Refractory cement unlike most other cements cure fully with firing.
If you have it on hand, a LPG gas burner ring is good to use for this as you can control the flame size, as most people will not have one i recommended making the smallest of fires and keeping it going all day.
It is best to use small bits of rotten wood, this will burn but will not create high temps.
You can control the fire if it starts to get too big by blocking the door and the flue starving the fire of oxygen, this will most likely be a smokey process but is worth it.
What can happen if your fire is to big at first firing is, the moisture still inside the dome pieces will turn to steam and start spitting pieces of refractory... also can make large cracks.
Here is the manufacturers guide, it is based on 250mm thick for a kiln, as this is nowhere near that thick you can 1/2 the times in this guide so try to keep it at 100-120 deg c for a day, then next day slowly bring the temps up fully watching for any sign of steaming.
Step 10: Thermal Properties of Common Masonry Materials.

Here is some information i have taken from "Masonry heaters" "designing, building, and with a piece of the sun" by Ken Matesz.
The graph explains the thermal properties of most of the materials you will use in in a wood fired oven.
It does not contain adobe, although later in the book in this section there is a write up about adobe... a material a lot of people use for "Earth ovens".
This is why i recommend to only use adobe as an external finish, not for the firing chamber of a wood fired oven.
I have replaced the word "masonry heater" with "WFO" in the write up.
___________________________________________________________________________________________________________
Pressed Earth or Adobe
Standard bricks are primarily clay along with adobe bricks.
A major difference is that common bricks or firebricks are fired at very high temperatures, while adobe or pressed-earth blocks generally are not subject to to more than natural sunlight.
Theoretically speaking, you could construct a WFO entirely from handmade bricks of this nature. Even firebrick, the usual choice for the inner life of a WFO, is fired-clay brick.
The idea of using entirely local, on-site earth and simple human energy to make the bricks and build a WFO could excite many avid environmentally minded builders with enough time to devote to the project.
However it is vital to understand that there are, indeed, reasons why refractory firebricks and common bricks are the norm, and pressed-earth and adobe bricks are not.
At least one of those reasons is that firebricks are specifically and carefully designed to withstand the abuses of daily hot fires without deterioration for many, many years .
The same cannot be said for hand-pressed or sun-dried earth bricks, which will deteriorate relatively rapidly under the various forces at work in a WFO.
There is mechanical abuse (from loading wood), thermal shock (periods of significant cooling followed by rapid heating), and the abrasion and deteriorating effects of the exhausts of wood fires.
While it is grand to have visions of minimum environmental impact by using inexpensive, self-made bricks and mortar, you need to consider the immense time loss of building this way only to have to rebuild the structure in the not-so-distant future.
It is therefore more reasonable to consider using handmade bricks only for the external veneer.
Even here, though, you must be aware that adobe bricks are likely to have even lower thermal performance characteristics than common bricks, which are already low on the scale.
The fact that many pressed or hand-formed bricks contain plant fibers and such means that they have lower conductivity, lower mass, and correspondingly lower heat storage capacity, diffusivity, and so forth.
Although little actual data exists for adobe bricks' thermal performance, there close relationship to standard bricks means that they are not going to preform any better than the manufactured variety, and likely somewhat worse.


