

Introduction: Beginner Arduino - Using a 1.8 Inch TFT Display


This is your introductory guide to using an 1.8 in TFT display with an Arduino. I like the 1.8 in display for its small size and low cost. I got mine for about $10 on ebay, here. It doesn't come with instructions but with some research and tinkering I was able to get it running.
You'll need the following:
Arduino Duo R3 ($10-25)
1.8in TFT Display ($10-20)
jumper cables
Computer w/ Arduino IDE
1k ohm resistors (5)
For about $20, Adafruit offers a 1.8 in display and has a great tutorial for their product on their website. This is not a tutorial for their product, that would be redundant.
First we'll look at the pins for the display board and what they do, then the wiring schematic, and last you'll load the code to test the display.
Step 1: Pin Layout


The first photo here shows the back of the display board. There are two sides of pins - the side circled in red is the side we will be working with. It has 8 pins and you can see what each pin corresponds to in the second photo. The opposite side with 16 pins is for using the SD card, which will be addressed in a later Instructable.
A brief summary of the pins (adapted from Adafruits thorough summary):
RST - this is the TFT reset pin. Connect to ground to reset the TFT! Its best to have this pin controlled by the library so the display is reset cleanly, but you can also connect it to the Arduino Reset pin, which works for most cases.
CS - this is the TFT SPI chip select pin
D/C - this is the TFT SPI data or command selector pin
DIN - this is the SPI Master Out Slave In pin (MOSI), it is used to send data from the microcontroller to the SD card and/or TFT
SCLK - this is the SPI clock input pin
Vcc - this is the power pin, connect to 5VDC - it has reverse polarity protection but try to wire it right!
BL - this is the input for the backlight control. Connect to 5VDC to turn on the backlight.
GND - this is the power and signal ground pin
Now that we know what we're dealing with it's time to start wiring!
Step 2: Making Connections

This is the step that I wish I had been able to find more easily when I started with this board. After I received the screen and realized I didn't know how to hook it up I turned to the Adafruit guide for their product.
At first, it looked like the pin lay out was different but otherwise the two displays were interchangeable and able to run the Adafruit Graphics library (more on the code in the next step). However, when I hooked up my board following the Adafruit guide, my display sort of worked. It did display text and drawings, but there was a lot of noise in the image and the images were streaky down the screen. It also had a bright glow along the top of the screen that interrupted the image quality. I thought it was because I was running the screen on 5V and it needed lower power. I tried 3.3V and the display got worse. After about 10 minutes of regretting my eBay purchase and wishing I had gone with the Adafruit board I decided to google my problem and found this helpful article about a similar problem: (1.8in SPI 128x160 TFT Module Arduino)
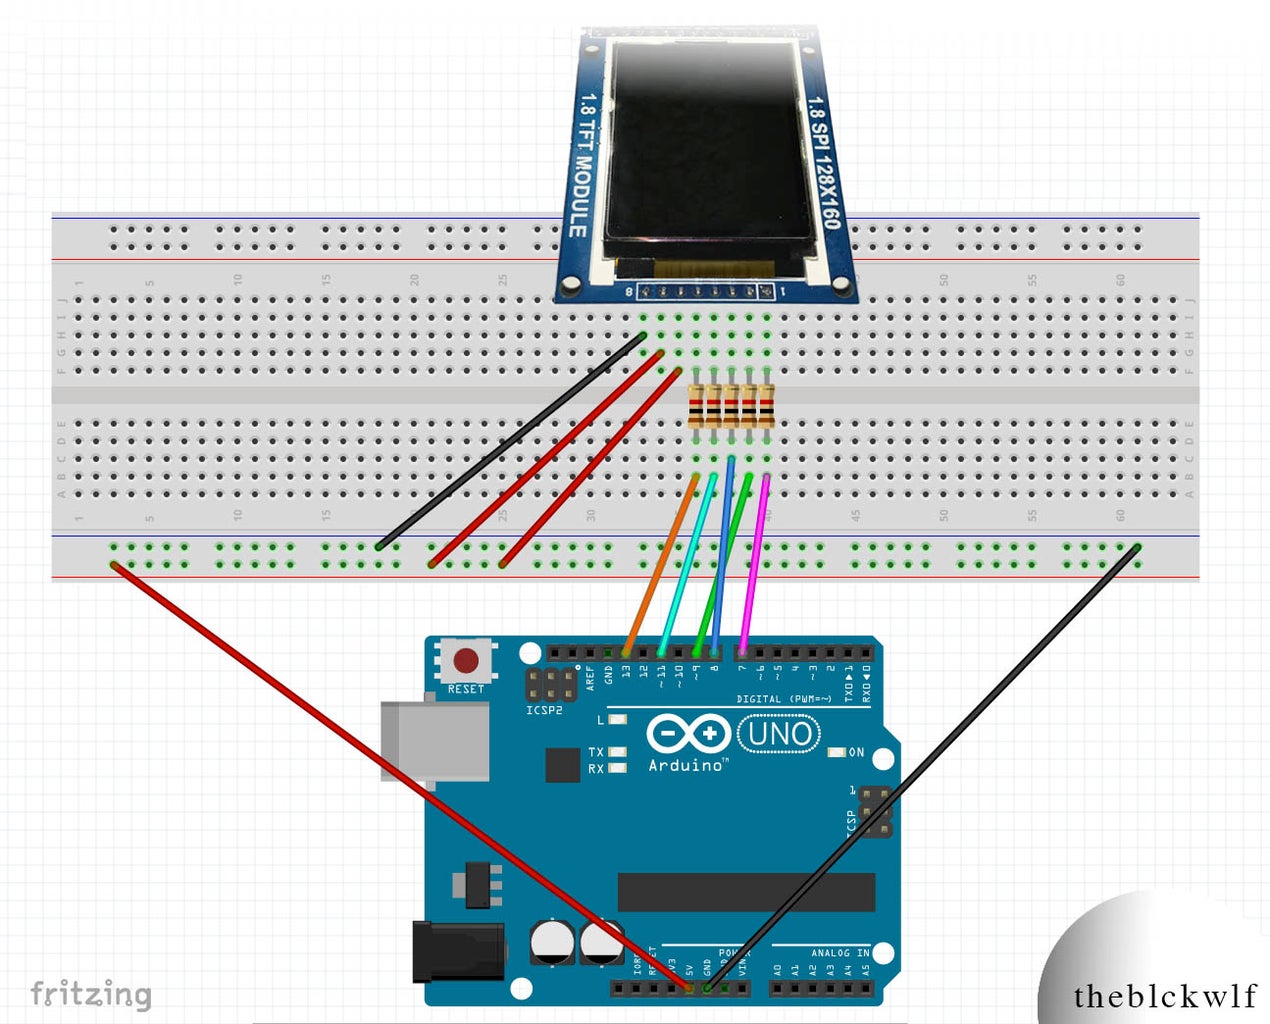
In short, you need 1k Ohm resistors between 5 of the connections. You can see where the resistors go in the Fritzing diagram. The second picture is a table of the connections between pins on the display and Arduino. I've listed them below and indicated if the connections requires a resistor.
RST - Arduino Pin 7 - 1k Resistor
CS - Arduino Pin 9 - 1k Resistor
DC - Arduino Pin 8 - 1k Resistor
DIN - Arduino Pin 11 - 1k Resistor
CLK - Arduino Pin 13 - 1k Resistor
Vcc - 5V
BL - 5V
GND - GND
Step 3: Upload Code and Run

You will need to install two libraries in order to operate the display:
Download each library and unzip the folders. Rename them to "Adafruit_ST7735" and "Adafruit_GFX" and place each folder inside your Arduino Libraries folder. I've attached a screenshot of the libraries in the correct folder. Once installed, you are ready to operate the screen! Inside the Adafruit ST7735 library is a file called graphicstest.ino which you can upload to your Arduino and it will run through a number of functions that draw objects to the screen. However, this file will need some altering to adapt the pins to your layout.
Alternatively, you can copy/paste the code below into the Arduino IDE and upload it. This is a modified version of Adafruit's graphictest.ino, the primary difference being the assignment of pins. I also played with the code a bit to see what kind of functions there are. Let me know if you experience any issues with code. It worked fine for me.
/***************************************************
  This is a library for the Adafruit 1.8" SPI display. This library has
  been modified from the original version to work with a non-Adafruit
  1.8in display.

This library works with the Adafruit 1.8" TFT Breakout w/SD card
  ---->  http://www.adafruit.com/products/358

The 1.8" TFT shield
  ---->  http://www.adafruit.com/products/358

The 1.44" TFT breakout
  ---->  http://www.adafruit.com/products/358

as well as Adafruit raw 1.8" TFT display
  ---->  http://www.adafruit.com/products/358


  Check out the links above for our tutorials and wiring diagrams
  These displays use SPI to communicate, 4 or 5 pins are required to
  interface (RST is optional)
  Adafruit invests time and resources providing this open source code,
  please support Adafruit and open-source hardware by purchasing
  products from Adafruit!

  Written by Limor Fried/Ladyada for Adafruit Industries.
  MIT license, all text above must be included in any redistribution
 ****************************************************/

#include <Adafruit_GFX.h>    // Core graphics library
#include <Adafruit_ST7735.h> // Hardware-specific library
#include <SPI.h>


// For the breakout, you can use any 2 or 3 pins
// These pins will also work for the 1.8" TFT shield
#define TFT_CS     9
#define TFT_RST    7 // you can also connect this to the Arduino reset
                      // in which case, set this #define pin to 0!
#define TFT_DC     8

// Option 1 (recommended): must use the hardware SPI pins
// (for UNO thats sclk = 13 and sid = 11) and pin 10 must be
// an output. This is much faster - also required if you want
// to use the microSD card (see the image drawing example)
Adafruit_ST7735 tft = Adafruit_ST7735(TFT_CS,  TFT_DC, TFT_RST);

// Option 2: use any pins but a little slower!
#define TFT_SCLK 13   // set these to be whatever pins you like!
#define TFT_MOSI 11   // set these to be whatever pins you like!
//Adafruit_ST7735 tft = Adafruit_ST7735(TFT_CS, TFT_DC, TFT_MOSI, TFT_SCLK, TFT_RST);


float p = 3.1415926;

void setup(void) {
  Serial.begin(9600);
  Serial.print("Hello! ST7735 TFT Test");

  // Use this initializer if you're using a 1.8" TFT
  tft.initR(INITR_BLACKTAB);   // initialize a ST7735S chip, black tab

  // Use this initializer (uncomment) if you're using a 1.44" TFT
  //tft.initR(INITR_144GREENTAB);   // initialize a ST7735S chip, black tab

  Serial.println("Initialized");

  uint16_t time = millis();
  tft.fillScreen(ST7735_BLACK);
  time = millis() - time;

  Serial.println(time, DEC);
  delay(500);

  // large block of text
  tft.fillScreen(ST7735_BLACK);
  testdrawtext(5, 45, "theblckwlf presents", ST7735_WHITE);
  delay(2000);

  testdrawtext(15, 65, "the microscreen", ST7735_WHITE);
  testdrawtext(10, 75, "1.8in TFT display", ST7735_WHITE);
  delay(4000);
  tft.fillScreen(ST7735_BLUE);
  tft.setTextSize(2);
  tft.fillScreen(ST7735_WHITE);
  tft.setTextSize(1);
  testdrawtext(5, 65, "start ", ST7735_BLACK);
  testdrawtext(5, 75, "diagnostic test...", ST7735_BLACK);
  delay(1000);

  tft.fillScreen(ST7735_WHITE);
  testdrawScreenData();
  delay(3000);

  tft.setTextSize(2);

  drawTestGrid(10,10);
  tft.setCursor(5, 40);
  tft.println("10x10 Grid");
  delay(2000);
  tft.setCursor(15, 40);
  drawTestGrid(5,5);
  tft.println("5x5 Grid");
  delay(2000);

  tft.fillScreen(ST7735_WHITE);
  tft.setTextSize(1);
  tft.drawPixel(tft.width()/2, tft.height()/2, ST7735_BLACK);
  tft.setCursor(15, (tft.height()/2)-15);
  tft.print("Center ");
  tft.print(tft.width()/2);
  tft.print(", ");
  tft.println(tft.height()/2);
  tft.drawCircle(tft.width()/2, tft.height()/2, 5, ST7735_BLACK);
  delay(2000);

  // tft print function!
  tftPrintTest();
  delay(4000);

  // a single pixel
  tft.drawPixel(tft.width()/2, tft.height()/2, ST7735_GREEN);
  delay(500);

  // line draw test
  testlines(ST7735_YELLOW);
  delay(500);

  // optimized lines
  testfastlines(ST7735_RED, ST7735_BLUE);
  delay(500);

  testdrawrects(ST7735_GREEN);
  delay(500);

  testfillrects(ST7735_YELLOW, ST7735_MAGENTA);
  delay(500);

  tft.fillScreen(ST7735_BLACK);
  testfillcircles(5, ST7735_BLUE);
  testdrawcircles(5, ST7735_WHITE);
  delay(500);

  for (int i=0; i<5; i++){
    testroundrects();
  }
  delay(500);

  testtriangles();
  delay(500);

  mediabuttons();
  delay(500);

  Serial.println("done");
  delay(1000);
}

void loop() {
  tft.invertDisplay(true);
  delay(500);
  tft.invertDisplay(false);
  delay(500);
}

void testlines(uint16_t color) {
  tft.fillScreen(ST7735_BLACK);
  for (int16_t x=0; x < tft.width(); x+=6) {
    tft.drawLine(0, 0, x, tft.height()-1, color);
  }
  for (int16_t y=0; y < tft.height(); y+=6) {
    tft.drawLine(0, 0, tft.width()-1, y, color);
  }

  tft.fillScreen(ST7735_BLACK);
  for (int16_t x=0; x < tft.width(); x+=6) {
    tft.drawLine(tft.width()-1, 0, x, tft.height()-1, color);
  }
  for (int16_t y=0; y < tft.height(); y+=6) {
    tft.drawLine(tft.width()-1, 0, 0, y, color);
  }

  tft.fillScreen(ST7735_BLACK);
  for (int16_t x=0; x < tft.width(); x+=6) {
    tft.drawLine(0, tft.height()-1, x, 0, color);
  }
  for (int16_t y=0; y < tft.height(); y+=6) {
    tft.drawLine(0, tft.height()-1, tft.width()-1, y, color);
  }

  tft.fillScreen(ST7735_BLACK);
  for (int16_t x=0; x < tft.width(); x+=6) {
    tft.drawLine(tft.width()-1, tft.height()-1, x, 0, color);
  }
  for (int16_t y=0; y < tft.height(); y+=6) {
    tft.drawLine(tft.width()-1, tft.height()-1, 0, y, color);
  }
}

void drawTestGrid(int hor, int vert){
  tft.fillScreen(ST7735_WHITE);
  //Draw vertical lines
  for (int16_t x=0; x < tft.width(); x+=vert){
    tft.drawFastVLine(x, 0, tft.height(), ST7735_RED);
  }
  for (int16_t y=0; y < tft.height(); y+=hor){
    tft.drawFastHLine(0, y, tft.width(), ST7735_BLACK);
  }
}

void testdrawtext(int wid, int hei, char *text, uint16_t color) {
  tft.setCursor(wid, hei);
  tft.setTextColor(color);
  tft.setTextWrap(true);
  tft.print(text);
}

void testfastlines(uint16_t color1, uint16_t color2) {
  tft.fillScreen(ST7735_BLACK);
  for (int16_t y=0; y < tft.height(); y+=5) {
    tft.drawFastHLine(0, y, tft.width(), color1);
  }
  for (int16_t x=0; x < tft.width(); x+=5) {
    tft.drawFastVLine(x, 0, tft.height(), color2);
  }
}

void testdrawrects(uint16_t color) {
  tft.fillScreen(ST7735_BLACK);
  for (int16_t x=0; x < tft.width(); x+=6) {
    tft.drawRect(tft.width()/2 -x/2, tft.height()/2 -x/2 , x, x, color);
  }
}

void testfillrects(uint16_t color1, uint16_t color2) {
  tft.fillScreen(ST7735_BLACK);
  for (int16_t x=tft.width()-1; x > 6; x-=6) {
    tft.fillRect(tft.width()/2 -x/2, tft.height()/2 -x/2 , x, x, color1);
    tft.drawRect(tft.width()/2 -x/2, tft.height()/2 -x/2 , x, x, color2);
  }
}

void testfillcircles(uint8_t radius, uint16_t color) {
  for (int16_t x=radius; x < tft.width(); x+=radius*2) {
    for (int16_t y=radius; y < tft.height(); y+=radius*2) {
      tft.fillCircle(x, y, radius, color);
    }
  }
}

void testdrawcircles(uint8_t radius, uint16_t color) {
  for (int16_t x=0; x < tft.width()+radius; x+=radius*2) {
    for (int16_t y=0; y < tft.height()+radius; y+=radius*2) {
      tft.drawCircle(x, y, radius, color);
    }
  }
}

void testtriangles() {
  tft.fillScreen(ST7735_BLACK);
  int color = 0xF800;
  int t;
  int w = tft.width()/2;
  int x = tft.height()-1;
  int y = 0;
  int z = tft.width();
  for(t = 0 ; t <= 15; t+=1) {
    tft.drawTriangle(w, y, y, x, z, x, color);
    x-=4;
    y+=4;
    z-=4;
    color+=100;
  }
}

void testroundrects() {
  tft.fillScreen(ST7735_BLACK);
  int color = 100;
  int i;
  int t;
  for(t = 0 ; t <= 4; t+=1) {
    int x = 0;
    int y = 0;
    int w = tft.width()-2;
    int h = tft.height()-2;
    for(i = 0 ; i <= 16; i+=1) {
      tft.drawRoundRect(x, y, w, h, 5, color);
      x+=2;
      y+=3;
      w-=4;
      h-=6;
      color+=1100;
    }
    color+=100;
  }
}
void testdrawScreenData(){
  tft.setCursor(0,20);
  tft.println("Screen Data:");
  tft.print("Screen Width: ");
  tft.println(tft.width());
  tft.print("Screen Height: ");
  tft.println(tft.height());

}
void testdrawCountdown(){
  tft.setTextWrap(true);
  tft.fillScreen(ST7735_RED);
  tft.setTextColor(ST7735_WHITE);
  tft.setTextSize(6);
  tft.setCursor(30, 50);
  for (int i=10; i>0; i--){
    tft.println(i);
    delay(1000);
    tft.setCursor(50, 50);
    tft.fillScreen(ST7735_RED);
  }
}

void circlePass(){
  tft.fillScreen(ST7735_BLACK);
  testfillcircles(5, ST7735_GREEN);
  delay(1000);
  testfillcircles(4, ST7735_RED);
  delay(1000);
  testfillcircles(2, ST7735_BLACK);
  testfillcircles(3, ST7735_YELLOW);
  delay(500);
}

void tftPrintTest() {
  tft.setTextWrap(false);
  tft.fillScreen(ST7735_BLACK);
  tft.setCursor(0, 30);
  tft.setTextColor(ST7735_RED);
  tft.setTextSize(1);
  tft.println("Hello World!");
  tft.setTextColor(ST7735_YELLOW);
  tft.setTextSize(2);
  tft.println("Hello World!");
  tft.setTextColor(ST7735_GREEN);
  tft.setTextSize(3);
  tft.println("Hello World!");
  tft.setTextColor(ST7735_BLUE);
  tft.setTextSize(4);
  tft.print(1234.567);
  delay(1500);
  tft.setCursor(0, 0);
  tft.fillScreen(ST7735_BLACK);
  tft.setTextColor(ST7735_WHITE);
  tft.setTextSize(0);
  tft.println("Hello World!");
  tft.setTextSize(1);
  tft.setTextColor(ST7735_GREEN);
  tft.print(p, 6);
  tft.println(" Want pi?");
  tft.println(" ");
  tft.print(8675309, HEX); // print 8,675,309 out in HEX!
  tft.println(" Print HEX!");
  tft.println(" ");
  tft.setTextColor(ST7735_WHITE);
  tft.println("Sketch has been");
  tft.println("running for: ");
  tft.setTextColor(ST7735_MAGENTA);
  tft.print(millis() / 1000);
  tft.setTextColor(ST7735_WHITE);
  tft.print(" seconds.");
}

void mediabuttons() {
  // play
  tft.fillScreen(ST7735_BLACK);
  tft.fillRoundRect(25, 10, 78, 60, 8, ST7735_WHITE);
  tft.fillTriangle(42, 20, 42, 60, 90, 40, ST7735_RED);
  delay(500);
  // pause
  tft.fillRoundRect(25, 90, 78, 60, 8, ST7735_WHITE);
  tft.fillRoundRect(39, 98, 20, 45, 5, ST7735_GREEN);
  tft.fillRoundRect(69, 98, 20, 45, 5, ST7735_GREEN);
  delay(500);
  // play color
  tft.fillTriangle(42, 20, 42, 60, 90, 40, ST7735_BLUE);
  delay(50);
  // pause color
  tft.fillRoundRect(39, 98, 20, 45, 5, ST7735_RED);
  tft.fillRoundRect(69, 98, 20, 45, 5, ST7735_RED);
  // play color
  tft.fillTriangle(42, 20, 42, 60, 90, 40, ST7735_GREEN);
}
That's all there is to it. My video for this step shows what the expected display should look like if you run the code above.
Enjoy your new display!


