

Introduction: Build a Mobile Shop Cart...out of Conduit!


I just got the super duper fancy laser and it was taking up a TON of space on my workbench. So, I needed to give it a new place to live. Fortunately, my friends over at MakerPipe sent me some of their new fittings so that I could build a sweet laser cart!
I'll explain more about what MakerPipe is and how to use it later, but for now, let's get some supplies!
Supplies

- Woodworkers Notebook (for planning)
- Giant Pencil (for writing terribly in above notebook)
- MakerPipe Fittings
- Plywood, MDF, or Particle Board (for shelving)
- 3/4" one hole conduit brackets (for mounting shelves)
- Pipe Cutter
- Panel Clips
Step 1: What Is Makerpipe?


MakerPipe is a company that makes special fitting that accept 3/4" conduit, and allow you to build all kinds of useful structures that are lighter (and often cheaper) than building that same project out of wood. A HUGE bonus here is that if you don't have a fully loaded workshop, the only tools you need to build with MakerPipe are an allen key and a pipe cutter!
The fittings have this clever puzzle piece design that clamps onto the conduit for a secure connection. There a ton of different styles of fittings, from T's, 90 degree connections, and more. Definitely give their website a browse if you're looking for inspiration!
Step 2: Planning!


Planning out the build is crucial to success. I love using this miniature model kit that MakerPipe sells, they are 3D printed and fit little straws. Using this miniature kit, we can build out a design and make sure it looks the way you want.
MakerPipe also provides all the 3D files needed to build in fusion 360 or other design programs.
I like to list out my project in my Woodworkers Notebook with my Giant Pencil before ordering parts or getting started. Just keep things straight. :-)
Step 3: Cutting the Conduit


Once I have my plan in place, it's time to cut some conduit!
Cutting conduit is really easy, I used a low cost pipe cutter, but if you have a metal cutting bandsaw or cutoff wheel, that would work too!
In order to find out how long each piece of conduit needs to be, simply take the width of your frame, and subtract 4".
Step 4: Avengers! ASSEMBLE!


I started by assembly my 90 degree connections, then adding my T connectors. This is a good time to double check you're dimensions (More forshadowing...) and make any adjustments before moving on...
Step 5: Oops, I Did It Again...


Alright, so this is where I messed up. My frame was supposed to be 24" x 28" so that means I needed cross bars measuring 20" and 24".... but of course I cut them at 24" and 28". Oh well....
So I went ahead and took everything apart, and cut down my crossbars to the correct dimensions...MOVING ON!
Step 6: WHEEE.... LS!


MakerPipe sells caster wheels that fit into the conduit, but I totally forgot to order the kit! (Should have planned better)
So I 3D printed some parts that would accept some threaded stud casters and stuck them into the conduit. For a light duty cart like this one, I think they will be fine.
Step 7: Adding Shelving


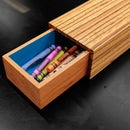
There are a few different ways to attach plywood shelving to a pipe frame, but I wanted my top and shelves to be flush, inside of the metal frame. This is really easy to do with some one hole conduit clips. The bonus of this method is that the shelves can easily be popped out of the frame if you need to move the panel, replace it, or...im not sure...give it to a friend?
Step 8: Adding Side Panels


I didn't like the look of this metal skeleton rolling around my shop, so I designed some 3D printed brackets that would hold 1/8" panels to the conduit. I really like this look and I might even swap out the panels with dry erase board or pegboard for storage in the future. If you want to 3D print some of these clips, I uploaded the file over on my website
Step 9: The End

And just like that, we have a fancy new mobile cart! I think this MakerPipe stuff has some interesting use cases around the shop, especially if you don't have a lot of tools starting out. I used a table saw to cut my shelving, but if you dont have a saw like mine, you could easily ask your local home center to cut down a sheet of plywood to whatever size you need! Easy Peasy!
Don't forget to check out the build video, thanks for reading this 'ible and I'll catch you in the next one!
---------------------
Don't forget to pick up your Woodworker's Notebook!
Make with Jake LLC, Makewithjake.net, and Jake Drews is a participant in the Amazon Services LLC Associates Program, an affiliate advertising program designed to provide a means for sites to earn advertising fees by advertising and linking to Amazon.com.


