

Introduction: Build a Realistic Insect From Wire


I first learned about wire sculpture in a sculpture class that I took in high school and it is definitely one of the most enjoyable, physical and adaptive types of sculpture that I have tried. A great way to get started with wire sculpture is to tackle making something that will look great but still offers a lot of adaptability and varied challenge. For this reason, I decided to build an insect, and the nice thing about bugs (and insects, I know not all bugs are insects) is that they have fairly similar basic body structures.
I went with building a locust, but any bug can give you a good introduction to wire sculpture. Nonetheless, try to be patient with yourself when you do anything with wire, because as you add more and more, previous mistakes become harder to fix.
If you like what you see, feel free to give this Instructable a favorite or a vote in the Metal Contest and it will be greatly appreciated!
Step 1: Choosing an Insect and Planning


To build a wire insect (or really any sort of bug), you need to start with a plan. This process is much easier than you might think, and all you really need are a few sketches of the insect you are trying to make and from there you can develop a plan of attack.
Most insects have many body segments, so start by determining what those should look like for the bug you choose. I decided to make a locust for this project, and from looking at some sketches I could see that I wanted to make him using 3 body segments, one for the head, one for the midsection, and one for the long rear section underneath the wings.
After you have an idea of what the main body should look like, you can think a bit more about the other components of your insect. Some of these sections like wings will have to be made separately and attached, while smaller bits like sets of legs can be made shaped directly onto the body sections.
A very important consideration with wire sculpture is that ends of wires look MESSY and can be VERY DIFFICULT to hide or make look good. Thus, with the main structural sections of your insect should be made with a SINGLE CONTIGUOUS piece of wire. You might not think this is important, but doing this will vastly improve the appearance and structural stability of your sculpture.
Additionally, always consider symmetry. Most insects are very symmetric so be sure to look your insect head-on every once in a while.
Step 2: Gather the Necessary Materials and Tools


To form your wire into a bug, you will want to get a few different gauges of wire. You can certainly use coated wire (like that used in electrical applications), but single strand wire found at a hardware store or an art store is the best.
For the thick supporting sections, 14 or 16 gauge steel wire works great. For detail sections, you can use anything smaller than that, and 18-24 gauge wire is great for that. In this project I used 14, 18 and 20 from an art classroom but you don't have to use as many if you don't want to. These wires can be purchased fairly cheaply in 25 foot lengths, so this project needn't cost you more than $20 but I would advise calling your local craft store or hardware store to see what they have before making the drive because not all stock that many uncoated wires.
As you will quickly find out, you will want a set of cutters to cut your wire. Both end cutters and diagonal cutters (pictured respectively) work fine for this, as long as you can get good at cutting very close for those wire ends.
For the thicker gauges (I would say anything thicker than 18, though with aluminum wire maybe 16) you will need pliers to shape the wire and do any wrapping of the wire. I advise you practice a little bit with a short section of your thick wire before you start, because you want to be able to do consistently very tight wraps at every structural joint, and doing this requires a bit of practice and skill. I advise using needlenose round or bent pliers for most work, but bigger/thicker standard pliers may still be useful for fixing or improving your wraps, as well as doing tight bends of any sort.
Step 3: Starting With the Body


With the body, aim to build the entire thing in one piece. Begin by bending the wires into the rough shapes you are aiming for before you cut the wire and USE A RULER to help get the dimensions right such that your bug doesn't look wonky. Then, you can cut your wire and begin making your first wraps, but only do as many wraps as necessary for a tight joint- usually 2-3- because more may make your sculpture look cluttered and ugly, and if you need that many, your wraps are likely not tight enough anyway. ALSO VERY IMPORTANT- when making wraps, squeeze them together so that they are neater, though be sure to do this throughout the process because this can also make each wrap a little looser.
Unfortunately I don't have pictures from my building process, but have instead included as many relevant images of the body and wraps to get a general idea of what I was going for. Obviously this is easier to see in an art classroom, but simply examining the joints and sections gives you a pretty good idea of what is going on.
Step 4: Building and Adding Legs, Antennae and (if Necessary) Wings


These are the most fun, and should take you considerably less time than the body (which may take many hours while you are learning to wrap wire and shape wire well), and you may choose to use a thinner gauge for some of these components.
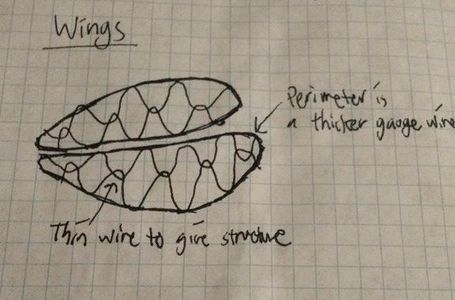
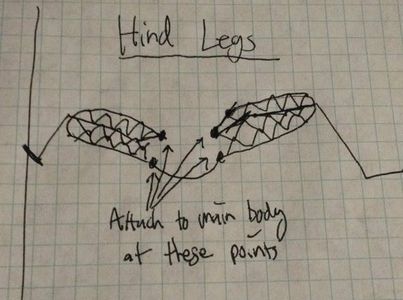
Go into each additional component with a bit of extra wire, ensuring everything is symmetric, and wrap away to your heart's content. With bigger pieces like wings, you may want to build them separately entirely from the body, adjust them such that they look right, and attach them with many (4+) wraps of a thinner gauge wire. You may also put consideration into how you want to fill your empty spaces rather than have single stranded wire. For the body sections, I used a slightly thinner gauge to add volume to each segment of the insect body, finishing with 2-3 tight wraps hidden on the bottom. For the wings, I wove a thin gauge (24 if I recall) to give a nice shimmer to the wings, and then I proceeded to use a similar tactic on the hind legs.
As all artwork goes, there is no need to rush. Take joy in the process, listen to some groovy music, make measurements and take pride in the accuracy of your work, and your insect will turn out looking beautiful.T
Step 5: Finishing Touches and Tips


Finally, assess what you feel is missing from your insect or bug and add it! I felt that my locust needed a set of eyes, so I made them from some thin gauge wire and attached them- and though they aren't perfectly the same, they still look great. I also added a set of pinsers with the 16 gauge wire to act as a mouth for my head.
If you're insect still looks a little empty, you may want to add some thinner gauge wire to improve that, and you may find that some of your wraps are a bit messy, and you can certainly put the work into making them look nice and neat.
For your final assessment, give your bug a head on look and a top on look and lightly adjust it until there is as good of a symmetry as you can get. Obviously, there will not be perfect symmetry everywhere, but you can achieve a pretty great standard that looks perfect from a distance.
I hope you have enjoyed learning about wire sculpture with insects, and don't fear trying other things with your leftover wire. Cars and vehicles are fun challenges, and humanoid sculptures can also be quite a challenge and a blast.

Participated in the
Metal Contest


