

Introduction: Cardboard Solar Filter Film Mount


This is the draft for an easy to implement, though very reliable simple mount (holder) of the Solar-filter film, which is widely available as a DIY telescope kit (like Baader Astro Solar Safety Film, Thousnad Oaks Black Polymer Solar Film, Mylar coated film, e.t.c.)
WARNING! Never look directly at the Sun with a telescope or binoculars. It is extremely dangerous and can result in permanent blindness. Use your bare hand to check the amount of concentrated heat near the eyepiece first, even with the filter attached.
---
Step 1: The Assembling Sequence


This construction of the mount for a film-like solar filter allows as much of the telescope aperture as possible for clarity of the view. It has very safe design to prevent an observer of the Sun from an accidental injury. And also prolongs the life of the filter film, protecting it from the typical causes of tear and wear.
All you need is a sheet of the solar filter film, a piece of a single-layer cardboard, any cardboard glue, and an utility knife.
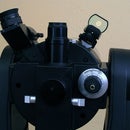
Everything regarding the construction is easy to figure out from the draft below.
- First of all, trim the film to make it about 1" larger than the inner diameter of the front edge of the telescope (1/2" on each side).
- Cut the components as pictured. It's not necessary to do the triangular cuts for the flaps of the T-adapter ring, which will be holding the filter assembly on the telescope. You can make just straight cuts every 1/2" or so (I was using scissors for that and it was easier to cut them like pictured).
- About 2/3" is enough for the top rings width. Make sure the inner diameter of the rings is less than the outer diameter of the telescope. This is to provide a hard stop for the filter, which is also serves as an auto-leveling measure for the filter on the edge of the telescope tube.
- Proceed with assembling and gluing from the top of the draft to the bottom. Use a stable flat surface for more precise results.
- Make sure the film IS NOT glued to any of the flat rings on top of the mount. That is important in order to prevent the possibility of film damage or following erosion from a glue chemicals, and also allows it to play a little bit between rings in response to any deformations of the mount while handling it.
- Leave the assembled mount on the telescope overnight or until the glue drys completely (check the glue instructions for the typical dry time).
- Use some scotch tape to give a nice finish and an additional rigidity to the sides of the top rings assembly.
- OR consider covering everything with some epoxy spray paint (don't forget to protect the filter with masking tape first).
---


