

Introduction: Cardboard Tube End Feed Roller With 3D Printed Parts


I needed an End Feed Roller to use with my bench planer and radial arm saw for running long boards through without assistance.
So instead of buying one or two, I thought I would try my hand at building one.
I have attached the 3D models I've designed to download and 3D print for yourself.
Step 1: MDF Base With Downspout Connector


Using a 12" x 12" piece of MDF cut out the shape of the base unit using a jig saw or other saw.
Trace the base downspout connector's inside edge (or outer diameter of the throat) and drill a pilot hole to then cut out the hole with a jig saw or scroll saw.
In my case, I also used a router to trim down where the downspout connector would be attached so that it would be flush with the bottom.
Run the outer edges of the base through the router with a round over bit to smooth them.
Then spray paint the base with several coats of paint to evenly seal the wood.
Attach the downspout connector with screws and I also added screw on rubber feet for added grip.
Attachments
Step 2: Prepare Cardboard Tube and 3D Printed Parts


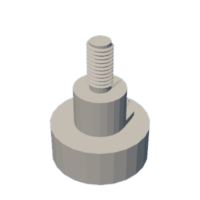
Using the attached 3D models, print two of the Tube Insert Screws of your choice.
Mk II is a circular grip with a 99% threading for a looser fit in the Cap. Mk III has a grippier pattern but has a 100% thread and is a little tighter fit and will take longer to print due to the pattern.
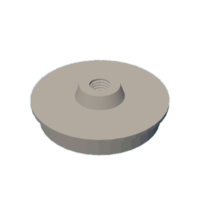
Also 3D print two of the threaded tube inserts. There are two versions, one is a little taller that I thought might be better to adhere with glue to the tube, but will require supports underneath.
Once the pieces are printed, hot glue the caps into the cardboard tube and hold firmly until tacked or dry.


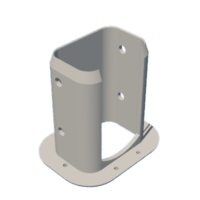
Step 3: Prepare the Tube Mounting Base.


I found a piece of scrap 1/2" plywood laying around the shop and measured a piece 2.5" wide x 13" long or enough to span the length of the tube.
Cut two more pieces of 1/2" plywood into 2.5" x 4" pieces as end cap and tube supports.
Using a 3/4" spade bit drill a hole into the end pieces 1.5" down from the top and centered to the piece.
Attach both end pieces to the base piece using clamps, glue and wood screws.
Step 4: Prepare Downspout Section


Cut a piece of drainage downspout to your desired height. In my case I wanted to have it fit both my bench planer and a radial arm saw at 30" tall so the tube was cut at 25-1/2".
Using a scrap piece of downspout, trace the inside diameter of the tube onto a small piece of 1/2" plywood. Cut out using a jig saw or scroll saw.
Insert into the end of the downspout tube and attach using screws with drilled pilot holes.
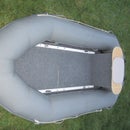
Step 5: Attach Roller Unit to Base Unit Et Voila


Finding the center of the base unit and roller mount, drill two pilot holes and attach the two together using wood screws.
The project is now completed and can be used for light to medium duty projects. Keep that in mind, this wasn't designed to be running slabs of wood through a sawmill, but works great for running long 2 x 4's through a planer or maybe even a table saw or your choice of tools.
Down the road I plan on making the height adjustable by adding a piece of slotted wood to the base that will slide up or down the downspout as needed and tighten with a screw.
Thank you for reading my instructable, I hope this piece serves you well and if you have any questions or comments, please feel free to comment below.
Please remember to vote for this project in the woodworking contest.

Participated in the
Woodworking Contest


