

Introduction: Chain-able LED Strips for 3D Printers (or Decor)


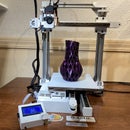
When 3D Printing it's nice to have it well lit, especially when, some photography of the print process is involved. Examples of this are Octoprint with timelapse or OctoLapse or other solutions like my Duet Timelapse solution.
Having proper lighting not only improves the quality of any photos/video taken, it also allows for shorter shutter times (in case of many "programmable" cameras). Shorter shutter times, imply shorter pauses and in turn faster prints.
In this instructable I show the chain-able LED strip I've created for the C3Dt/cxy. These strips can be created to any length and can be attached to any extrusion (doesn't have to be a 3D Printer). Because I use aluminum angle the light will be pointed either upward or downwards at 45 degrees.
These modules will work perfectly fine outside of the 3D printing world as well. Simply replace the t-nuts for some wood screws and these modules will look good in any decor.
Step 1: Materials


1/2 inch aluminum angle 1/16th thick:
Home Depot $5.78 (96") https://www.homedepot.com/p/204604756
Amazon $7.34 (48") https://amzn.to/2NUIdKO
LED Strip" Amazon: $15.99 https://amzn.to/33WACkG
Heat Shrink Tubing (1/8" 1/4") Amazon: $9.98 https://amzn.to/33WACkG
JST 2.0 connector wires with plugs: Amazon: $11.99 https://amzn.to/33WACkG
Braided sleeve 1/4": Amazon: $9.99 https://amzn.to/33WACkG
T-nut (size depending on your extrusion)
2020 series: Amazon: $8.99 https://amzn.to/33WACkG
3030/4040 series: Amazon: $11.99 https://amzn.to/33WACkG
M3 screw 16mm: Amazon: $8.99 https://amzn.to/33WACkG
There are 4 3D printed parts for each LED strip. Two connectors and two "caps" that hide some of the led ends. Files attached here:
- Light Strip End.stl (2x)
- Light Strip Cap.stl (2x)


Step 2: Prepare Materials


The chain-able LED strip can be created at any length as long as your power source supports the power needs for the number of physical leds that are present on your strip. Chances are, your strip will only be a fraction of the roll you bought and this won't be an issue.
Cut your LED strip at desired length by using the scissor marked locations on the strip.
Cut your Aluminum Angle leaving about 2 extra centimeters past each end of the strip (i.e. if led strip is 40cm make the aluminum angle about 44cm.
Print 2 sets of each of the STL files found in the previous step.
For drilling use 1/8" drill bit.
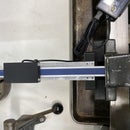
Connect the Light Strip Ends to the Aluminum angle and drill two holes right next to them on the surface you've chosen for the leds.
Drill 2 holes through the aluminum angle angle. Best results would be achieved with a drill press but I was able to do this holding the aluminum angle and using a battery operated drill.
Cut two JST connector wires to have it add up to the desired length of your chain cable (add more wire if it's longer than two connectors wires added.
Cut wires black and red to length to connect to each end of the led strip at about 6cm.
Step 3: Soldering the Wires and Assemble Light Strip


Prepare the LED strip by adding solder to solder pads
- Push solder iron to copper solder pad on strip till heated
- Add solder which will adhere itself to the pad
- Repeat for all copper pads on strip at each end (4 total)
Add a little flux to all ends of 6cm black and red wires and add a little solder.
Solder 6cm wires to the strip. MAKE SURE red goes to positive and black to ground/negative.
Connect and assemble one end of the strip
- Push the wires for the LED strip though the hole in the Aluminum angle.
- Push the black and red wire through 3D printed led strip end piece (Light Strip End.stl)
- Add heat shrink tubing to each of the wires and solder to JST female connector. I recommend you plug a JST connector into the female connector to make sure you connect red to red and black to black.
- After soldering slide heat shrink tube over solder connectors and shrink (using lighter or hot air gun)
- Apply a little super glue into the light stip and slide in the female JST connector (pushing the wire back though)
Repeat this for the other end. But before you do remove the 3M glue backing strip, from the back of the led strip and adhere it to the Aluminum angle.
Step 4: Creating the Connecting Wires


Depending on how many strip you create you'll need to create connecting wires to chain them together. It's up to you how long or how short you make there. For the C3Dt/cxy I only needed them to be about 10cm (4").
For this implementation I want to connecting wires to look good so I'm using braided sleeving (1/4").
It's important that before soldering the wires together you add 2 1/8" heat shrink tubes and 2 1/4" heat shrink tubes. The thin ones are to cover the soldered connections, the bigger ones go around the ends of the braided sleeving.
Make sure you solder black to black and red to red.
Step 5: Connecting the Lights

Since all black is soldered to black and red to red, you can chain as many strips as your PSU allows (the provided power source with the LEDs was 12V at 2 Amps. Be sure to push no more than 12V though the LEDs. If your printer has a 24V PSU use something like a buck converter to bring it down to 12V.
My previous leds over time (years) burned out so at the point where to many of them are out you can now simply unplug one strip and replace it with another.
Also, these strip can really be connected to anything. It doesn't have to be aluminum extrusion. If you want to connect these to the bottom of you bookshelves, these would be an ideal solution as well.

Participated in the
Home Decor Contest


