

Introduction: Chicken Foot Dissection


One of the most gripping parts of anatomy is well, the grip. With hands, feet, paws, and claws, evolution has made a giant vast array of answers to the question: how do we make physical contact with the environment around us? In the chicken foot dissection, we're heading through a labyrinth of muscle, bone, and tendon to find out.
Feeling clucky?
- What: Chicken Foot Dissection
- Concepts: anatomy, biology, mechanical motion
- Time: 50 minutes
- Cost: ~$0.30
- Materials:
- Chicken Feet (very cheap from butcher, Asian grocery, can buy frozen, too)
- Wide Straw
- Zip-Tie
- Tape
- Nitrile gloves
- Tools:
- Blade for dissection (X-acto, utility knife, etc.)
- Tweezers
- Scissors
A NOTE ON DISSECTION:
Dissecting animal organisms is a tricky subject which ultimately some will object to and that's okay. For me, I believe that with careful scientific exploration of animals who were treated in humane ways, we can learn about anatomy and teach our students to be greater stewards of the environment, and especially toward the species they just learned about. There will always be some students who wish not to do a dissection, and we always allow whatever level of participation they choose in these experiences. Many prefer to just watch. Many of those eventually join in. But whatever it is, feel it out with your classroom or audience.
Step 1: Observe: Hands


The easiest place to start is with your own self. And to look at something very important at that: your hands.
The first thing I usually do is have students count how many bones are in their fingers. How many are there in each hand? If you start above the metacarpals, there are fourteen because the thumb only has two. Linking each one of those are joints, and not all of those are the same. What is the difference in motion between your thumb and the other four fingers.
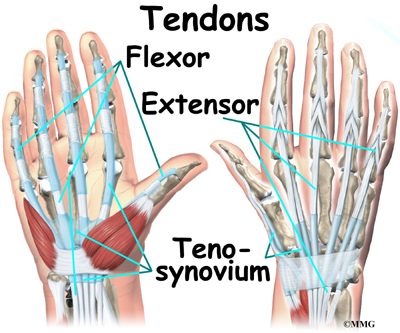
The second thing is to see what makes the fingers move. Try wiggling your fingers, and looking at the back (dorsal) side for tendons. Tendons connect muscle to bone. You can find a good illustration here. You can even play with moving your hand without your arm muscle by pressing on the tendons. Can you find where the tendons are to make your fingers curl? What about to extend?
Other exercises and questions include:
- Tendon Connection: Place your hand on the table with the ring finer tucked back. Which fingers can you lift easily, and which are more difficult? For efficiency, our body has mad some of the tendons more connected than others
- Radius and Ulna: Grip one wrist area with the opposite hand, and twist to feel. Can you feel both bones that make up your forearm?
- Muscle Use: Try wiggling your thumb back and forth repeatedly. Where is the muscle that gets sore? Try wiggling your other fingers repeatedly. Where are those muscles that get sore?
Some of the most delicate surgeries are on the hands, and you can probably see why. There is a ton of important motion packed in to a very tiny and fragile space.
Step 2: Model: Muscles and Tendons


Start by folding over a straw, and cutting out a corner of the fold. When you unfold it, it will be a diamond. Let's make two of those to start, keeping them on the same side of the straw. Slide a zip tie through (cutting either the zip tie or the straw for length if necessary), and fold over the top with some tape.
In this case, our pulling is like a muscle, which goes to a tendon (the zip-tie), which attaches it to the bone (a section of straw). We are looking at the equivalent of flexion, of the finger, whereas extension happens naturally from the pullback of the straw.
Experiment with what happens when you make longer versions (two straws in a line), or make the joints bend in other directions (change the orientation of the diamond cuts).
If you want to see a more detailed step-by-step of this section, go here.
Step 3: Experiment: Chicken Feet


We've arrived at our chicken feet.
Start by gloving up, going over your rules for dissection, and start with observations. Here are some things to do and notice:
- Step: Look at the way a chicken foot touches the ground. How is it different from ours?
- Skin: Look at the bumps on the skin. They may remind you of ours when we get goosebumps (referred to as chicken flesh in Spanish). Also, look at the webbing between the fingers. Why would chicken have this?
- Joints: Curl the fingers inward to see how the joints work. Do they have range like ours? How many bones are there in the fingers?
- Finger differences: What do each of the fingers do for the chicken? What are the differences in length, shape, and motion?
You can explore your chicken feet further by looking at the foot pads, the claws, the skin on the dorsal vs. ventral sides, and much more before actually opening it up.
Step 4: Solve the Tendon Maze


The first thing students might notice is that there are many tendons coming out the top of the chicken foot. Each of these tendons serves a different function for a type of motion. There are more tendons that will be easier to locate inside, but for now, use the tweezers to find the motions that you can.
Can you find out how to move each finger? What other motions are possible, but not easily findable? Do two fingers ever move at once? What about making them move side to side?
In this case, pulling on the tendons is just like in our model straw finger example. We are acting as the muscle, pulling on a tendon, that is connected to finger bone.
Step 5: Make a Back Cut


The best first cut is to go down the back (dorsal) side. Do this carefully, and you can reveal the tendon attachments all the way down the fingers. You can find fat deposits, tendons, and bones. Try pulling on different tendons to find different finger motions. Also, look at the way the joints connect the fingers, and what shapes they are.
Step 6: Make a Front Cut


Here will you find the tendons used for flexion, and also run into a fat deposit known as the metatarsal pad. Why would a chicken want extra padding there? See if you find the individual tendons for flexion for each of the three long fingers. What is attached to the rear one?
Step 7: Go Further

There is always more to look at, so keep going! By examining, illustrating, measuring, and comparing, you can always go deeper in understanding and take a class there with you. At the end of your lab, clean up and wash your tools and hands. Chicken feet can be cooked in a huge variety of ways. Or they can be composted.
For another look at chicken foot anatomy, click here.
Get interested, go deeper, and as always, keep exploring.


