

Introduction: Christmas Decorations Using Coffee Cups


Every so often I search through the contests that are currently listed and see if I have any specific ideas that will fit in line with the guidelines. A few times I have seen a contest come up, and only come up with a good idea for it after the fact.
A while back Instructables sponsored a coffee-cup re-use contest, and at the time I didn't have any ideas for it. Then I came up with an idea of what to do with them... and this instructable is the result. Luckily for me, it once again fits right in line with a current contest, so I decided to give it another go. In addition to the tree, I've also added a bunch of ways to help decorate it. The idea here is cheap, green, and/or crafts that can be done as a family.
Step 1: Build the Tree


I mentioned the coffee cups in the last step, but any paper cup will do. I also tried styrofoam cups, and they were not suitable because the spray paint was making them dissolve without really covering the writing on them. The cups can also be all one size, or you could vary them from small to big, possibly even in layers. I tried to alternate from small to big and back again.
The first thing you will need to build is a base for the tree. I built mine out of various sized circles of cardboard, each a 1/2 inch smaller than the last. I started at 10" and worked down to around 5 inches. This will help give weight to the base and make the tree unlikely to tip over. I then ran a 3' leftover piece of CPVC up. Eventually I had to add an extra support to the base made out of a plastic subway cup and used a hot glue gun to attach it. This kept the tree straight instead of leaning to a side. I was going to paint everything green, but at the last minute called an audible and spray painted it red instead.
I then painted all the cups green, both inside and out. Once they were dry, I made a bunch of vertical cuts on each one. At first, I was marking them off, but then just started cutting them via guesswork. I can't really tell which was which after the fact, so that's probably easiest. I then made a hole in the base of each, and glued them to the CPVC center. At the top is an old party hat, which got the same treatment. To bend the limbs out slightly, just stick the next cup inside and gently move it in. You don't want to go too far, or you'll end up with hard bends instead of genltly sloping out. After it's all together, give the limbs another quick coat of green paint.
Step 2: Hidden Christmas Lights


I waited until much later in the build to put in the christmas lights, and quickly discovered this was a mistake. They were difficult to place in, and I spent half the time trying not to tear up the other stuff I had already glued to the tree.
Basically, I began with a string of LED christmas lights. I had used most of the strand for another project, and that left me with a small amount of leftover lights. To run the lights, you'll need a 9V battery, and 9V battery lead, and to do some soldering with the lights. I usually would link to instructables, but a few years ago I found this guide which does a fantastic job of explaining it from beginning to end. I'm using option 3, taking AC LED Christmas lights and re-wiring them to run from a DC 9V battery source. In my case, this came out to 3 lights per loop instead of 4 as he shows.
I used a paper punch, and made three holes in each cup. After the lights are placed in the hole, I used a spot of hot glue to secure each one. The holes were slightly larger than the lights, but it was a pretty good fit for our purposes.
Next, I put a hole as high as possible on the backside of each cup, this is where the wires from the loop above will run down and attach. Carefully solder the wires where you need and keep in mind that paint and paper are both flamable. When you are done, give it plenty of time to cool off to make sure that it isn't going to ignite. You could even put the lights in before painting and only add the runners later, but you would have to remember to tape them off you you can still see them later. I put a small box to hold the battery inside the bottom cup and stuck the switch on the CPVC pole. Alternately, you could also drill a hole in the pole and run wires down to the base and put the switch there for easier accessability.
Step 3: Tree Skirt


We didn't happen to have a tree skirt, but what we did happen to have were several santa hats. Folding each in half and laying the ball on the hat previous, we came up with a nice tree skirt. If you're looking for something more permanent, you could sew them together, but this skirt worked nicely for my tree at work.
Step 4: The Tree Topper


The tree topper is probably the favorite decoration I put together for the tree. I actually made two of them, one for my tree at work, and one for the coffee cup tree here at home.
Start by taking two thin pieces of cardboard. Mark out a star, and then mark out a section at the bottom that will go around the top of the tree. If you are careful, you can use the one marked piece to cut both pieces at the same time. You may have to do a little trimming to match them up exactly whether you do this or not. The part that is not going to be covered by the star can be painted green, or I just used a green magic marker to color it at work. After that, I taped the edges of the star so that they wouldn't come apart when you put it on the tree.
Next, I used holographic wrapping paper, with a couple of pieces a little bigger than the star. I cut out the bottom of the stars, and used that to line them up, and then glued the wrapping paper to the cardboard. When you cut the wrapping paper down to the size of the star, it should come out without being able to see the white backing of the wrapping paper. Try it out on the tree, and be fascinated by how the light looks like it's sort of flashing as you walk by.
Step 5: Garland & Streamers


There are many different materials that can be used for garland, and a few different things that can be used to string them all together. I used popcorn and thread, but stringing it on dental floss or fishing line may be a better alternative for more permanent strands.
I chose popcorn for a few different reasons. The smell is nice, and you get a chance to eat the leftovers. The downside is that it will have to be thrown away at the end of each christmas so it doesn't attract insects and other unwanted pests. Another downside is that it can't be roughly handled or it will break up. Still, this is was we did traditionally growing up, and what I decided to go with.
Really though, anything it that is small and uniform could work nicely. At work, I used a few sets of party beads, cut the loop and glued the ends together. Before stringing together the popcorn, I also considered using pop tabs instead of popcorn. I'm still not sure what this would have looked like, but ultimately decided against it. Another geeky alternative I thought of was to string together some old keyboard keys similar to this instructable from Lithium Rain. Ultimately though, I just went with the popcorn. You can choose whatever you have on hand.
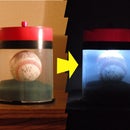
Step 6: Robot Drops


The robot drops didn't turn out quite like I had hoped. I originally tried to use Liquid Nails, a type of silicone to encase my cutout robot. First the container blew out on the wrong end instead of squeezing it out of the nozzle. Then, even after about a week it had not set up at all. Luckily, I was able to retrieve my robot from the middle and go with plan B.
For starters, you need to make your robot. I took a robot sticker and very carefully cut it out with the back still attached. Then I found a piece of cardboard that had a comparable area of yellow on it, removed all the corrugation it was attached to and placed the stick on it. Then, I once again had to carefully cut out the robot. When I was done, I took a Sharpie and carefully drew on the reverse side of the robot.
Next, I took a CD blank- when you buy a spool of CDs or DVDs, they come at the top and bottom to help protect the discs. They are clear plastic, and some are thicker or thinner than others. I found one of medium thickness, and used a camera lens to draw a couple of circles just big enough to encompass the robot sticker with a blue colored pencil. This was difficult to see, so I then used a sharpie to help outline the circle for visibility.
I rough cut the disc with scissors, which will crack it off to the side, so you don't want to get too close to your finished circle. I ruined a couple of circles this way and had to start over. Once you have two circles ready, I used superglue to glue the two pieces together, carefully lining up the circles, and making sure the robot sticker was equally close to all sides. Allow the superglue time to set up properly, and then the not so fun part. I took a rasp file, and sanded down the edges until you get to the circle outlines you made. After that, I drilled a small hole in the top, and placed a hook through it from a cut up paper clip. That's your robot drop!
Step 7: Angel Ornament


This is pretty easy to make. I started with what I thought was the perfect head, the outer covering of an old mouse trackball. Unfortunetely, while being a perfect sphere, hot glue would not stick to it. A different type of glue would have maybe worked, but I decided in the interest of time to replace it with a bottle cap.
The wings were simply made out of thin cardboard, I drew one wing, folded it in half, and cut out both sides together to achieve conformity. I rolled some more thin cardboard in half for the body (the leftover popcorn box I used for making the garland) and then used scissors to cut the bases even. I drilled a small hole in the bottle cap for the paper clip and glued everthing together. The halo is the padding from the top of a tube of DVDs. I pierced it with the paper clip, moved it into place, and glued it with the body.
Next, I used a small piece of tape to cover the paper clip, and tried out the metallic gold paint from Krylon. I taped this to a stick and stuck in my yard so I could paint all sides of it at once. I also kept some glitter handy, and sprinkled it on the paint while it was still wet. I discovered right away that you have to go fast- the paint dries very quickly. A fresh coat, some sprinkled glitter, and I was done. Some spray adhesive later will help keep the glitter from falling off too.
Step 8: Wreath


The wreath is actually pretty easy to make, just a little bit time consuming. It also took a lot more bulbs than I thought it was going to. I started with a piece of galvanized wire cut into a circle to use as a guide for the circle. I didn't need to be exact, but I did want it to be fairly even. Then I just started cutting cups at 1 1/2" intrevals and placing them around the circle.
When I got the first layer set, I glued all the pieces together. Then I laid out the second layer and glued them in place as well. Some of the pieces angle in and some of them angle out to make attaching them to each other easier. When you get close to the bottom of the cup, you also need to double check than an ornament fits into it before you glue it in place.
Once all the cups are in place, I used some emerald green Krylon paint and gave the whole thing a good coating. It's hard to reach everywhere with all the angles that are in place. If you paint both the front and back, you should catch almost everything. I ended up missing a couple of places, but the ornaments cover up a lot of the imperfections too. Then I punched opening in the top of each circle. Using a punch of paper clips, cut them up and bend them to hang the ornament with. I tried to center each ornament in the holes, but that's a lot more difficult than it sounds. I took a piece of the galvanized wire and bent it into a small circle to hang the entire wreath in. A few days later, I realized the gold of my Christmas Robot ornament might look good hanging in the middle. Check the main image of this instructable for the new look!
Finalist in the
Krylon Holiday Decorations Contest


