

Introduction: Clay Extruder Gun for Under $15 With CNC Milled Dies!


Preface: While at NCECA this spring, I came in contact with tons of clay extruder guns for sale. They seemed like a great tool for my practice; able to generate handles and coils with just a squeeze! The problem I found was that, at best, these guns retailed for $37.99 with minimal die selection. I knew, being a starving college student and creative mind, that I could easily make a gun for half the price and make custom dies!
This instructable will show you the materials needed and steps to make a gun for under $15! It will also show you how to mill out dies using Rino and the CNC mill.
Step 1: Materials

The materials needed to make the clay gun are minimal and cheep. All of the materials I got were perchused at the Home Depot, so they might vary depending on where you shop.
-29 oz Smooth Rod Caulk Gun.......... $8.97
- 2 in. x 2 ft. PVC Sch. 40 Plain-End Pipe......... $3.97
-2 in. x. 2 in. PVC coupling.........$.079
Step 2: Modifications

There were only three modifications I did to the calking gun. The first was to cut away the metal on the head of the gun where the clay would come out. For this I used a bow saw and tin snips to cut away the material. This is not a necessary modification, I just wanted a larger opening. The second modification I did was to the metal disk on the plunger. This disk's diameter was just a bit to wide to fit through the 2" diameter pvc pipe. For this I filed the disk using metal files and a bench grinder.
Step 3: Making the Extruder

This is the simplest part of the entire process. Simply measure the length of the barrel and cut the pvc pipe to fit. Make sure to include the length of the coupling in your measurement. **** It is very important to wear a dusk mask or reparatior when doing this! You do not want to breath in any of the pvc matterial!!!! ****Once this is done all you have to do is make dies and your gun is complete!
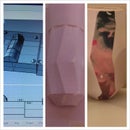
Step 4: Dies


For my dies I created a variety of shapes in Rhino then milled out the dies with the CNC router. To do this I measured the diamiter of the coupling where my dies sit. I then drew out the shapes in the inside of the circle in Rhino. I then loaded the information into the CNC program and it generated a code. From here I used 3/16 inch think melamine board for the cut outs of my dies. Once these where cut out I sanded them on the inside curve and outside curve to fit nicely in the coupling.
I was interested in getting a variety of shapes and using Rhino for my dies. However, if you do not have access to Rhino or a CNC mill you can easily make dies as well.
Step 5: Ready to Use!

Now you are ready to use your extruder gun! SIimply roll out a thick wedged coil of clay and drop it into the pvc pipe. Put the pipe in the barrel and begin to pump the handel. It is helpful to guide the clay as it is coming out so it does not curl. Cut off the clay with sissors then pull back the plunger to add more clay!


