

Introduction: Collector for Tabletennis Balls


This collector can pick up tabletennis balls from the floor in a very short time without effort, reaching almost any point under the tables, transennas and without bending the back.
Supplies
- Steel tube [external diameter 6.2 mm ; internal 4.6 ; length 1000 mm];
- Steel broomstick: you can buy a cheap one from the supermarket;
- Fruit packaging nets: kiwi, prunes, apricot packages use these elastic nets;
- Spray paint: choose the color you prefer to paint the steel frame of the collector;
- Fishing wire [diameter 0.5 mm or more, with at least 15 kgf strength];
- Fishing wire [diameter 0.2 mm] or some sturdy sewing thread;
- Electric cable sheath [external diameter 2 mm] from recycled wiring;
- Bi-component epoxy (better) resin or polyester (it smells!);
- A piece (75 mm) of an old steel broomstick [its tube inner diameter has to be the same of the above broomstick];
- Some foam rubber recycled from packaging;
- Corrugated pipe for cable protection [outer diameter 10 mm; inner 6.5 mm ; length 400 mm] opened;
- Duct tape;
- Nylon cable ties;
Tools:
- Drill;
- Drill bit 2 mm, 4 mm;
- Small hammer;
- Large sewing needle (for the fishing wire);
- Blacksmith vice or a strong one that can be used with light hammering;
- Hacksaw for steel;
- Disposable syringe 20 cc (to measure epoxy resin);
- Disposable syringe 5 cc (to measure hardener);
- Small plastic bowl withot corners (you can use one of the plastic shell from the easter egg surprise);
- Wooden stick (to mix epoxy resin);
- Marker;
- Hole puncher;
- Protection gloves.
Step 1: Create the Collector Frame


The collector consists in a rectangular frame 170 x 225 mm (measured from the inside) with an extension that goes inside the broomstick. There is a string that goes all through the frame with a specific spacing between each segment.
It is useful to draw all the required dimensions on a cardboard that once cut precisely can be used as reference to bend the steel tube and to drill the holes for the string.
The steel tube can be bent by hand once put in the vice with some hammering.
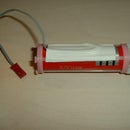
Step 2: Create the Insert for the Broomstick


The standard threaded insert at the end of the broomstick has to be removed and replaced by the one of the collector.
In order to create a suitable insert I used a piece of broomstick tube as mold for the epoxy resin to include the collector frame into the insert itself. Some foam wrapped on the frame and some duct tape can provide the correct placing of the mold and prevent the resin to leak.
Mix the resin and the hardener in the correct proportions (in volume) using the disposable syringes. About 11.5 cc are required for the insert. (20 mm diameter and 45 mm lenght). Let the resin cure for about 24 hours in a warm room, better if near some radiator or heat source (30-35 °C).
Step 3: Drill the Holes for the Main String


Using the cardboard mark the position of the holes and punch them before drilling.
Drill 2 mm through holes on the sides.
Step 4: Paint the Collector Frame(s)

I used some red acrylic spray paint. I made two collectors this time! :-)
Step 5: Assemble the Net


Collect 4 elastic nets from fruit packaging, carefully removing with pliers the metal clips at each end of the net tube.
Put one net tube inside another and sew them toghether using some 0.2 mm fishing wire. This will keep them aligned when fitting the nets on the rectangular frame of the collector.
Use some duct tape at the four corners to keep the net tube in place and sew the net around the frame tube all around the perimeter.
Step 6: Assemble the Main String


Cut a piece of about 1.8 meters of fishing wire (0.5 mm diameter) to make the main string.
Strip 15 mm pieces of sheath (one for each hole) from a recycles electrical wire. Introduce them in to the holes leaving out the same length both sides of the hole.
These sheats can prevent the string to be damaged and cut due to sharp edges and burrs that may be present in the holes.
Secure the string with some knots at the first hole and then pass it through all the others until the last hole. Apply some tension on the string and bend the pieces of sheath to allow settlement. Then make knots on the last hole keeping some tension. It should be easy to move the string with a gente pressure of the fingers. Do not tight the string too much.
Step 7: Assemble the Collector Frame Protections


Cut 4 pieces of about 120 mm of corrugated protection to put at each corner of the frame. It is easy to open the corrugated and wrap around the frame tube and also make the curves. Secure each extremity with nylon cable ties.
Step 8: Prepare the Broomstick


To remove the plastic threaded end from the broomstick it's necessary to remove the dimples that secure it to the tube. This can be done drilling holes slightly bigger than the dimple.
A broom screwed to broomstick and kept by the feet can be used to block the insert while the turning and extracting the broomstick. Sometimes it is very annoying to remove the insert, if it is too hard you can cut the the insert and remove it piece by piece.
Step 9: Assemble the Collector to the Broomstick


Check the fitting of the resin insert into the broomstick, if necessary use some sandpaper on the insert to tune the interference that should keep everything in place and still. The assembly should be done by hand without tools.
Step 10: Tune the Collector Inclination


Last step is to give the collector the correct inclination angle (about 40 degrees from the floor) so it is comfortable to use both for tall and short people.
Put the frame between a step and your foot to secure it, then lift the broomstick to reach 40 degrees angles bending the frame permanently in correspondence of the first 2 corners near the handle. Check the inclination and if necessary adjust it accordingly with the same procedure.
Done!


