

Introduction: Converting Clothes Cabinet Into a Multiple Vivarium Enclosure


In this Project I decided to convert my old and redundant Clothes cabinet into a multiple vivarium and utilizes from some functions of cabinet by keeping one drawer and making a small door access to enclosure for the misting system , lighting , electrical , the drawer for the food and other things .
Step 1: Introduction


1- In this Project I decided to convert my old and redundant Clothes cabinet into a multiple vivarium and utilizes from some functions of cabinet by keeping one drawer and making a small door access to enclosure for the misting system , lighting , electrical , the drawer for the food and other things .
The project involve with some carpentry work but I used my lovely tools ( Dremel 4000 with all its attachments . ) and also the driller .
Step 2: Construction


After that I remove the doors , drawers , making the holes by hole saws attached to drill for drain
Opening for lighting, fans, pipes and other requirements..
Step 3:


Here also I close all
the corners gaps with black silicon in order to make it tight.
Step 4:


To start the work in the main tank I need lighting hood and some electrical, So I start with Main Electrical in ( I name it control or service enclosure ) .
Step 5:


After the converting it will be three vivariums with one drawer and cabinet for services as below :
Step 6: Lighting Hood


Lighting Hood :
Lighting hood I make it from wood plates with dimensions similar to the unused or redundant from drawers to eliminate cost and time, I cut the opening for the light food from above.
Then I used as I said before the wood pieces from drawers to built the hood and install lighting holders , I used 3 lighting holders two for fluorescent / UV bulb and the other one for Blue / night light .
Step 7: Lighting Hood


Fan will be mounted above this fan can work to extract the air with lighting heat to help to prevent over heat the tank or work opposite by open it and re install it to pump the air with lighting heat into the vivarium ..
Step 8: Breathing Tube or Duct


Breathing tube or duct :
A method I think about it to inlet the air to the vivarium and then extract it be fan from the top , the pipe will be near the bottom and opening covered by mesh :
Step 9: Drain


Drain :
Two drains I installed for the main tank and one beside thanks to mist king, I drilled the bottom and installed..
Also some piece cut to let the pipe come out..
Step 10: Other Fans

Installing another fans for the other two vivariums .
Step 11: Construction of the Bio Topic


Construction: Now we will start with construction of inner vivarium side and back replicas of tropical biotopes: first cleaning of the inside flat panels then point out the pots for plants then the foam plates and blocks and imagine the shape that you want and I hide all wood or the appearance of the clothes cabinets and lighting bulb, I use masking tape to support temporary before the foam applied on it..
Also I used some screws and nails for fixing .
In the bottom I protect the drain by masking tape and isolate all the bottom my foam in order to reduce the water effect on wood with slope to the central of the base which drain installed to take as much as of the drain water before come in the wood .. Silicon will apply after the foam dry to reduce this chance.
Types of foam used
Step 12: Construction of Bio Topic


Foam board or blocks installed inside
Step 13: Construction of the Bio Topic


Foam spray applying on the bottom
Step 14: Construction of Bio Topic


Foam applying on the foam blocks to glue and full gaps ..
Step 15: Using Tools for Shaping and Carving


After one day of construction, now I start with trimming, cutting and shaping by using my amazing PROXXON hot wire cutter and Einhell hot gun..
Cleaning and vacuum by vacuum cleaner all the waste , glue and reinstall any weak , soft or moving parts of the decoration or replica .
Step 16: Mixture Used ..


Now we will start place the cover of cement / concrete material :
I use for 5 Liter jar shown:
100 to 200 CC adhesive or Tribond
100 to 200 cc cement
4 letter of peat moss
1 spoon of black cement colour
1 spoon of brown cement colour
Mixing all with water, and now will be ready to establish by shoot them by hand (unfortunately no body to help me photo this process – but it is similar to any building works), Also some brushes similar used in painting with different kind , also small spoon and knife which help to applying the mixture to the corners and deep groove which can not by normal tools , try to use different kind of lighting from different corner to see if there any parts missing from covering by mixture ..
Step 17: Artificial Roots


Making Roots :
It is one on the beautiful things which will add some naturalistic touch in the vivarium are the droopy and suspended roots or dried air roots .. to make these we need some ropes and yarn string which manufactured from plastic , I used several types with several widths , just make a full bucket of the same mixer but without the beat moss and sink these ropes inside , after calculating the length required , take in your consideration that it will be twisted to mimic the real environment .
After that put a news paper and lay the beat moss with 3 to 4 cm thickness layer on the newspaper , now take the rope from bucket and place it on the beat moss , spread some of beat moss on it and roll the news paper to make sure that all the rope become covered with beat moss ..
After one day open the newspaper carefully and take the rope.. Fix it inside the vivarium by using same stationary pins, but two or three and twist the rope as you want and supported by these pins..
Now some of areas of ropes, pins need to repair with same colour of the rope , using brush ( same to paint small brushes used in painting picture to do the work ) try to use same materials ..
Step 18: Other Two Tanks


Other Two Tanks :
For the other side two tanks, I decided one of them (The upper one to be tropical the lower one desert terrarium)
The tropical one will be equipped with drain, light and fan as explain previously, only the lighting will be changed I used IKEA light , I need light to not taken as much as size and not release too much heat , led light used ..
The construction process will be same as main vivarium..
Step 19: Lower Tank


For the other lower tank which is the smallest one will be a desert type terrarium , I try to hide the pipe and the drain of the upper tank .. by put some foam and cover it by different colour cement and without beat moss , I used same foam spray to do that and putting only two small pots for plants ..
Lighting is by IKEA light. I like White light similar to florescent, But I cannot find it..
Step 20: Doors :


Note : Like any artist you need to think
about your terrarium , caves , holes grooves , potting places , lighting and shading , and these need from you a brain storming , sketches and imagination and also see some movies , programs and reading some books about the natural habitats ..
Doors :
I used Acrylic panels door , I order some sheet which is cutting
according to my dimensions ( 8 mm thickness ) , after that I make some holes for air inlet in the bottom , big hole for the Temperature / Humidity digital meters ( from EXXO Terra ) , also one hole in the middle of the door for grapping ..
The slide I used aluminium rail, it is only this type available which is big and ugly (Unfortunately the terrarium / vivarium supplies here not available here in our area)
Step 21: Drainage Installation


Drainage:
Now we will connect the two drains pipes by using PVC cement with one main pipe , don’t forget to put a slope for the pipes and a small container as a drain sump ..
Step 22: Electricals and Sprinklers


A view inside the enclosure , where I put the timer , pump and tank and other lighting , small shelve for different uses and also a drawers for any food ... etc .
Step 23: Enjoy ...


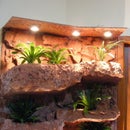
Finally the Big day: Now Purchase the plants and plant, arrange and water
.. Enjoy your time..
You will need beat moss , water and ceramic bubbles for drain which will be laid first , then the beat moss and then planting the plants with heavy watering ..


