

Introduction: Cookie Candy Container


🎃🍬 Get ready to scare and sweeten your Halloween festivities with this cookie and candy container! 🍪👻
This mysterious edible creation is not just a container for your favorite treats; It's the perfect addition to your Halloween party or a unique gift for those who love all things sweet and spooky.
Don't miss the opportunity to add a touch of Halloween magic to your celebrations.
Let's get started!
Supplies
Bassic Butter Cookies
Ingredients:
0.55 lb unsalted butter, softened
0.44 lb granulated sugar
1 large egg
1 teaspoons pure vanilla extract
1.10 lb all-purpose flour
1/2 teaspoon salt
Click to download the file and print in PLA filament
https://www.thingiverse.com/thing:6268315
Recipe for Edible Glue
Ingredients:
1/4 teaspoon tylose powder (also known as CMC powder)
2 tablespoons warm water
Recipe for Fondant
Ingredients:
1/4 cup (60 ml) water
1 packet (about 2 1/2 teaspoons) unflavored gelatin
1/2 cup (120 ml) light corn syrup
1 tablespoon glycerin (optional, but recommended for texture)
1 tablespoon clear vanilla extract
1/4 teaspoon salt
2 pounds (about 8 cups) powdered sugar (confectioner's sugar)
Food coloring (gel or paste) as desired
Step 1:

How to make butter cookies?
Make the dough
Cream Butter and Sugar: In a large mixing bowl, cream together the softened butter and granulated sugar until light and fluffy. This will take about 2-3 minutes using an electric mixer on medium speed.
Add Egg and Vanilla: Beat in the egg and vanilla extract until well combined.
Combine Dry Ingredients: In a separate bowl, whisk together the all-purpose flour and salt. Gradually add this dry mixture to the wet ingredients, mixing until a soft dough forms. Be careful not to overmix.
Form a Dough:Divide the dough into two equal portions. Place each portion of dough on a sheet of plastic wrap or parchment paper. Spread the dough, about 2 inches (5 cm) in diameter.
Chill the Dough: Wrap the dough in plastic wrap or parchment paper.Place the wrapped dough in the refrigerator and chill for at least 2 hours, or until the dough is firm.
Step 2:
Cut out the dough
Slice and Decorate: First downlad and print the cookie cutters in PLA filament. Remove the chilled dough from the refrigerator.
Unwrap dough, roll out to 1/4 inch (0.6 cm) thick. Cut cookies with the large cutter that will serve as the base of the container, cut at least four cookies combining the small cutter with the large cutter, these will serve to introduce snacks or candies.
Step 3:

Bake the cookies
Place the cookie rounds on the prepared baking sheets, leaving some space between each cookie.Bake the cookies in the preheated oven for 10-12 minutes or until the edges start to turn golden brown. Keep an eye on them to prevent over-baking.
Cool: Allow the cookies to cool on the baking sheets for a few minutes before transferring them to a wire rack to cool completely.
Enjoy: Once the cookies have cooled, they are ready to be decorate!
To ensure that the cookies do not move we will need edible glue.
Step 4:

How to make edible glue?
Prepare Your Materials: Ensure that your utensils and mixing bowl are clean and dry.
Combine Tylose Powder and Water: In a small bowl, add the tylose powder to the warm water.
Stir the mixture vigorously until the tylose powder is completely dissolved. It may take a few minutes for the powder to dissolve entirely.
Let It Rest: After the tylose powder is fully dissolved, let the mixture sit for about 30 minutes. During this time, the mixture will thicken and become more adhesive.
Stir Again: After resting, stir the mixture again to ensure it's well combined and has a glue-like consistency. If it's too thick, you can add a small amount of water and stir until you reach the desired consistency.
Your edible glue is now ready to use!
Take a cookie on top of it, put glue and glue one cookie on top of another until you get the size you want, wait about 2 hours for it to dry completely.
In the meantime we will make fondant to make the decorations.
Step 5:
How to make Fondant?
Prepare the Gelatin
In a small microwave-safe bowl, pour the water and sprinkle the gelatin over it. Allow it to sit for a few minutes to bloom.
Microwave the gelatin mixture in 5-10 second intervals until it's fully dissolved. Stir well after each interval. Set it aside to cool slightly.
Step 6:

Combine Wet Ingredients
In a large microwave-safe bowl, combine the corn syrup, glycerin (if using), clear vanilla extract, and salt.
Microwave the mixture for about 30 seconds or until it's warmed but not boiling. Stir to combine
Step 7:

Mix the Fondant
Gradually add about half of the powdered sugar to the wet ingredients and stir until well combined.
Pour in the dissolved gelatin mixture and stir to incorporate.
Continue adding the remaining powdered sugar, one cup at a time, and mixing until the mixture becomes stiff.
Knead the Fondant:
Dust a clean surface with powdered sugar and turn the fondant out onto it.
Knead the fondant like you would with dough, adding more powdered sugar as needed, until it becomes smooth, pliable, and no longer sticky. This can take about 5-10 minutes.
Step 8:

Color the Fondant
If you want to color the fondant, add a small amount of gel or paste food coloring to the center of the fondant ball.
Fold the fondant over the coloring and knead it until the color is evenly distributed. Add more coloring for a deeper color.
Store or Use:Wrap the fondant tightly in plastic wrap to prevent it from drying out.
You can now use the fondant to create decorations.
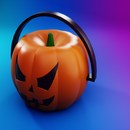
In this case I used green and black fondant.
Step 9:


We start by spreading the green fondant enough to cover the cookie, we place a little edible glue on the edges of the cookie tower and cover it with the fondat, flatten it and remove the excess. We spread the black fondant and cut the shape we want to give to the hair, eyes, mouth and small details. To glue them we put edible glue.
Your Frankie cookie container is ready!.
You can put some candies inside to give as a gift, it is 100% edible.
Step 10:


Unleash your creativity and explore a world of endless possibilities in designing cookie containers!

Participated in the
Halloween Contest


