

Introduction: Creality CR-7 ,3d Printer Review


I got this interesting printer from Gearbest.com . Here is the link : http://goo.gl/UCh45t
They have a LOT of cool stuff for grown up, but still a child, as me . I also tested the makeblock kit like this :
http://www.gearbest.com/kits/pp_346351.html Its really cool too. I might make an instructable later for this. But its really easy to build. So it might not be needed.
The pack was delivered by DHL, and weighed just over 5 kilos.
First, I was a bit skeptic about the NON heated printbed. But this do not seems to be a problem, other than you can not print ABS plastic. I never do anyway, so it does not matter.
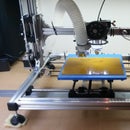
Also, the print size is about 120 x 140 mm I would say.. And the Z height is about 100 mm. It says 130 x 150 on the box, but this is a bit over the limit I think. Maybe if you pull out the rollers as far as it goes. The z height was 100 mm at least.
Anyway, I was thinking of the parts that I normally print on my other 5 printers. Most have the "standard" 210 x 210 mm bed size. But most of the time I only print much smaller pieces. So , this will be more than enough for most type of printing.
Step 1: Assembly


The parts seems very well organized, and the nuts and screws were all separately labeled. Really neat.
It had all the tools needed also for building the printer. I actually used them to build it.
There was a micro SD card in a USB adapter, and this had all the instructions needed. The printer already had the firmware installed, so it was later just plug and play.
The building instructions ,is the best I have seen on any printer . There is no PDF file printer assembly, but there is a great video, and an exe file using Solid Works composer ,showing every step you need to do building the printer. This was just fun :)
The rubber rollers made the rig really stiff, and everything is very rigid.
Step 2: Testing


All the wires were pre-cut and connectors were installed also. Really easy to wire it up. No soldering needed, and everything was properly labeled.
The first thing I ran in to, was the Z axis screw. This was almost stuck. I looked at the bracket for the Z axis follower nut, and saw that this was slightly bent. So, first, check that this angle is 90 degrees. Otherwise, it will jam.
The other thing, is that a micro switch was also really bent. So I re - soldered this. This was actually going to work , so it was just a cosmetic improvement ;)
I also had a problem with interference in the LED panel, but this was just me that had over-tightened the bolts for the lcd case.
I was also thinking that the printer plate aligning could be a problem, since it`s just 3 screws. But this was actually not a big issue. So I will not go in to this now. But you should align the micro switch bracket pushing it UPWARDS before tightening the screws.
Step 3: Conclusion


As I said earlier, I was a bit skeptic about the size and that it had no heated bed.
But over all, I am really pleased about the looks of this printer, and really impressed about the accuracy about the print I made. None of my other printers can make prints so good.
Its also the first time that I use an extrusion motor with a teflon tube. But this worked out perfect. No problems.
And that it is so portable, makes it a fun ,and really useful rig.
I can highly recommend this printer if you need an easy build, easy set up, and easy to move printer..!
The printer has also a micro SD card slot, so you don`t actually need to print using a pc.
The printer was tested using Repetier software, and the Slic3r slicing tool.
The LCD display, I think I can attach to the electronics cover. This is also optional, and not really needed using a PC connected to the printer.
Despite some minor faults, it could easily be adjusted. And other printers have been harder to build, and with more bigger adjustments.
Now, I actually can bring this printer on camping trips, and just connect it to a 12 volt source !
I definitely will be using this printer in the upcoming time :) Recomended


