

Introduction: Customizing Bike With DanceSkateLive Sound System for a Local Street Performer


Mei is a local street performer who's developing and nurturing a unique talent: the ability to hula hoop while rollerskating to classic soul music, and delivering the news of the day, be it an environmental lesson or the history of modern rollerskating. She calls her this "DanceSkateLive".
Rock The Bike created a custom Soul Cycle for Mei that helps her take her art form to the next level.
Step 1: Get Out There and Meet Interesting Collaborators.

Mei was looking for a way to carry her street performing gear. We hooked her up with an Xtracycle and some Ice Blue Down Low Glow on a classic Bridgestone step-through mountain bike she found and suggested that she consider a custom sound system.
Step 2: Work With Cardboard, Box Cutter, and Clamps Before You Work Rwith Computers, Saws, and Glue.
In the first stage of a custom bike, you need to think fast and generate lots of ideas. At this point I was just trying to put all the objects into my workspace: her skate, the speakers, the Xtracycle frame, etc. This way you can quickly get a sense of the sizes of the objects and make decisions about where things go, what can fit, and how it looks in proportion to the bike.
Step 3: Build Your Cabinet.
Rather than teach woodworking, I'll just say that you will need a ton of good clamps, of all sizes. So be on the lookout for those next time you're at the flea market. As you can see, I cut this box at an angle, so that the top would be narrower than the bottom. This allows the woofer to angle up, which directs the sound to ear level.
I picked up the plywood from Macbeath on the shop Mundo. I used 5 ply 1/2" plywood. I can tell the difference in quality when comparing it the 9-ply Finnish Birch. But $60 worth of difference? Not really. We recently bought a circle buddy router jig to cut holes for speakers. It's good. The arithmetic on the setup can be a bit tricky, but you'll get the hang of it.
Step 4: Divide Stereo Left and Right With Perfectly Sealed Cabinets.
As you can see I used square dowel to position the dividers. I decided to angle the walls in so that the center compartment would have a "Shakespearean Stage".
Step 5: Continue Customizing the Box With the Various Components of the Audio System.
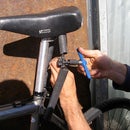
Step 6: Develop a Mounting System.
Here we were trying to see how this rig was going to be mounted to the Xtracycle system.
Step 7: Add Lighting.
Step 8: Veneer the Box.


