

Introduction: DIY BRUSHLESS BELT SANDER AND DISC SANDER


We reccently designed and built our Disc and Belt sanding machine using brushless hub motor from an old hoverboard and a bunch of spare metal sheet.
The basic idea is to replace our current sanding machine thats powered by an induction motor. It requires 120v AC thus we need an additional step down transformer to drive it and as its an induction motor, its lacks alot in power.
Besides we love building tools and stuff so it's just another reason to get our hands dirty.
Lets get building....
Supplies
Tools:
- Angle grinder
- Drill machine
- Drill bits
- Welding machine
- Soldering iron
- Basic metal working tools
Material:
- An old hoverboard
- An old conveyor belt assembly
- A bunch of nutbolts
- Sanding belts
- PCB
- Heavy duty hinge
- Ball bearings
Step 1: Design


Before we get our hands dirty we designed the whole unit. The approach was simple, The structure is made out of 6mm thick metal sheet. We are going to use a bunch of rollers that we have salvaged from a conveyor belt assemble. The belt rolls over the outer surface of our hub motor and the sanding disc is attached to the face plate.
A heavy duty hinge is attached to the base plate and the roller assemble to shift the unit to hotizontol sanding position to sand wider parts using the sanding belt.
Step 2: Cutting Metal Parts


Once we are done with the CAD design we than printed 2-Dimensional layouts of all the parts the need to cut out of the metal sheet.
We stick them to the metal sheet and use our angle grinder and jigsaw to cut out all the pieces.
Step 3: Drilling and Taping


Once we cut down all the parts we than drill and do the threads taping where needed.One of the reason for using 6mm thick metal sheet is to hold everything together using the embeded threadsand minimize welding parts together.
Step 4: Welding


A bunch of parts need to be welded together like the base and both the sanding beds. Once we started welding everything messed up as the thermal shrinkage caused a lot of twisting. Later we need to do a lot of troubble shooting to get things as acurate as possible.
We than grinded the excess welds and finished all the parts to get them painted.
Step 5: Painting


Later we painted all the metal parts to give them a neat look and prevent them from rusting. We have usedmatt black auto paint for better finish.
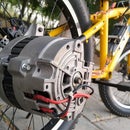
Step 6: Modifying the Motor


To make sure we have plenty of power, we decided to use a brushless hub motor that we salvaged from an old hoverboard. We dissassembled the motors as it needs a bunch of modifications before we can use it. The front plate and the drum needs to be flat so that we can mount our sanding disc over the face plate and smoothly run the belt over the drum. An hour on lathe machine got the job done but before we reassemble the motor we need to figure out a way to increase the speed of motor.
Hoverbaord motors spins a lot slower than what we need for our sanding machine, just 700 rotations per minute. For simplicity we are going to use an RC car ESC that can handle 6 cells in series compared to 10 cells from hoverboard setup. Now thats further going to decrease the speed.
Rewinding the stator was the solution but its going to take alot of time so instead we rewired the original winding. Since its a three phase motor so each phase has three sets each set having three poles and all of them connected in series. We rewired the winding so that all three sets are are connected in parallel. This make the current to flow three times faster as compared to the series connection ,making the motor spin three times faster.
Before we sotter the PCB we trimmed the coils and removed the enammled coating … man that job took ages to complete….
Once we are done with that we sottered the PCB carefully not to damage the winding. Before we reassemble the motor we drilled holes into the motor drum for sanding plate and to make the sanding plate we have used 6mm thick aluminium sheet.
Step 7: JLC PCB


Here I would love to thank JLCPCB not only for sponsoring this project but to make sure that we pull this modification upto the standards. We designed the PCB for the stator unit and ordered it from JLCPCB. The process is straight forward, all you need to do is to upload your gerber files and go through a bunch of options and you are done. We recieved the PCBs within a week and as always the product quality is exceptional. Its over three years since our first collaboration and not even a single glitch in there services and product quality.So guys make sure to visit JLCPCB, the link is in the discription.
JLC PCB : https://jlcpcb.com/IYB
Step 8: Final Assembly


After modifying the motor to our need we then start assembling all the parts together and for that we first installed heavy duty hinge & main vertical plate with base and then mounted up the motor holder bush using flathead screws, then we slide the motor shaft and tightened it up using M6 gerb screws. After that we have installed the sanding disc bed holder and bed also and make sure that both pieces bed and holder are perfectly square to the main sanding dics.
After completing the sanding disc assembly now we have move towards assembling the roller assembly for sanding belt. For that we attached the roller assembly bar to vertical plate and then mounted the main bed infront of it.
After assembling whole unit we have 3d printed the enclosure for our speed controller and servo tester to make wirring and things orzanized. The 3d printed enclosure slides over the motor holder and tightened up using two screws.
Step 9: Final Results


Later we installed both the sanding disc and belt and the unit is ready to get tested.As we turned the unit on the belt started to skid on left side so to fix that we made some adjustments over the tentioner pully. We than started sanding over the belt sanding bed in verticle position. With variable speed there was sufficient power to sand metal bar without the belt stopping, sanding aluminium sheet was a piece of butter for this thing.
Later we tried the sanding Disc and got even more power as its directly attached to the drive unit. With the amount of power we are getting we could have placed a 12in sanding disc over there which would have been more usefull as the part near the centre of the disc is not that useful.
Next we switched the bed to horizontal position and started sanding face of remaining metal sheet from this project. Now thats something that we cant get done on a sanding disc as it sands unevenly but with this bed we can easily sand a 12 in wide plate evenly.
The only issue we face is that the belt was touching the bed and as we sand large plates like this one the belt slips over the hub motor whereas the motor keeps spining. Well thats something we will fix later. Consider subscribing if you love this build and let us know your thoughts in the comment section below. Will soon be there with another awesome project.

Second Prize in the
Metal Contest


