

Introduction: DIY Clip-In Hair Extensions

This is for those of you who want to change your hair length or volume, without a long-term commitment, damage, or a pile of money.
Clip-in extension kits, in both human and synthetic hair, are incredibly expensive, when you can make your own for a fraction of the price. Below I show you how I made my own, starting with bulk hair.
Many how-to sites stress that you *must* buy real human hair. Personally, however, I prefer synthetic, since it's much less expensive (and the idea of using human hair kind of squicks me). If you get the color right, the drawbacks of synthetic hair - not being able to dye it or use heat styling - are not that big a deal, especially since clip-ins can be removed so easily. They can also be easily swapped out for different textures/lengths/colors and other effects, so you don't have to bother dyeing or curling.
Step 1: Gather Materials

To make the hair clips, you will need:
- 1-2 packets of synthetic hair, on a weft
(do not buy "ponytail hair," which is loose and incredibly difficult to work with*).
Depending on the store, you can also buy it off a roll, by length. In this case, measure your head and decide how thick you'll want the pieces before you go. (More on choosing hair on the next page)
- 15-20 wig clips
This will depend on how many hairpieces you make, but it's better to have extra than have to make another trip to the beauty supply store. You also don't want to skimp on the amount of clips you put in each hairpiece, or they're likely to come loose while wearing.
- Sharp scissors. to cut the wefts and trim the final pieces
- Needle and strong matching or invisible thread, to sew the wefts and clips together
- Measuring tape (or long piece of string), to gauge how wide each piece should be to custom-fit your head.
Optional:
-Sewing machine, to attach the wefts to one another
-Universal adhesive/crazy glue, to strengthen the bonds between wefts and clips, to finish off the edges, or as a shortcut to sewing
* (If you are a really hardcore DIY-er, very cheap, have limited access to colors/textures, or are just a masochist, you can save money by buying loose/bulk/'ponytail' hair and making your own wefts. While you can do this by hand, It doesn't have any benefit, unless you're trying to while away a prison sentence, so this is only a really good option if you have a sewing machine. It's still a very time-consuming and frustrating process, but do-able. There are several variations on the best way to do this, some using paper, some using tulle - searching 'sewing your own wefts' should turn up some helpful tutorials for the patient among you.)
Step 2: Choosing the Hair


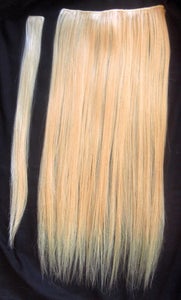
As you can see in the first picture, the hair comes on a long weft, and is very thin. You'll want to double and/or triple it up before wearing.
(I got mine at Rafina's, which I would recommend, if you're in Holland...)
Make sure the synthetic hair matches your natural color as closely as possible, since you can't dye synthetic hair. Ditto the texture: if you buy stick-straight hair, be prepared to flat-iron your own, or it'll look silly, since you can't curl extensions. If you buy wavy hair, be prepared to curl your own a bit to match.
When choosing length, measure from about the middle of your ear down, since that's where the lowest piece will fall. The ones pictured are 22", which is really long, especially for straight hair (curly extensions hang shorter than straight ones of the same measurement). The store I went to didn't have an awful lot of variety in my color, though, so it was a choice between that or 14", which was too short for the effect i wanted. 18-20" is pretty long, regardless. If you're in doubt, err on the side of too long, since you can always trim the extensions (and because you'll need to trim them a bit after they're made, to blend into your hair, so you'll lose length then).
You can also check your hair color at a local beauty supply store, then order off ebay to save money, since the shade #'s are standardized (I'm using a blend of T27/613, as you can see on the tag).
Step 3: Measure and Make the Pieces


You can mess around and figure out what works best for you and your hair type, but a typical set of clip-ins would include 4 wide back pieces and 4-6 small side pieces.
To custom-fit your extensions, measure your hair along the back, first just above the nape, then about an inch above, then from about 1/2 inch behind one ear to the other, and the last about an inch above that. Cut the hair from the weft in those lengths, and double or triple them - if you are adding length, but not volume, you may want to just double them, and vice versa. I have short, fine hair, so I triple most of mine. This means I take 3 identical pieces and layer them one on top of the other (facing the same way - this is very important if you choose hair with any curl!), then sew them together along the weft at the top (a whipstitch works well). Some people glue the wefts together, but I would still add a few stitches at the ends and middle if you choose to do that.
This is where a sewing machine comes in handy - it cuts way down on time. Because the weft lines are so thick, it's really difficult to sew them directly on top of each other (you can't really pin them, and they keep slipping off, even with basting). I lay them down next to one another, sewed the first two together, and then the third to that. I used an invisible polyester thread and a medium zig-zag stitch, to keep them even.
When you're done, you should have 4 wide back pieces, and 4-6 smaller strands of hair for the sides. I alternated between 2 weft and 3 weft thicknesses for variety, so I have 2 thicker back pieces and 3 thicker side pieces.
(Note: in the wide hair piece pic, there are two different types of wig clips pictured: the two on each end match, while the center one is slightly different. This doesn't matter, as long as the color matches, and the size is appropriate.)
Step 4: Attach the Clips

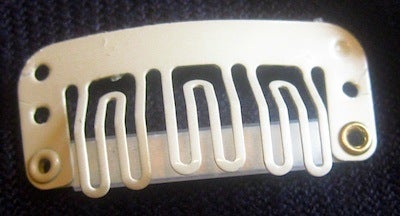
Get wig clips from a beauty supply store or online (two types are pictured), and hand sew them to the top of the pieces, with matching or invisible thread. I used a light yellow thread on mine, rather than the invisible thread I used to machine-sew the wefts, since it was easier to work with.
As pictured, wig clips have combs that slide into your hair and come in a rounded shape to fit against your head. They snap shut by pressing down on the sides and open by pressing the center and pulling up on the sides.. Make sure you practice opening and closing them - both so that it'll be easier when you actually clip in the extensions, and so that you're certain you're sewing them right side out. It's pretty common to sew the wrong side on and end up having to redo them, the first time you try this.
All the wide back pieces should have 3 clips (one at each end, and one in the center), and the small side pieces should have one clip each. If you decide to make some of your own mid-size pieces (2-3 inches or so) to fill gaps, they should have 2 clips, one at either end. Don't be stingy with the clips. If you don't use enough, the hair will be loose, and you'll end up having to stick bobby pins all over the place, which will look and feel weird.
(Note: some sites recommend just glueing the clips in place, or using only 2 clips for the shorter back pieces. I don't think it's worth the time you save to have your hair come loose at an inopportune time, so I'd really urge you to spend the extra time sewing on all the clips!)
Step 5: Preparing to Insert the Pieces

To insert them, you'll need:
- A rat-tail comb, to section hair (and tease, if desired)
- 1-2 bobby pins, to secure bottom hair
- Clips to lift sectioned hair out of the way
- At least 2 mirrors, angled to let you see the back of your head
- A soft brush, to blend the layers after letting them down.
Depending on your hair texture, you may want to start with clean hair that has some product in it (e.g., mousse or hairspray), to help the clips grip better. Remember that the extensions will be covered by your own hair, so make sure you note where your part is going to be, and don't put any of the clips more than 1/2 behind your hairline around the face.
Step 6: Attaching the Back Pieces


Starting at the bottom of your hair, section off about 1 inch.
-If you have short hair, take about half of that and roll it into a teensy little bun and secure that with a single bobby pin. This tiny step keeps short hair from poking out at the sides, and making the long extensions look obvious.
If you have fine or slippery hair, you can backcomb it a little to provide a stronger anchor for the pieces.
Start by attaching the bottom piece - this should be a thicker piece (at least 2 layers thick), but not the widest. Insert the center comb into the middle of the hair that you've already pulled down and press to snap shut. Pull the sides along your head and do the same, making sure they're attached securely and flat against your head (play with them and re-insert as necessary, until it feels secure and even).
Using the tip of the rat-tail comb, move up just a bit, section off another horizontal strip about 3/4 - 1 inch wide, and pull it down (again, you can tease it a bit if you like). Insert the second to bottom piece here, ensuring that the combs are all placed snugly and lay flat against your head.
Repeat this for the next two pieces, making sure to stop before you get too high to camouflage the highest piece with your real hair.
(Yes, I know how obvious the fake hair looks in the pic, but I assure you it's a function of the flash and my own hair being pulled forward - it actually blends really well.)
Step 7: Attaching the Sides

You should now unclip your natural hair and pull it down over the back clips. You should have lovely, thick, long hair in back, and short or thin hair on the sides.
If you part on the side, use the comb to section the hair 1/4 inch from your hairline forward, then insert two of the clips on the narrow side of your part. If you have different sizes for the side clips, the wider one should be paced lower and slightly back, and the smaller one as high to your hairline as you can safely get away with.
Flip your hair to the other side and clip in place, then follow the same steps as above. After, pull your hair back down and see where the side looks empty. Add your last two combs there (for me, this is very much toward the center, to blend into my side-swept bangs).
Make sure all the clips are snug! Feel free to take them out and re-adjust them until they feel secure. Then run a soft brush through all the layers. Your hair should look relatively natural (if implausible, depending on length and cut).
(Note: once you have an arrangement you like, you may want to mark the inside of the clips, so you don't have to hold them up and check each time you insert them - just look if it's #1 or #3 and insert. This goes double after you cut them.)
Step 8: Styling the Extensions

Unless you're going for a contrasting color or dramatic scene look, you're going to want to make sure your extensions look as realistic as possible. If you picked a good color, the difference won't be very obvious - the main giveaways are seeing the clips poking out near the crown of your head, and seeing a very distinct 'break' between the length of your real hair and the extensions.
In the first case, you need to ensure you have enough hair to comb over the clips near the top and blend. If your hair is thin, or you're worried about it staying in place, you can tease it a bit and add hairspray. Another thing that helps is to clip it in back, in a sort of half-up/half-down style, which camouflages the break between lengths, as well as keeping the hair in place.
In the latter case (and longer term), you're going to want to layer your extensions. If possible, have an actual stylist do this for you. If that's not in the cards, you can cut a few layers in it yourself, to keep the difference from looking as obvious. The easiest way to do this is to slide a plain shaving razor lightly downward along the sides, starting just below your natural hair length, and moving downward an inch or so. Be careful not to take too much off with any stroke, and go slowly, using 2-3 mirrors to check your progress. You'll definitely want to trim a bit around the bottom, so you don't have any big choppy strands hanging down, and to make the cut a little more natural looking.
Tip: wavy hair is easier to blend than straight.
Step 9: Caring for Your Clip-Ins

You're not going to want to wash them with your natural hair, but remove and gently swirl them in a mixture of mild shampoo and water, then rinse. You should use a spray conditioner on them, then lay them on a towel and leave them to dry on their own - no wringing or blow drying. You also shouldn't comb them when wet - they'll automatically snap back into shape as they dry, and you can comb them then. And you should - don't let them get knotted up.
Store them somewhere safe, where they won't get tangled, and trim the ends if they start to get crispy (heat can make the fiber get curly/kinky/frizzy at the ends).
You *can* sleep in them, but I wouldn't suggest it - it's not as comfortable, and it'll subject them to unnecessary heat and possible tangling.
You can use a blowdryer on a no or very low heat setting, if you're in a hurry, but I'd avoid it, if possible. Definitely no heat styling tools, like curlers or flat-irons.
(If you want to change straight hair to curly or vice versa, you can try the boiling water method. I have never done this, so cannot vouch for it at all, but it looks worth a try. Here's a link to one instructional video: http://tinyurl.com/boilingwigstyle )
Step 10: [Quick and Dirty] Styling
![[Quick and Dirty] Styling](https://content.instructables.com/F35/BF1A/GMIG0M18/F35BF1AGMIG0M18.jpg?auto=webp&fit=bounds&frame=1auto=webp&frame=1&height=300)
In a perfect world, after making the extensions, you would trim them to blend in perfectly with your own hair, and style them to ensure all the clips are well-covered. If you don't have the time to fiddle with your extensions or make sure the tracks are covered, but still feel like having extra length, however, you can just stick them in and cover the crown of your head with a headband or scarf. If the bottom looks uneven or ill-blended, you can pull it into a loose, low bun, or half-ponytail (a ponytail that you don't pull all the way through on the last pass, so it's doubled over), which will give a nice, artfully messy look.


