

Introduction: DIY Electric Skateboard - How To


Have you ever got tired of walking? Yeah, it's lame =) That's why I made this self propelling platform aka. electric Skateboard. Did you heard about Boosted Board with a range of 7 miles and a top speed of 28mph? So I made my own version of that using some RC car parts. It's basically an RC car that moves you around. Check out the video first.
Step 1: Making the Deck


I made the deck of the skateboard out of a 1/2" birch plywood. It's extremely solid and looks awesome. There are no particular recommendations for size or shape. I made mine to my own taste, making sure that the box that holds all the electronic components will be completely covered under the board.
I've used my scroll saw to shape the ends of the board adding some finishing touches with a file. Then I've rounded the edges with a router.
After marking the center line of the board I've align the trucks and drilled the mounting holes for them.
All it was left is to apply few layers of spray laquer and a grip tape.
Step 2: Building Parts
I made this skateboard using a combination of parts from BangGood and Amazon.
Parts:
Batterie - https://goo.gl/w8b588
Motor - https://goo.gl/sT2Tem
Motor Bracket - https://goo.gl/aDa5Pu
Remote - https://goo.gl/aDa5Pu
Motor Controller 120A ESC - https://goo.gl/aDa5Pu
Grip Tape - https://goo.gl/aDa5Pu
Tracks - https://goo.gl/aDa5Pu
Wheels - https://goo.gl/aDa5Pu
Bearrings - https://goo.gl/aDa5Pu
Step 3: Electronics


The electronics part of this build is basically the same as a simple RC car.
Batteries, ESC, receiver, and a motor connected together.
I have changed the connector type on my ESC from Deans to XT60 to feat my battery.
To make everything nice and pretty I've modeled and printed custom motor connectors for my aluminum electronics enclosure. (3D Model attached here).
Attachments

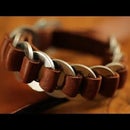
Step 4: Wheel Base Assembly.


The most challenging part of the build is the wheel assembly. Connecting that belt gear to the wheel.
I recommend using drillpress to drill through the wheel and then drill with a handheld drill to expand the holes. The best way to align the gear on the wheel is to use one of the skateboard bearings slightly pushed out of the wheel. The gear hole has the same diameter as the bearing, so everything will be centered.
When the wheels are done, it's time to attach the motor brackets to the track. In my case, the track has to be modified to fit the bracket. So I file it down with a file for a proper fit.
Then I've mounted everything together.
Quick tip: Make sure there is enough space between motors and the deck for the proper truck flex at the turn.
Step 5: Assembling Everything Together


This step is self-explanatory. Then I got all my electronics tested and all the hardware assembled, I've mounted everything on the deck.
Step 6: Enjoy the Ride!


And here it is. My own version of Boosted Board with no programming and minimum soldering. It has it's own flaws. I'll try to come up with a battery management charging solution in version two. But now I'm to busy enjoying my new ride =)
Step 7: Don't Forget to Check Out the Video.
And subscribe to my Youtube Channel for more cool projects like this.

Participated in the
Wheels Contest 2017

Participated in the
Epilog Challenge 9

Participated in the
Remote Control Contest 2017


