

Introduction: DIY Exhaust Repairs and Maintenance


When an exhaust flange goes bad (Picture #2) it is often most expedient to just change it, if you can. Most of the time it is not so straight forward as you have to disassemble the pipes, causing a lot of additional work, expense, and sometimes damage to other components.
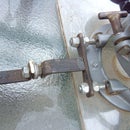
The lead picture above, shows a typical Chrysler manifold pipe flange that had rusted away and needed replacing. Everything else was OK, so it made sense to just change the flange and not disturb the pipe.. In order to do that the new flange was split in half with a hack saw for easy assembly. But before that happened, a length of pipe (two pieces) was drilled 3/8" and then brazed to either side of the new flange. If you look carefully you'll see the cut line through the flange, pipe and the brazing. The two halves were then positioned around the pipe and 3/8" bolts were installed through the halves to bring it back to its original shape. It is ready to now install, and bolt up to the manifold.
The third picture shows a similar exhaust flange split using 3/8" nuts, to put it back together.
If you look carefully at that first picture you'll see the outer ear of the flange LHS has broken away. This sometimes happens when the bolts are left undisturbed for many years then twisted loose. In this case a washer under the bolt head gives it enough grip to be able to adequately secure the new flange. But, I have had examples where there has not been enough "meat" left on the flange ear to hold the bolt straight.and secure it. There is a solution for this , without going to the expense of changing the manifold (or attempting a weld repair) as you would be faced with if you took it to a garage.
Here is the DIY solution.....refer to the drawing, picture #4. That is a length of 3/8 X 1" flat bar. I chose that because it works and I have lots on hand, as you'll see from my other Instructables ( Grinder Rests ). I would suggest you make a cardboard template to see where it is best to drill and bend your flat stock into a horse shoe shape so that it will sit on top of the manifold flange and keep the bolts from wandering. Even if both manifold ears have broken away, this horse shoe will keep the bolts in line. I showed drilling the flat stock and notching it in four places to aid in the ease of bending. Placing it in a vise will let you bend it into the horse shoe shape with a hammer and with out heat. If you use thinner stock you may need to weld up the notches to give it rigidity. Your cardboard template will assist in the layout of the notches.
When this done it is a matter of slipping the new flange bolts through the horse shoe, through the manifold flange and the new pipe flange. Install nuts and tighten and you are done.
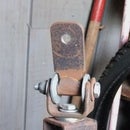
If you are unfortunate not to have through manifold bolts and have instead studs that have broken off, you can attempt to drill them or take the easy way out, as pictured in shot #4. The trade name of them is Exhaust Manifold, Clamp-A-Stud and are a Napa item.
https://www.napaonline.com/en/p/BK_7336501
I have not used these but reports say they are OK.
Step 1: Modify Your System for Easier Maintenance.


All my vehicles are long term and I perform all the exhaust work in my driveway.
In the first picture you can see how all the components are flanged in place. This might seem like over kill but it really pays off when you need to quickly repair one item like a pipe, converter, or a muffler. When you use SS bolts a muffler can be dropped in five minutes damage free.
Picture #2 shows the fittings that I have made up at a muffler shop. I use mostly 2 1/4" pipes and the flanges are Walker Exhaust Flange (#31861)
Picture #3 shows a typical custom pipe.
Step 2: Pipe Repair Kit, Etc.


My road trip tool kit includes the exhaust pipe repair kit shown in picture #1. It is pipe sections split in half, muffler clamps and muffler cement (AKA stove cement). If you experience a blow hole or break in an exhaust pipe these half shells will allow a roadside repair. Examples are shown in the two other pictures. Three overlapping shells work the best to give a good seal, and in these two cases are a permanent no weld repair. Forget the bean cans, they are temporary at best.
If your muffler blows a hole in the body, you can install a sheet metal wrap and hold it in place with a couple of straps made from that steel strapping that often comes on shipping crates. Double over the ends and drill for bolts to secure the straps and sheet metal wrap. A cordless drill will help if this ends up as a road side repair.


