

Introduction: DIY Low Cost Spectrometer


Being a final-year undergraduate student majoring in physics, I believe that labs and practical experiments are just as important as the theory when it comes to subjects like physics. Lab sessions and experiments provide tangible results which often help clarify the concepts much more effectively than a lecture. However, due to the global pandemic, we have not had a lab session for over a year now.
Most experiments, especially in the final year of an undergraduate physics course require complex, intricate, and highly expensive instruments and equipment. However, in our course, the spectroscope experiments caught my eye and I decided to build a low-cost version using materials that are available in every household.
I am also interested in the field of computer science so I decided to make a digital version of a spectrometer using a webcam, and create a program to analyze the results.
Follow on to create your own DIY Low-Cost Spectrometer and do drop a favorite and follow this page if you enjoyed the project and decide to build your own version. I would love to see your own versions so do post your creations using the "I made it" section.
Step 1: Overview of the Theory of Spectrophotometry

The concept of spectroscopy is generally elaborated in undergraduate-level physics courses, however, here is a brief explanation about the theory behind spectroscopy and the spectrometer.
A spectrometer is a clever instrument used to measure the properties of light. This allows scientists to use this instrument for a vast number of experiments such as determining the materials found in objects used in day-to-day life or determining the elements found on distant stars and planets.
The basic concept of a spectrometer is that an "unknown" beam of light is flashed onto an optical element that splits the beam of light based on the wavelengths present in the "unknown" beam of light. Each wavelength is deviated a different amount, therefore by measuring the deviation, one can determine the wavelengths present in the "unknown" beam of light, which could potentially provide more information about the source of the beam of light, even if it originated millions of kilometers away.
In earlier times, scientists used prisms to split the beam of light into its components, and a pivoting eyepiece to measure the angular deviation of each wavelength component. However, more recently, the prism is replaced by a diffraction grating that serves the same purpose as the prism, and the eyepiece is replaced by an electronic photoreceptor array that is connected to a computer.
Step 2: Materials Needed


Here is a list of all the components and parts required to make your very own Low-Cost Spectrometer. All parts should be commonly available and easy to find and you may already have them lying around in your home.
Materials:
- Cardboard
- Black chart paper
- Old DVD disk
- Razorblades
- Webcam
- Glue
- Tape
The total cost of the project excluding the webcam is less than 5$.
Step 3: Building the Enclosure Pieces


The enclosure could have been made using any kind of box but I decided to create one from scratch to make it the perfect size for the webcam that I was using. Begin by taking the measurements of the webcam:
- Height
- Width
- Height of lens
Build a box according to the following measurements:
- Length - 20 to 25 cms
- Width - 2 cm larger than the width of the webcam
- Height - 1 cm taller than the height of the webcam
Trace the 6 faces of the box according to the dimensions onto a piece of cardboard and use a knife to cut the pieces out. On the rear face make a slot through which you can pass the webcam's cable and on the front face make a 2cm x 1cm slot in the middle at the height of the camera lens.
Stick all the faces onto a piece of black chart paper using glue and cut the paper along the boundaries of the cardboard pieces.
Note: It may be useful to mark the faces using a pencil to avoid any confusion.
Step 4: Assembling the Enclosure


Grab the bottom face and the two side faces and place them side by side. Use tape to join the three pieces together. Next, attach the front and rear faces using more tape by making sure that the orientations of the faces are maintained.
The top face is attached along a single edge so that we can open the enclosure using the top face like a hinged lid in case we need to make any adjustments later. To prevent any light from entering through the top, cut some more pieces of cardboard to make a slight overlap.
Peek into the enclosure through one of the slots and make sure that no light gets into the box. An extra layer of electrical tape or any kind of non-transparent tape can be used to cover up small gaps.
Step 5: Making the Entrance Slit

To make the entrance slit, tape one of the razorblades vertically to cover up a portion of the gap on the front face. Tape the second razor blade next to the first one by using a single sheet of paper to create a thin gap between the two blades. Tape the second blade and use electrical tape to cover any gaps to prevent any light from getting into the enclosure.
Step 6: Making the Diffraction Grating


This step is the most crucial part of the project. The diffraction grating is responsible for splitting the beam of light according to the wavelength. One option would be to buy a diffraction grating directly. These are usually available online for about 4 to 5$. The other option is to use an old DVD disk for the diffraction grating. Both provide similar results.
Begin by cutting into the disk using a pair of scissors. As you cut deeper into the disk, you will notice that the disk consists of two layers that will begin to split apart. Split the two layers completely and discard the half that consists of the silver coating.
Cut a quarter piece out of the second half and square the edges to form a small rectangle that is a little bigger than the width of the lens.
Next, use some glue to stick this piece onto the lens. Make sure to use temporary glue so that you can remove the diffraction grating in case you want to reuse the webcam.
Note: One crucial step for your spectrometer to work is that the concentric grooves along the disk are lined up such that they are vertical, that is, they need to be parallel to the slit. If they are not parallel to the slit, the diffraction will not take place.
Step 7: Mounting the Camera


Once the diffraction grating is stuck to the webcam, pass the cable through the enclosure using the rear slot and place the webcam towards the rear of the enclosure at a 30-degree angle with respect to the front face, and aligned with the slit in the front. Before sticking the webcam in place, connect the webcam to a computer and open the camera app. Point the spectrometer towards a source of light and adjust the position of the webcam till the diffraction spectrum is positioned in the center of the image.
At this point, you can stick the webcam to the bottom face using double-sided tape.
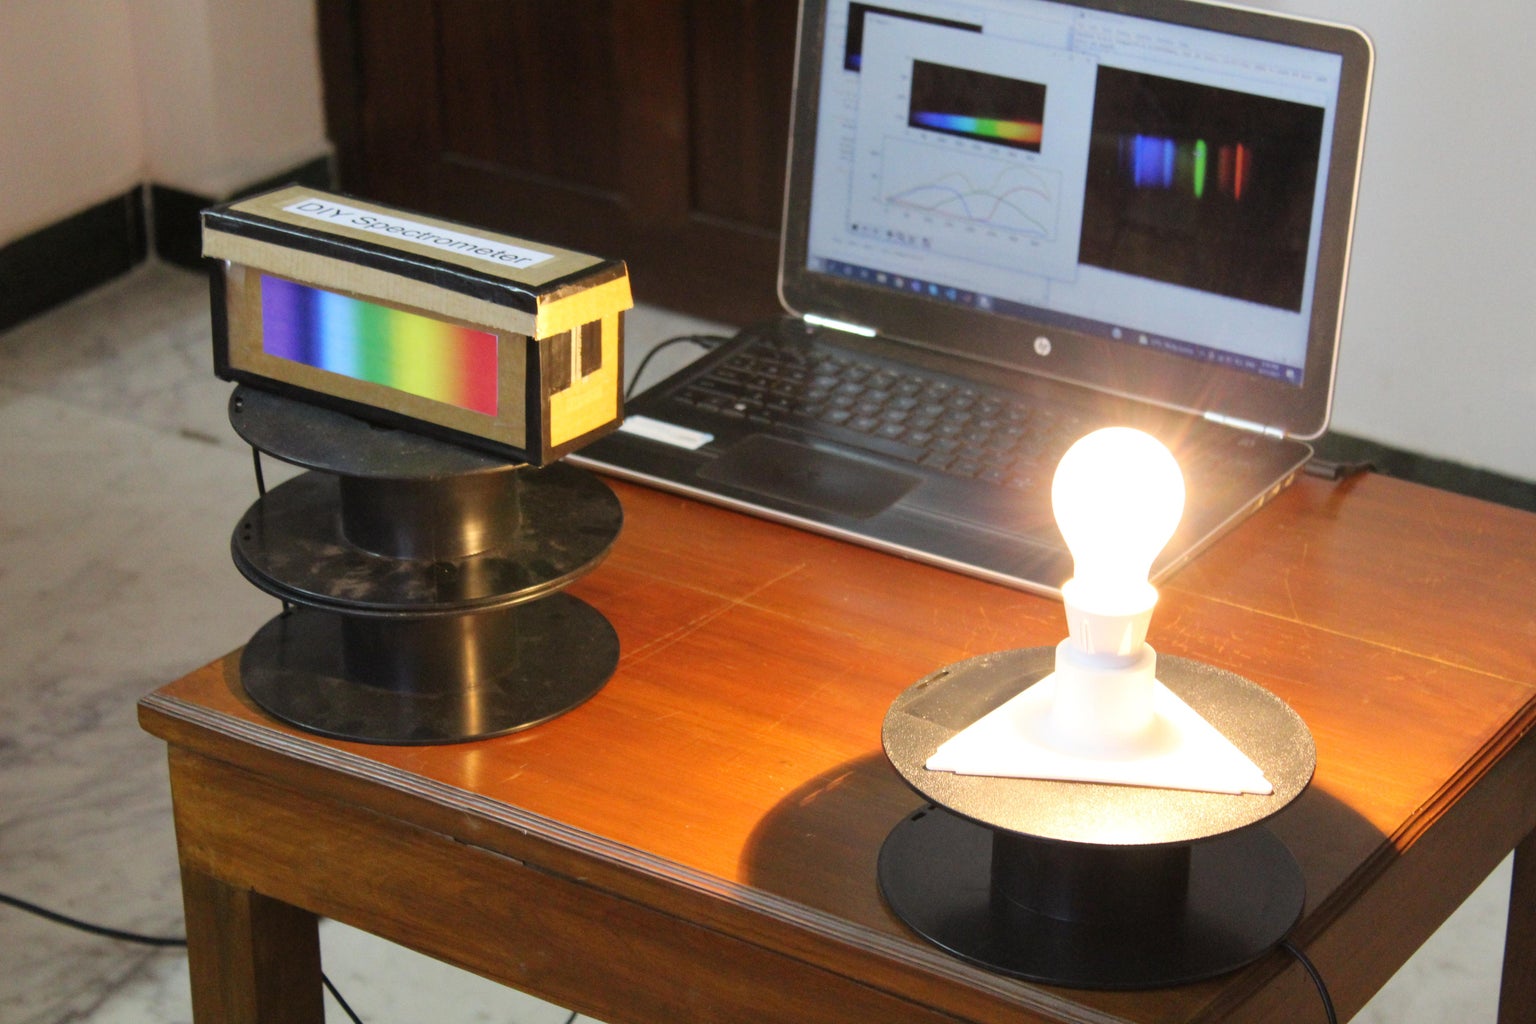
Step 8: Testing


To test if your spectrometer works correctly, point it at a source of light and adjust the height of the light source and spectrometer till both are aligned. You can use a pile of books or something else to adjust the vertical alignment, I decided to use some old 3D printer filament rolls.
Connect the webcam to a computer and open a camera app. The image should consist of a neat diffraction spectrum.
You can further decorate and label the spectrometer using printouts.
Step 9: Using the Analyzer Software


Simply having a picture of the spectrum may not provide much information, so I designed a program in Python to plot the intensity of light. This will provide the relative distance between "peaks" which can be further used to determine the wavelengths present in the source of light.
To run the program you will need to install Python on your computer along with a few additional open-source libraries. Python can be downloaded using the following link https://www.python.org/.
The additional libraries can be downloaded and installed using pip through the terminal. The libraries along with the terminal commands are provided below:
- Opencv - pip install opencv-contrib-python
- Numpy - pip instal numpy
- Matplotlib - pip install matplotlib
Once all the libraries are installed, you can clone the spectrum analyzer program from the following GitHub repo: https://github.com/kousheekc/DIY-Spectrometer-Analyser
Run the program and you should see the webcam feed. Point the webcam to a source of light and press the "r" button on your keyboard to capture the region of interest of the feed. Click and drag your mouse over the spectrum and press enter. Once the region of interest is selected, press the "s" button to capture a frame and analyze the intensity using a graph visualization. You can use the "q" button to quit the program.
Step 10: Final Results


Once you have tested the spectrometer and the software program, you can begin your experiments. You can point your spectrometer at various sources of light such as CFL bulbs, neon lights, incandescent bulbs, or even smart color-changing LED bulbs. You can also step outside and point the spectrometer into a clear portion of the sky and explore the results.
To measure the wavelengths of a certain light source you can begin with a source of light with a known wavelength such as a laser and determine a relation between the position of the peaks and the wavelength.
There are various other fun experiments that you can try such as detecting and measuring sodium in table salt and detecting chlorophyll in olive oil. With this low-cost spectrometer, you can perform various simple and interesting experiments right from your house.
Hope you enjoyed this Instructable and it has inspired you to build your own DIY Low-Cost Spectrometer. This was originally targeted towards undergrad physics students who are unable to conduct practical experiments and labs due to the pandemic, though the process is simple for anyone to follow without the need for a formal physics background. I would love to see your very own versions of the spectrometer so do post them and the results using the "I made it" section. Apart from that, feedback, questions, comment, concerns can be addressed in the comment section below.
Happy Making!

Grand Prize in the
Explore Science Challenge


