

Introduction: DIY Mid Century Modern Computer Desk With Reclaimed Wood


At the beginning of the pandemic, like many of us, I purchased the first “under $50 IKEA desk" I could find off of Craigslist. It was sad, small, and more fit for a child's drawing table than my everyday "home office" work desk. After nearly a year of dealing with it, I decided I was done with not being able write in my notebook and have my keyboard on the table at the same time.
I needed space! And the awkward setup of our office meant I needed something custom. So I decided to jump into my first woodworking project to create a DIY mid-century modern computer desk! Because of that I wanted it to be:
- Simple: something I could build without months of practice
- Affordable(-ish): I was willing to invest in tools to do it right and that I could use for years, but I didn't want to spend $500 on walnut lumber just to mess it up
- Stylish: I wanted it to look like a professional put it together. Or...at least be nice enough that it could pass as something you'd see in a store.
So, let me take you through the journey of upgrading from 2x4 DIY projects to building a Mid Century Modern computer desk with reclaimed wood!
Note for Readers: I am approaching this instructable from the perspective of someone's first woodworking project. Apologizes for the extra details, but if I help one person learn something important I consider it a success. So feel free to skip to the details that matter to you!
Step 1: Tools + Supplies
I am going to assume that you are starting this project off from scratch with no tools at your disposal. If you have already done a couple DIY projects, you probably have half of these already in your house:
- Table saw (a circular saw could work but I wouldn't recommend it)
- 40T+ Saw Blades
- Chisels
- Drill
- Orbital Sander
- Combination Square
- Long (3-4') Level
- Angle Finder
- 2-4 sets of pipe clamps
- 36-48" 1/2" pipe for said clamps
- 2-4 12-24" hand clamps (bar clamps or one hand
- 1 ratchet clamp
- Lumber (1x3/1x4/1x6's; 4x4's; 5/16" Dowels)
- 1 sheet of MDF (Medium-density fibreboard)
- 16oz+ of Wood Glue (Titebond II)
- Sandpaper
- Hardware to attach top to base
- Varnish (Lacquer, Shellac, Polyurethane, etc.)
Optional
- Wood Stain
- Epoxy
- Router
- Planer (depending on the condition of your wood)
- Belt Sander (speeds things up but is overkill)
- Dowel Centers
Quick $ tip! You don't always have to buy new/brand name! I got a old craftsman table saw off Craigslist for $175, my clamps from Harbor Freight, and borrowed a router/belt sander from my friend. Some cities even have tool libraries!
What I don't recommend is getting your power tools or chisels super cheap. I tried cheap harbor freight versions and noticed a WORLD of difference when I shelled out the liiittle extra money for the chisels I listed. Any power tool I linked is one that I personally use, and -with the exception of my new planer- one I have used for years with great results.
Step 2: My Beautiful (and Arduous) First Mistake


So remember how I said I wanted something stylish and I also didn't want to spend $100's on lumber? Well, step in Craigslist ad and my...enthusiasm for the antique. To make a long story short, I found some free redwood fence posts from the 1800's! This is original old-growth material, cut from trees that were hundreds or thousands of years old!
Because they were riddled with nails, fence staples, etc, no lumber mill would touch them. Since 99.9% of you (even if you are dealing with reclaimed wood) are NOT going to have to deal with this, I will leave the process of converting them into lumber out. In short, it involved setting up a jig, clamping the posts down and running them through the table saw. It took 20-30 hours to cut all the posts, hence why I will never do it again.
But! The wood was gorgeous as you can see from this photo later on!
If for some reason you are one of the .1% of people that is working from uncut wood, happy to exchange tips/tricks: algwoodwork@gmail.com
Step 3: Your (Reclaimed) Wood

As someone who gets impatient reading steps like these (show me the plans already!) I will be short.
If you are wondering where to find cheap lumber, you can search a number of different ways. Craigslist, OfferUp, or even your local Habitat for Humanity will probably have more than enough! Just make sure that you are aware of any potential hazards (nails, lead paint, etc.) when purchasing.
Of course, you could also just purchase some pine at your local hardware store and be done with it!
The last thing I will say is make sure to inspect your wood to make sure it is not cupped, bowed, twisted, or crooked. If you have to choose one of these defects, go with crooked as that (in my experience) is the easiest to correct with limited tools.
Step 4: Designing the Table


I drew my inspiration from several different sources. Notably a mid century modern table that the Wood Whisperer YouTube channel built. They had a lot more tools and did a lot more fancy things than I could afford to do though, so I ended up having to translate their idea into something more simple.
Enter Tinkercad! (Insert plug for another Autodesk platform ironically?) Tinkercad is meant for educators and student to get used to 3D printing I believe, but their rectangles are great for planning simple tables. As you can see with the table side apron/non-tapered legs though, their limited selection of shapes mean that its not a perfect tool. Regardless, it allowed for me to get a visual and some preliminary ideas for the measurements for my pieces!
My dimensions ended up as follows:
- Tabletop:
- 25" Wide x 60" L x .75" thick
- Aprons:
- Side Aprons: 49" L
- End Aprons: 17" (including 1/2" tenon on either side)
- Legs:
- 27 3/4" tall
- Slight Taper = 2" at bottom, 3" at top
If you want to "tinker" around with my original Tinkercad mockup, you can click this link.
Tip! Want to make the desk perfect for your height like I did? Look here!
Step 5: Prepping Wood for the Desktop


Unless you are spending +$250 on either a butcher block or live edge slab, you are going to need to assemble and glue your own! The first step in this (unless you shell out the $$$ to buy it finished) is to make your lumber what's called "S4S." What does it stand for? I don't know. But it just means that all four side of your piece of wood are flat with sharp 90 degree angles.
Why is this important? Because if you glue the wood you got from the normal lumber yard or some reclaimed wood you scavenged, at minimum the corners will be rounded. At worst, they have one of the defects listed above. If you don't make the sides flat, your table won't be flat! Plus it's less surface area for the glue to bond to. And finally, you'll get lots of food crumbs in all those crevices!
So, if you have straight wood, all you need to do it run it through your table saw and trim a 1/16"-1/8" off the sides to make them flat (roughly where that dotted line is). If you want to make the top/bottom's super flat too, you could build a jointer jig like I did, but I think lots of sanding could accomplish the same effect as well. We mainly want the sides flush so the gluing is tight. Cause look at the gap difference from the redwood vs the pine! #shocked
Step 6: Gluing the Desktop


Ok, you trimmed your lumber and you feel like a boss because now you know what S4S is. Let's glue!
This part is simple, particularly if you have boards that are long enough for the entire length of your table.
- Just prep your pipe clamps (alternating placing them under/over),
- Line up your boards (again, alternating the "U's" of the end grain)
- Place glue down the sides
- Clamp! (Just "common sense tight" as my grandpa used to say)
Note, if you were like me and didn't have boards long enough, two additional points:
- No need to glue the "butt ends.” They simply soak up the glue and as long as they all don't line up, you should be structurally sound.
- Because they don't run the full length, you can't do the under/over method
Lastly, some of you may be wondering about biscuits/dowels/pocket screws. After conducting hours and hours of research, I found many experts state that your glue will be stronger than your wood. Apply it liberally, scrape off the excess, and you'll be good.
Step 7: Optional: Fill Any Nail Holes/knots/cracks


This step may or may not apply to you depending on the state of the wood you acquired. 200 years out in the weather meant that my wood had lots of...character. Which is why I got it in the first place! But it meant that I had a lot of fill work to do.
You can choose a variety of ways to approach this. If you are trying to hide the defects, sand a portion of your tabletop down and then mix the sawdust with some wood glue until you have a paste. Push that into the holes then sand. I on the other hand wanted to preserve these marks, and after a test run with a cheap 5-minute tube, chose a clear epoxy instead.
Since I had a lot of holes, I wanted it to look professional. I also needed something I could work with for more than 5 minutes. So I chose Total Boat's Crystal Clear Epoxy Kit. The quart kit was more than enough for the whole table and the slow hardener allowed me 20+ minutes to dab it all around the table. Plus the resin/hardener have pre-calibrated pumps, so no measuring for you or me! You can easily add dye to the mix to tint it whatever color you want! I kept it clear.
Since epoxy takes 24 hours to cure and you might need to do 1-3 passes to fully fill holes (the wood soaks some of it up somewhere). I wanted to place this step here so you can start while finishing the other parts of the table.
Important Note! Freshly mixed epoxy is almost water like in its consistency. Make sure to place masking tape under/around any cracks/holes you are filling so it doesn't leak out. Here's a quick video if you want to go this direction.
Step 8: Making the Legs


Dose legs doh...But in all seriousness, this is the part of this table that I think helps set it apart from most basic DIY desks or tables! While I initially wanted to have some extreme angles/tapers on the legs, I decided to go conservative so I could minimize any stress on the joints.
For the taper and angle, I first made a model with a piece of MDF. I simply measured my 2" increasing to 3" and then cut. For the angle, you use your angle finder, draw your cut off, then cut the top/bottom's.
But since I didn't have one at the time, I use my miter gauge on my table saw. Adjusting it to 5 degrees, I lined up the corner with my template and made cross cuts. It wasn't a perfect 5 degrees, but since I am using the template for all the legs the error is canceled out.
Step 9: Making the Aprons


I will cover the fancy jointery stuff in the next step, but I technically there's a half step in between.
Table aprons are essentially just long boards, so cut them either to the dimensions I listed or measure the inside distance of your legs and add 1" for the end aprons.
What you might have realized is that because your legs are angled, you will need to angle the cut of your apron. Simply take one of your legs (I have my MDF template in the photo), place it on a flat surface and copy the angle onto your angle finder. Trace that onto the apron and cut.
Step 10: Joints N' Stuff: Mortise & Tenon


I went with two types of joints for my table. Mortise and tenon for the end aprons, and simple dowels for the side aprons. Cuz’ heck if I know how to make an angled mortise and tenon, that's too much math for me.
Mortise & Tenon
While you obviously could do everything by hand, I didn't trust myself to do much with my chisels other than clean up. I utilized a drill and my table saw to make the mortise and tenon's respectively.
For the mortise, it's simple:
- Drill out some of the main material of the mortise
- Clean up the rest by hand with a chisel
Here's a video with a drill press (same idea) if you want to see it in action.
For the tenon:
- Measure and mark the areas you want to trim off
- Optional: install dado blades (just makes it faster, I didn't have them though)
- Raise your table saw blade just under your cut off point
- Make a test pass and adjust
- Trim and adjust for all four sides.
Again, more visual learner? Here's another demonstration.
Step 11: Joints N' Stuff: Dowels

Dowel Joints
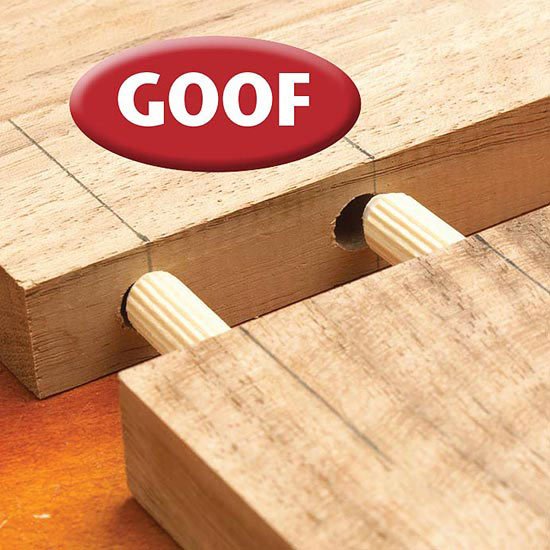
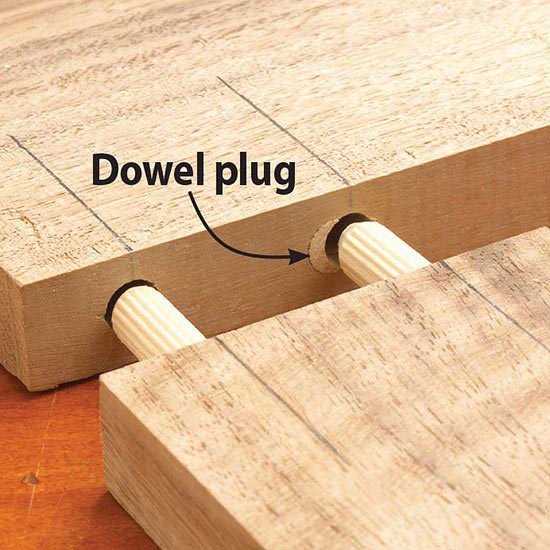
I mentioned how this is my first woodworking project. And outside of an ugly shoe rack and some garden beds, I’ve never made furniture before right? Well, after measuring 27 times and finally drilling holes, my dowels were not lining up.
I fixed it by plugging it with a dowel, cutting it flush, and re-drilling new holes (like this). But learn from my mistake and spend $8 at your local woodworking shop on "dowel centers!" This isn't required but would've save me so much headache during this step. It saved me a LOT of headache when I attached the tabletop. Essentially they will mark the wood so you know precisely where to drill.
Other than the measuring, dowel joints are straight forward.
- Measure and drill
- Dry fit test
- Adjust if necessary (hopefully not)
Step 12: Assemble the Base

So, you cut your joints, tested them out without glue. Now it's time to assemble! Since I lack a flat floor in my garage, I took this step indoors. I glued my base in two parts, end aprons, then side aprons. I was also adjusting the holes because my dowels were misaligned though, so you could do it all at once.
- Basically line up your pieces
- Line up your ratchet band clamp loosely around the legs
- Glue
- Clamp!
Note: I unfortunately don't have a photo of the base with the ratchet clamp, but I think you can get the idea. Just put the stoppers on the corners and tighten.
Step 13: Sanding

With the base assembled, your epoxy should be well dried. Sand down the top with 80, 150, then 220 grit. If you want your epoxy to look super smooth, spot sand it with 320, 600, then 1500 grit.
Repeat for the base as needed.
Step 14: Attaching Base to Top


There are many ways to attached your top to your base. If you want to know all your options, this comprehensive article served me well.
Since I already got this far without any screws or hardware, I decided to go with more dowels. That way I could be even more flashy when I said I made this without and nails or screws! I altered the plans you see in the article by only drilling halfway. I was using cheap pine dowels and I definitely didn't want those to show through!
If you want to follow my method:
- Drill holes in the eight spots circled
- Insert your dowels (with the dowel centers)
- Lower, align, and then mark your top with the centers (helps to have a buddy for this)
- Drill out the marks
- Glue!
- Clamp (if you can, I didn't have clamps with deep enough mouths)
Step 15: Protectant

Once again, there are many ways you can protect your wood. I have used polyurethanes in the past, but sometimes even the matte ones look like a layer of plastic. So this time I tried lacquer! I was really pleased with the results. On a sunny warm day, coats dried within 20-40 minutes (as opposed to hours) and it doesn't require sanding in between! Just one quick 220 grit before your last coat. So, give it a consideration for your next project.
Note: If you decide to stain your wood, do so before applying a protectant! If it is pine or a softwood, you might want to do a layer of wood conditioner to reduce blotchy-ness. I wanted to keep the natural color of the redwood, so I did not apply stain. Onwards!
Step 16: You're Done!


And with that, you are done!
Hopefully you now have a great looking table to impress your friends!
I hope you enjoyed my first ever Instructable! And thanks to instructables.com for inspiration/guidance with this project and others. Also for hosting the 1st time author contest to give me the kick-in-the-pants to submit this!
For me, now I am off to build something to replace my cardboard box monitor stand...

Participated in the
First Time Author Contest


