

Introduction: Light Therapy for Less Than $60.00


Near Infrared (IR) Light Emitting Array for Body Detox and Light Therapy
This NIFTY device is good for all kinds of stuff as well as looking COOL! (would go great on the wall above the couch in a hipster loft!)
I decided to post this for winter because we all need a little sun when the sky is gray.
It is well proven that humans and animals respond to certain frequencies of light. S.A.D. is a seasonal type of depression common near the holidays. But Light Therapy is a proven way to counteract this effect by simulating a warm, sunny day. (Makes you smile just thinking about it). And there is much positive research in NEAR INFRA RED.
Its what baby animals are put under when they are born. Its safe, and feels natural. It can't give you a "sun burn" either!
So with that in mind I posed these instructions so anyone can benefit from
Light Therapy which you can use to drive away the "winter blues". And you won't have to spend much money or time figuring out this very simple project.
As soon as you turn it on and bath in the red-orange light you will feel better.
But that's not all!
This project is equally as valid for another reason altogether and can be used all year long as a powerful way of Detoxifying the Body.
This array when placed in a small room like a bathroom or small closet functions as a real SAUNA!
Certain wavelengths of light have "special effects" Near infra red wont heat the air in the room like a traditional sauna, but it will PENETRATE your flesh and provide a calming warming effect.
The light waves go below the suffice of the skin, heating from the inside out.
There are many more benefits of this type of SAUNA over traditional steam saunas, as it is safer and is more effective for detoxing the body!
You may want to add a FIR space heater in the room too raise the air temperature and decrease pre-heating times. The recommended effective temperature range is in the mid 90s to just over 100 degrees F to induce sweating. If you are heating the room that much take care, and remember that SAUNA should not be taken for more then a half hour. And some one else should be at home, who will know to come get you if you are in for too long. You will want to keep a timer and rotate every 5 min. This both keeps the mind and body alert as well as keeps the heat evenly distributed on the body.
Now that you have an idea about how this NILE (Near Infrared Light Emitting) Array works...
Let's Build One!''
Luckily this project is very easy to do. I believe that if you follow the instructions closely and visit all the links in this Instructable, that even some one completely unfamiliar with electrical projects can accomplish this.
And best of all, not expensive either!
Step 1: Supplies:


This is what I payed. Some stuff you can defiantly get cheaper!
Lamp Cable:15 feet = 5.00
Lamp Sockets @ $1.50: X4 = $6.00
Heat Lamps @ $11.00: X4 = $44.00
Plug-End: 1 = 2.20
Wire-Nuts (marretts): One Bag = 2.00
"Recycled" palette from work (could use plywood) = FREE
I layed out the fixtures in a diamond shape, eye balling it, and drew pencil outlines of the placement.
I figured out the center-points by drawing a cross through them.
I used a 1-inch "Flat wood bit". When I drilled the holes in the wood, with my trusty RYOBI drill (cheap!) from Home Despot. .
Step 2: Simple Construction:


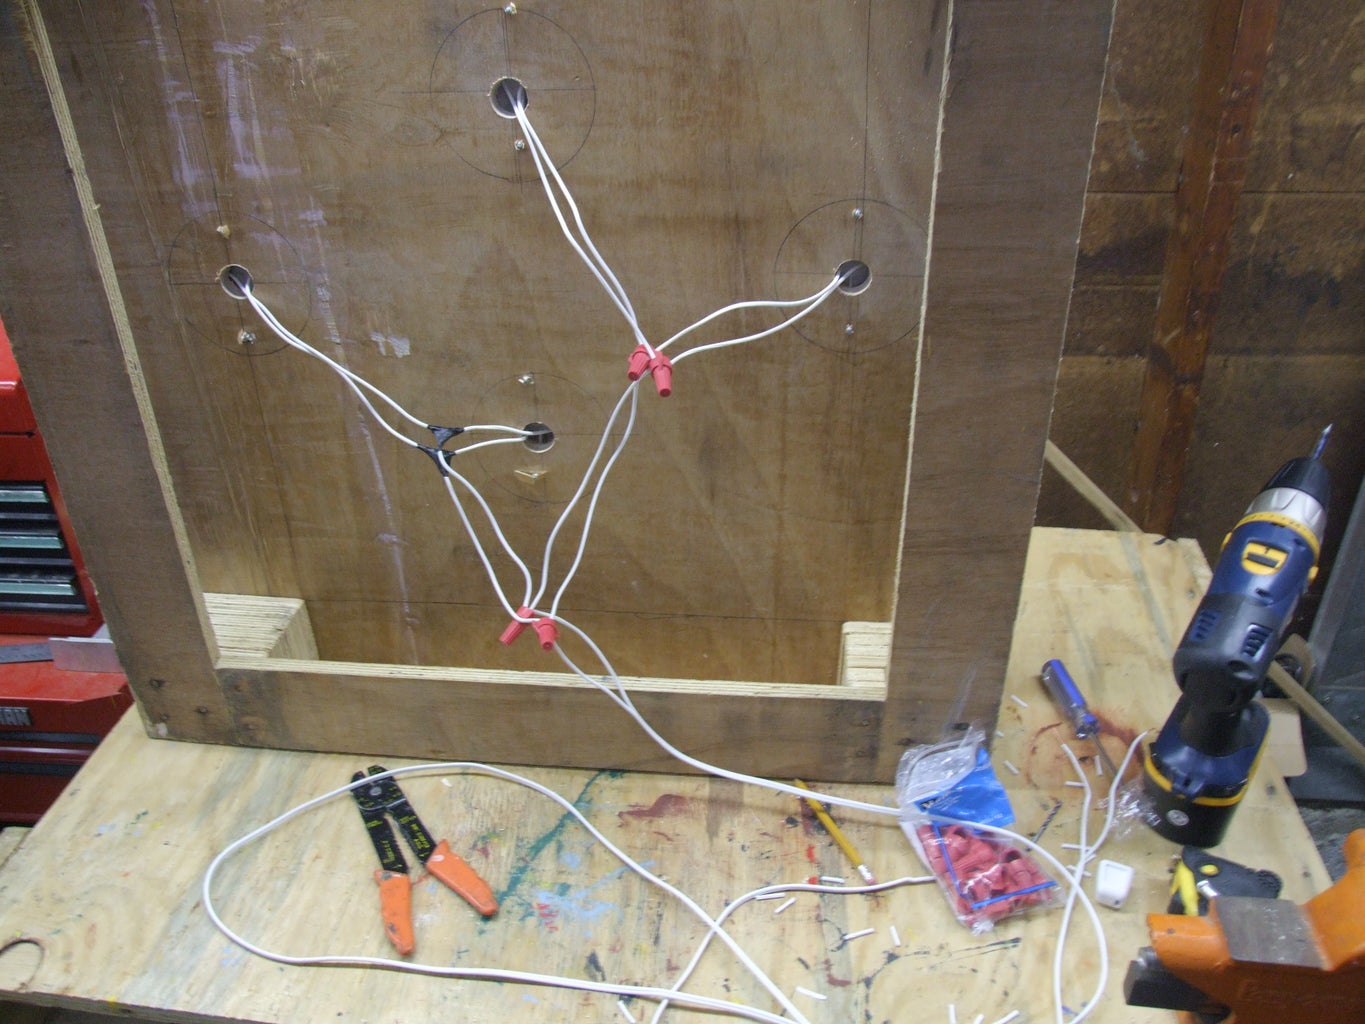

After drilling the holes, attach about a foot of lamp wire to the screws on the back the the fixtures. Remember to attach the ribbed or silver wire to the silver screws.
IMPORTANT:
You have to notice something, one side of your wire will be the ribbed or "silver side". The screws on the fixture will show this pattern as well, and the instructions on the plug-end will mention this too. It is very important to be consistent when you are wiring this. Always wire the silver/ribbed/right wires consistent because it will all come together at the end.
Feed the wire through the hole you drilled and use the supplied screws to attach the fixture from the front. You will probably want to drill some pilot holes (see image notes).
Now is the time where you will connect all the "smooth" wires to one point and all the "ribbed/silver" to another point. Then you will connect these points to the wires going to the plug. If one light goes out the rest will still work because the circuit is in "parallel".
Step 3: Yep, Yer Finnished!


That's about it!
To keep the cables from getting pulled I drilled a medium sized hole in the wood, and tied a knot in the piece of wire that would end up being "the power cord". Before attaching the plug end, I tied a knot on the other end too. This keeps the length of the power cord consistent.
Now, just attach the plug end as per the instructions on the box. "Ribbed/silver" side on the right, and then you pinch it closed.
TESTING:
I tested the outlets with a potentially dangerous CFL light bulb by screwing it into each one-by-one and they all checked out, functional.
So that's it. The rest of the pictures are the Infra red array in action! I hope this benefits the people that need it most!
enjoy!


