

Introduction: DIY Vanity Unit- IKEA Base


A quick guide on how to build a stylish yet inexpensive vanity unit for your Bathroom. Only basic skills required! Total cost was approx $200 not including the basins and tapware.
Step 1: What You'll Need
What You'll need
- Bench top- for this one we used a timber benchtop from ikea as one in their range came is almost the exact size as the vanity we wanted to build. Alternatives can be any slab of timber or you can make your own bench using lengths of timber
- Cabinets below the bench- Again ikea came in handy, using 2 of the FULLEN wash-basin cabinets
- Tapware- to suit your taste
- Timber sealer
- Wall brackets and wall anchors
Step 2: Benchtop

We won't cover too much on measuring the benchtop and working out your heights as this is going to be entirely personal and based on the size of your bathroom. Having the bench sitting about 100mm higher then the cabinets, give it the 'floating' look with we think looks great. Although don't make this gap too big otherwise you will be able to see the pipework too easily.
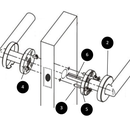
Firstly you need to make your cuts in the bench. For a duel sink vanity you'll need 2 holes for the mixer taps, 2 for the basin plumbing and likely several more smaller ones for the basin if it is fixed with hooks to the bench. As you can see below the wing nuts are hooks which for this basin attach to the bottom of the basin and go through the bench through a small hole. here you can also see the holes for the taps to the left and basin drains.
If the timber is solid as in this case, cutting the holes can be tricky. For the tap holes, the correct size hole saw attachment for your drill will work perfectly.
The hole for the basin needs to be larger then the ones for the taps, as it's not just big enough for the drain pipe but also big enough for the screw connection so it can be screwed onto the bottom of the basin. If you can't find a hole saw attachment big enough, drill a small hole and use a jigsaw to cut it out. Or use a hole saw and make several holes. It won't matter too much if the holes are a little messy as you will never see this. Next you need to seal the timber benchtop. Depending on the final look you want, either use a sealer or stain and sealer. Here we used a fairly standard oil based interior stain and sealer.Ensure you seal around and in all the tap and pipework holes in case water makes it way in there.
Step 3: Fix to Wall

Next fix the bench to the wall. For this metal brackets will be used. 3 were used for this bench although a longer vanity top will require more. They need to be high quality and study as the final weigh of the bench with taps and basins will be very heavy. Also remember with the brackets that as there is a cabinet going under the bench, the brackets with the diagonal bracing will not work, unless you want to modify your cabinets at the back.
Measure the locations perfectly ensure they sit in the best possible spot under the bench to not interfere with the pipework or taps coming through the bench. Where possible fix these brackets to the studs, again, due to the weight of the bench. IN a new bathroom if there is not a stud in the correct location, consider putting one in, in the correct location or timber between 2 studs to fix to. I would strongly recommend against using plasterboard anchors or similar as they will not hold the weight.
Step 4: Install Basins and Plumbing


Install the basins and taps. You can fit these in place and position through the holes. Arrange your plumber to then connect up all the pipework for the mixer taps and basin. Before doing this, fit the cabinets beneath the bench so the plumber knows where to run the pipework and they can cut all the holes in the cabinets.
One final thing to remember is to ensure whatever cabinet you use, ensure you have 'legs' on the bottom as per the attached image so water doesn't damage the bottom of the cabinet, particularly if it is made of laminate.
Now you're done !


