

Introduction: Diy Free Style F7 Quadcopter


Hello friends for a long time i wants to build a free style quadcopter and i am a huge fan of fpv and also beginner too.
so lets start i tried my best, this instructables is all about the construction and assemblies. This is a 5" free style quad running on Betaflight i tried to keep the cost a low as possible so this is the 1st part, later when i will post part 2 of my videos series i will also edit this instructables and add steps like betaflight and fpv camera configurations
Supplies


The list of all the components for this build is--
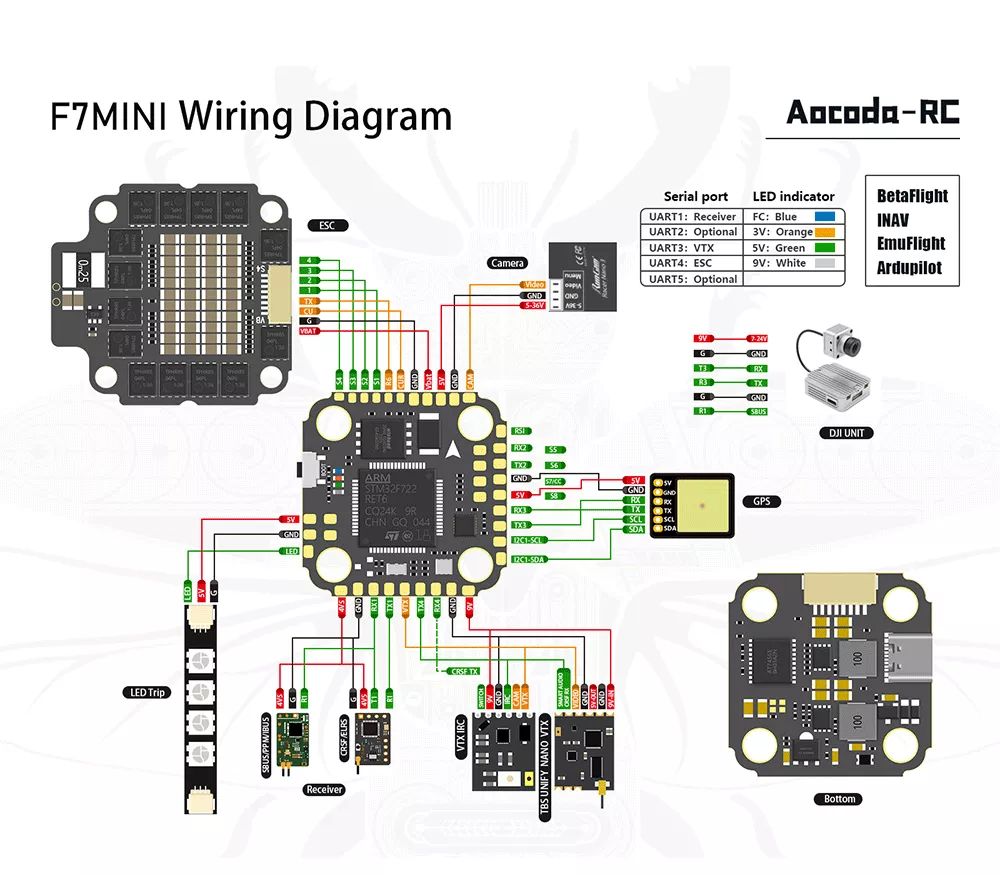
- The flight controller so i went with AOCODA F7 RC stack with BLHELI_S ese 20*20 stack
- BLDC motors ready to sky 'RS20505'
- Ready to sky QAV250 5" carbon fiber frame
- Flysky fsi6 transmitter and receiver ( not a good option i prefer ExpressLRS but it is expensive )
- Orange 2500mAh 3s LIPO battery
Step 1: Step 1 the Frame Assemblies


These frames come with assemblies manuals as shown in picture
- first place the arms on to the top plate and place the back plate and insert the screws the key point is dont tight all the screws as same time.
- insert and tight 2 screws diagonally on each 4 arms
- after securing all four arms all remaining screws
- when bottom plate is secured screw the spacers on to the top plate
Step 2: Mounting the Motors


lets mount the motors
- The motors i am using comes with ccw and cw rotations markings so these should be mounted as betaflight configurator diagram which i attached for the referance
- secure the motors on the frame key point is to tight the motor mounting screws diagonally for balance fit
- mount all four motors as per diagram
- well no issue if you are using some other bldc motors you can mount them in any random order the direction of motors can also be changed in betaflight configurator later on. but the motors i am using have the marking of cw and ccw mark on them so i went this this approach.
- i also soldered some long wires because the original motor wires were short.
Step 3: Flight Controller and Receiver


After mounting the motors its time to mount the flight controller. stack come with plastic screws and spacers so i mounted the ese on the the frame first then soldered the motor wires on the ese key point always use flux and tin the new copper pads first before soldering the wires.
- solder all the 12 wires on to the ese polarity dose not matter the right direction can be later changed in betaflight configurator
- i also soldered Deans-T connector on ese or a xt60 it depends on your choice.
- install the cable connector come with stack on both ese and flight controller.
- i also soldered the receiver as per diagram provided with manufacturer.
- after everything make sure that nothing touches the frame because the fact that carbon fiber is conductive.
- wiring diagram is attached for reference.
- i mounted receiver on the frame with the help of zip ties
Attachments
Step 4: Final


now the final step is to screw the top plate with the spacers and propellers in right orientation and it is good to go.
- well not yet completed two steps are still remaining
- first is to configure the drone in betaflight configurator and secount is to add a fpv camers which i will be sharing in my next instructables.
- i also mounted the battery with zip ties which i later replaced with proper battery strap.
- test flight video is attached and if you like my efforts please hit the like button.
- thank you


![Tim's Mechanical Spider Leg [LU9685-20CU]](https://content.instructables.com/FFB/5R4I/LVKZ6G6R/FFB5R4ILVKZ6G6R.png?auto=webp&crop=1.2%3A1&frame=1&width=306)


