

Introduction: Empower: the Aquatic 3-D Printed Prosthetic


Welcome to Empower: The prosthetic extension to the Raptor-Reloaded! This hand has been designed to be used for athletic swimming (i.e. swimming laps), and fits directly onto "Raptor Reloaded's" forearm gauntlet. This extension has been designed for free-style swimming.
Step 1: Concept


The idea came about when we looked through the many variations on 3-D printed prosthetic hands and couldn’t find one which someone could use for swimming (our favorite sport). I looked around and could only find very expensive prosthesis, so we decided to fill the need for a low-cost alternative.
The idea of the design is that it should be easy to make, effective in free-style swimming and should be aesthetically pleasing. Therefore we used the gauntlet from Raptor Reloaded to make it easily accessible.
Step 2: Process of Design


Design UNO (RED):
This was a mere concept design to see if the 3-D modeling could be achieved and how printing would affect the final model.
The main problem that we encountered with this part was that simply printing two of the same part and expecting them to fit together was just not smart. We learned a lot from this print.
We learned about the importance of the mirror function as a result.
Design DOS (GRAY):
This was the first model which began to use the geometry from “Raptor Reloaded’s” gauntlet.
(Everything from this point on was sized to be 152.3% scaled up to fit one of the designer’s hand; during design the final model has been sized back to 100%)
We had initially envisioned using an animal as the concept design and thus we used a geometric artwork of a deer as the initial outline of the design.
Although not as hydrodynamically effective as a single-pointed prosthetic, the aesthetics were much more pleasing, so we decided to stick with this look.
After designing the outline, we decided against etching the design, as this could be done individually after production to suit the wearer’s preference.
The problem with this prosthesis was that it was all one solid piece, so it has to be printed standing up, on a large non-commercial 3-D printer.
The printing striations caused easy breaks due to the layered nature of 3-D printing.
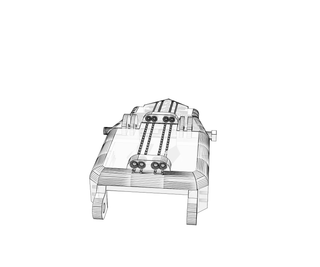
Design TRES (GREEN):
This model tackled the largest problem of DOS, printing the piece in a normal commercial 3-D printer. Tackling this problem allowed the prosthetic to be much more accessible to individuals using household printers, as well as offered the important advantage of strengthening the structure.
Henceforth we split up the large piece into two pieces: ALPHA and BETA
ALPHA is the square portion where the prosthesis makes direct contact with the user’s hand.
BETA is the hydrodynamically designed portion which first breaks the water during the free-style stroke.
These two portions fit together by a pin, sized to be able to work much like the pins in the Raptor Reloaded.
In fact, we made sure that the pins from the Raptor Hand and Empower are interchangeable!
In order to better optimize the hydrodynamics of the design, the bottom portion of BETA was redesigned.
A Christmas tree design was added to channel water away from the user’s hand. This allows for fewer forces from the water to be placed directly on the hand of the user.
The problem we found was that there was nothing maintaining Beta’s position relative to the gauntlet. When it was being used, BETA would flop around the pin, and wouldn’t stay in the swimming position.
Design Final:
This model addresses all other problems by having the same features as TRES by including tensioner wires. This included small holes near the tip of BETA, small tensioner holders on ALPHA and BETA and small semi-circular stoppers.
The small holes near the tip of BETA were designed to secure the new tensioning wires.
The tensioner holders on ALPHA and BETA were designed to maintain tensioner position through the turbulent movements of swimming
Small semi-circular components were added to make sure that BETA didn’t flop under the strain of the tensioner wires.
Step 3: Materials


Materials
Raptor-Reloaded Materials Kit
http://shop3duniverse.com/collections/3d-printabl...
Clear Coat
*Make sure it has acetone in it
http://www.amazon.com/Krylon-Colormaster-Crystal-...
Finished Raptor Reloaded Gauntlet
The instructions to create this can be found:
https://www.instructables.com/id/Assembly-of-e-NAB...
An extra file from Raptor Reloaded
“raptor_reloaded_with_pin_cap.stl”
Step 4: Printing and Files


The files are attached, and work on the same scaling mechanism as Raptor Reloaded.
The files should be printed on their shortest sides
*We saw this to prevent most printing error
*Do not print standing up! This will make the prosthesis structurally unsound due to the rastering nature of 3-D printing.
Print in ABS preferred
PLA works fine, but it will degrade in water after continued use
Print in 35% infill with at least 2 shells, but 3 is preferred


Step 5: Clear Coat/Waterproofing [Optional]
![Clear Coat/Waterproofing [Optional]](https://content.instructables.com/F4D/2KZO/ILTOAHUD/F4D2KZOILTOAHUD.jpg?auto=webp&fit=bounds&frame=1auto=webp&frame=1&height=300)
With a clear coat go over each piece individually 5 or more times.
The acetone will slightly melt the outside of each piece to reduce any small gaps which may introduce water.
The clear coat will give it a nice water-proof seal.
Another option which has not been tested is to give all of the pieces an acetone bath.
Step 6: Insert Pin


Put ALPHA’s projection into BETA’s insert, and run the pin through it
Secure the end of the pin “raptor_reloaded_with_pin_cap.stl”
Now fit in alpha’s two projections into the Raptor Hand’s Gauntlet protrusions
Insert raptor_reloaded_wirst_pin.stl and secure with raptor_reloaded_wrist_pin_cap.stl
Step 7: Pad and Velcro Placement


We are going to be using the medical padding and Velcro from the Raptor Hand’s Material Kit
Here you’re going to have to size out the dimensions of where you want padding.
We sized the main portions of prosthetic/ hand contact and put padding.
Use the small screws provided to secure the padding
It is important to secure the padding with screws because after a few uses the water will wash the original padding glue out.
Make sure to place the screws away from where the hand will be placed.
Around the corners is preferred.
Velcro will fit into the holes on the sides of the ALPHA, much like they do in the gauntlet.
You can put Velcro above the padding in order to have more flexibility in moving Velcro, or under the padding for it to be more secure with screws.
Step 8: Wiring


To begin with, cut a length of stretchy wire the length of BETA.
Then run this through the holes near the tip of BETA, and make a slipknot
Run the wire through the protrusion on the top of both BETA and ALPHA, and secure them to the tensioning pins in Raptor Reloaded’s gauntlet
It is very important that they are as taught as possible.
Again you can use a slipknot to secure them to the gauntlet’s pins
Note: It is not necessary to run stretchy wires through all of the holes, and to attach them.
The team noted that the prosthetic works best with 2 or 3 pin connection, depending on how taught your connections are.
Step 9: Try It Out!


This is the most important part. There are many things which can be improved.
This is designed to be a base for others to build off of so please try it out, optimize it, or redesign it to fit your needs, and most of all SHARE IT!
If you have any questions, or would like the models for you to work with, just message us through my instructables messages!
Step 10: Credits

E-nabling the Future: for creating the platform which I could build off of.
Without them, this could not be possible, so please visit their website and contribute :) http://enablingthefuture.org/
Dr. William Lee
My thesis advisor, and a wonderful collaborator
Dr. Stephanie Carey
My thesis chair, which made sure I took into account the importance of product testing into the mix.
Gus Bora and Luis Huertas
Their shenanigans and input helped the prosthetic become what it is now.
Carmen Rosado
She would literally (not figuratively) kill me if I don't mention her, and I love her.


