

Introduction: ESP32 TCPIP Server - CSharp Windows Forms TCPIP Client
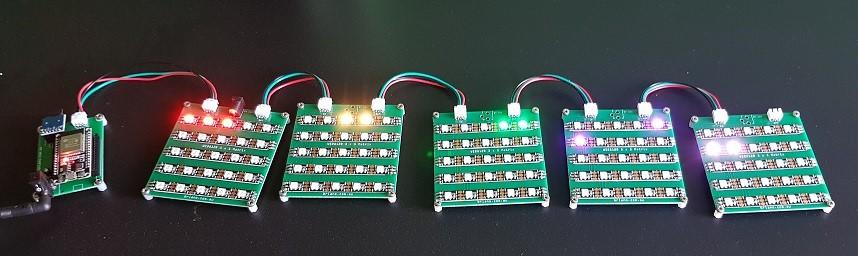


This is a project in several parts. Most of these parts (if not all) will be covered in this instructable. For the most part, I wanted to create a matrix of WS2812B programmable LED that I could use to indicate information to my role playing gamers. The information is, simply, whose turn is it and the player characters "Conditions". The LED matrix would be connected to an ESP32 microcontroller, that will have the job of turning the individual lights on and setting the colour of the individual lights.
There would be five of these matrixes, each of these matrixes would have 25 LED. So, to control each LED individually would require 125 control elements.
I wandered down a number of paths to find the most appropriate way of controlling the matrix remotely ... ASYNC Web Server, Python, Physical switches ... etc. The path that seemed to me to be the most practical was using TCPIP to send and receive the instructions. Of course, I looked around on the internet and didn't find anything that matched, or even approximated, my requirements ... so, of course, I thought "Hey, I can do this".
The 4 main parts of this project were:
- Build a 5 x 5 WS2812B Matrix, preferably one that can daisy chain to another WS2812B Matrix;
- Build an ESP32 carrier board that can take a 5V DC connection and send that 5V DC connection on to a WS2812B matrix;
- Write a sketch to enable the ESP32 to act as a TCPIP server and do something with an inbound instruction;
- Write a c# Windows Forms Application that can act as a TCPIP client and build and send an outbound instruction.
The goal is to embed the hardware into a gaming table (oh … hey … another project), so that, as the Game Master, I can launch the Windows Forms Application on my laptop and send a bunch of instructions to the ESP32 (embedded in the table).
I also figured that the project needed to be dynamic enough that it would work with multiple role playing game systems and multiple running games. So I needed to be able to do some saving of state data along the way.
That's probably enough of the preamble. So ... put on your seatbelts and get ready for a rough ride!
Supplies
If you want to build this project, you are going to need a few things:
- 125 x WS2812B LED. I bought a 5m strip with 150 LED per meter.
- An ESP32
- 1 x 3v3 SPI MicroSD board
- 1 x MicroSD card (whatever size ... I use 32Gb because that's the smallest that I could find)
- 3 pin JST connectors (x 11)
- 1 x 100uF capacitor
- 1 x 220 ohm resistor
- PCB (I designed the PCB and had them made by JLCPCB)
- one for the ESP32 carrier board
- five for the WS2812B matrix board
- 1 x 2.5mm DC barrel jack
- 1 x 5V 3 AMP DC power supply
- Microsoft Visual Studio 2022 - I use the free community edition
- Arduino IDE
Of course, there are things that you can switch out. While my project uses Visual Studio and Arduino IDE, there are other options. Don't let me oppress you!
Step 1: Build an ESP32 Carrier Board

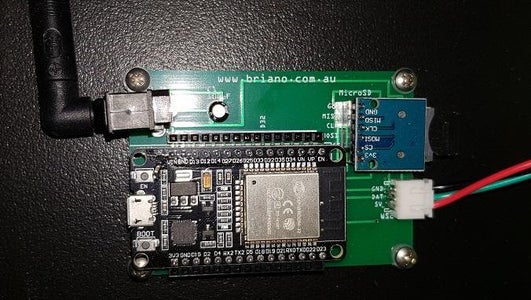
This step isn't really rocket surgery, we're building a simple - low component count - carrier board that gives us an interface between the ESP32, 5V DC power, a MicroSD card module and the WS2812B 5x5 matrix.
There really aren't very many components to this, so I will keep the description brief.
I use an ESP32 Do It Dev Kit v1.0 (32 pin) as the microprocessor. I can usually pick these up for less than $10 AUD on eBay or AliExpress.
There are 4 x 16 pin header sockets for the ESP32 ... because I like to break out the pins in case I want to use them for something else later and then this board can be used for other projects too.
The SPI MicroSD module is 3v3 and has a 6 pin header socket that it fits in to.
I like to use an SPI MicroSD module in a lot of my ESP32 builds because I use a configuration file (JSON) on the SD card to configure how my ESP32 connects to my WiFi network. I use this technique because I don't like to hard code my SSID and password into the code and this makes it easy to take my project to another network and connect it. We'll get to that later when I describe the ESP32 code.
The WS2812B connection uses a 3 pin JST connector ... I make the connection wires with a 3 pin female socket at each end ... so there's that to add in to the BOM.
The board is double sided to keep the traces as simple as possible.
Apart from that ... soldering the circuit is pretty straight forward, solder the shortest components first and check your connections using a multimeter.
The attached are etchable PDF.
Attachments
 ESP32 - WS2812B Controller - MicroSD - V3_etch_copper_bottom.pdf
- ESP32 - WS2812B Controller - MicroSD - V3_etch_copper_bottom_mirror.pdf
- ESP32 - WS2812B Controller - MicroSD - V3_etch_copper_top.pdf
- ESP32 - WS2812B Controller - MicroSD - V3_etch_copper_top_mirror.pdf
- ESP32 - WS2812B Controller - MicroSD - V3_etch_mask_bottom.pdf
- ESP32 - WS2812B Controller - MicroSD - V3_etch_mask_bottom_mirror.pdf
- ESP32 - WS2812B Controller - MicroSD - V3_etch_mask_top.pdf
- ESP32 - WS2812B Controller - MicroSD - V3_etch_mask_top_mirror.pdf
- ESP32 - WS2812B Controller - MicroSD - V3_etch_paste_mask_bottom.pdf
- ESP32 - WS2812B Controller - MicroSD - V3_etch_paste_mask_bottom_mirror.pdf
- ESP32 - WS2812B Controller - MicroSD - V3_etch_paste_mask_top.pdf
- ESP32 - WS2812B Controller - MicroSD - V3_etch_paste_mask_top_mirror.pdf
- ESP32 - WS2812B Controller - MicroSD - V3_etch_silk_bottom.pdf
- ESP32 - WS2812B Controller - MicroSD - V3_etch_silk_bottom_mirror.pdf
- ESP32 - WS2812B Controller - MicroSD - V3_etch_silk_top.pdf
- ESP32 - WS2812B Controller - MicroSD - V3_etch_silk_top_mirror.pdf

Step 2: Build a WS2812B Matrix
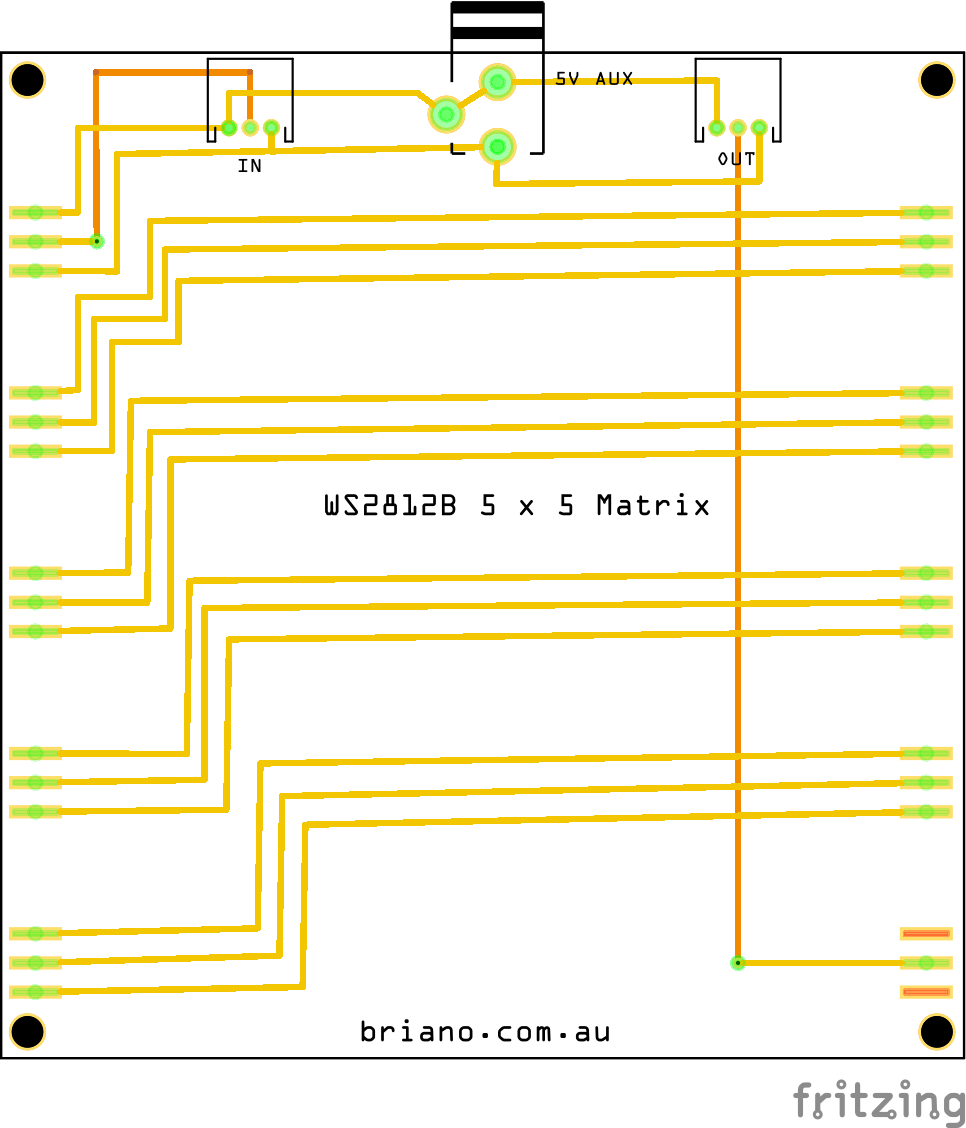

This is another low component count PCB.
This PCB has:
- 2 x 3 pin JST connectors (in and out)
- a 5V AUX input (not needed for just 125 LED in total)
- 5 x WS2812B LED strips each with 5 LED on board.
I designed the board so that the LED end up equidistant, so the spacing of the rows is equal to the spacing of the LED columns.
The biggest difficulty with soldering this board is bridging the cut edge of the 5 LED strip to the copper trace. I recommend using a fairly low soldering temperature (say around 320 degrees) so that the solder flows nicely. It was not too hard to avoid bridging between the copper traces, but hey, it CAN be difficult.
Cut your WS2812B strip where your strip says to cut! Peel off the backing and stick the strip to the PCB. I used a metal ruler to help keep the strip nice and straight so that the solder points met up with the copper trace at the other end. There are several techniques for this, but probably the easiest is to peel just a small amount off at one end, hold the strip down and pull the backing off slowly and carefully ... it is a pain to have to pull the strip up when the sticky backing has stuck.
Again, solder and test with a multimeter.
Attachments
- WS2812B 5x5 Matrix_etch_copper_bottom.pdf
- WS2812B 5x5 Matrix_etch_copper_bottom_mirror.pdf
- WS2812B 5x5 Matrix_etch_copper_top.pdf
- WS2812B 5x5 Matrix_etch_copper_top_mirror.pdf
- WS2812B 5x5 Matrix_etch_mask_bottom.pdf
- WS2812B 5x5 Matrix_etch_mask_bottom_mirror.pdf
- WS2812B 5x5 Matrix_etch_mask_top.pdf
- WS2812B 5x5 Matrix_etch_mask_top_mirror.pdf
- WS2812B 5x5 Matrix_etch_paste_mask_bottom.pdf
- WS2812B 5x5 Matrix_etch_paste_mask_bottom_mirror.pdf
- WS2812B 5x5 Matrix_etch_paste_mask_top.pdf
- WS2812B 5x5 Matrix_etch_paste_mask_top_mirror.pdf
- WS2812B 5x5 Matrix_etch_silk_bottom.pdf
- WS2812B 5x5 Matrix_etch_silk_bottom_mirror.pdf
- WS2812B 5x5 Matrix_etch_silk_top.pdf
- WS2812B 5x5 Matrix_etch_silk_top_mirror.pdf
Step 3: ESP32 As TCPIP Server
The ESP32 sketch uses a couple of contributed libraries: FastLED and ArduinoJson. I like the FastLED library for controlling the WS2812B strip because it works nicely, has fairly rich functionality and is not too big.
I am also a bit of a struct tragic ... I guess that it is a throwback to my years of programming ... sorry.
The first (and arguably most important) struct defines the Config object. This is where the JSON configuration data is stored when it is read by the "loadConfiguration" function.
The second struct defines the state data (colour and state). This is where the inbound TCPIP instruction stores it's data.
The global objects are defined in the sketch header also. One global object of note is the state[5] object. This is a 5 element array of state objects which will contain the RGB and state values for each of the 5 matrices.
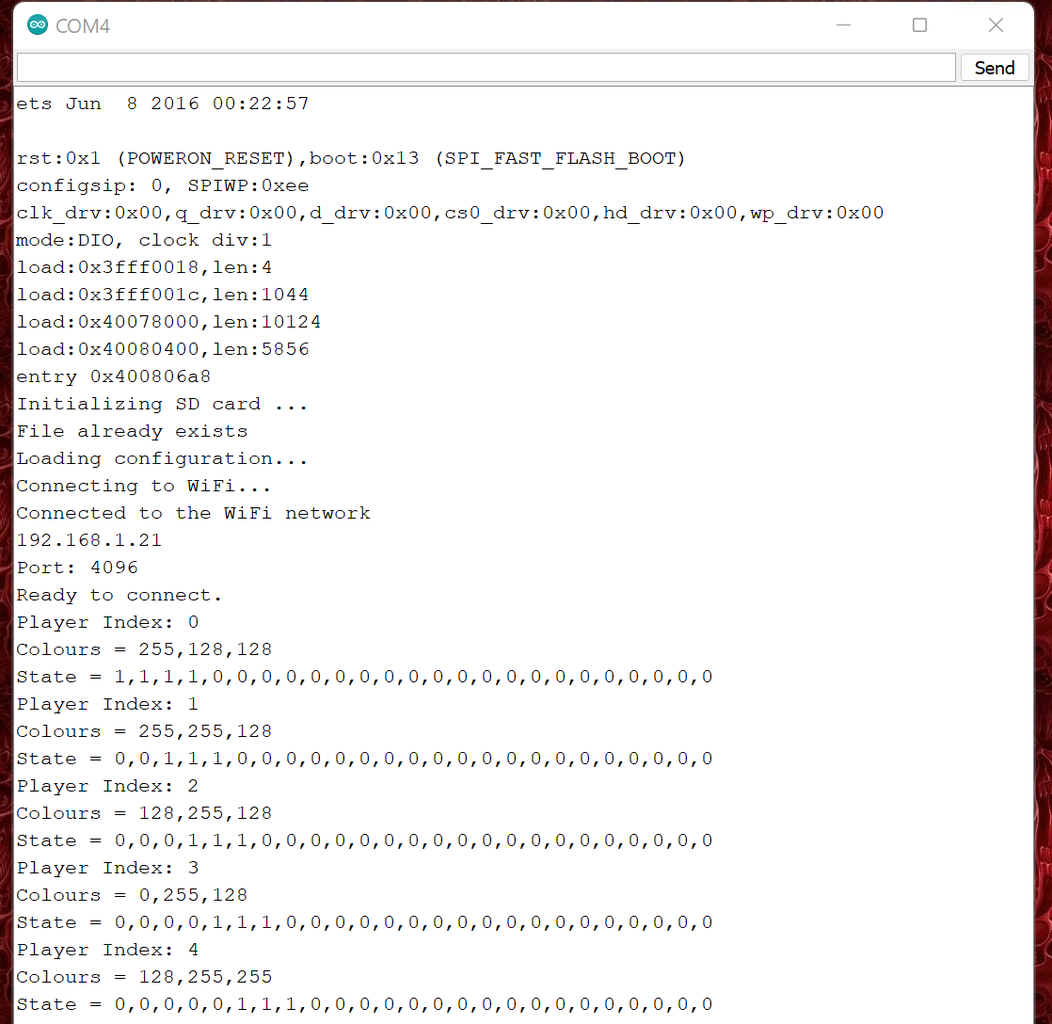
The setup function is used to instantiate the FastLED and SD libraries and to start the WiFi server listening on the configured IP Port.
The loop function waits for a client connection and passes the inbound IP message off to the parseSerial function when the inbound IP message is terminated with a new line character (\n).
void loop() {
  WiFiClient client = wifiServer.available();
  uint size=0;
  String nString;
  if (client) {
    while (client.connected()) {
      while ((size = client.available())>0) {
        char c = client.read();
        if(c != '\n'){
          nString += (String)c;
        } else {
          //echoSerial(nString);
          parseSerial(nString);
          //Serial.println(nString);
          nString = "";
          client.write("ok\n");
        }
      }
      delay(10);
    }
    client.stop();
  }
}
The loop function is where the ESP32 is acting as a TCPIP server. The setup function defined which port to listen on, while the loop function defines what to do when it hears something on it's listen port.
loadConfiguration
The loadConfiguration function opens the configuration file from the SD card and then, using the ArduinoJSON library, deserializes the data into the config object. The JSON file is constructed, thus:
{
 "SSID": "*********",
 "pass": "*********",
 "ep": "192.168.1.254",
 "port": 4096
}
Where the SSID and password are replaced with the SSID and password for connecting to your WiFi. The ep (end point) is the IP address of the ESP32 (this value is not currently used) and the port is the TCPIP listen port of the ESP32.
I have provided a saveConfiguration and printStruct function which are both used in testing.
parseSerial
The parseSerial function receives the IP message from the loop function. Here we are expecting the message to be in the form of [command]=[data].
The function will (currently) take the following commands:
C = Colour. The [data] for this command is a 4 element CSV string where the 1st element indicates which of the 5 state objects to use, while the remaining 3 values indicate Red, Green and Blue integer values (0-254).
S = State. The [data] for this command is a 26 element CSV string where the 1st is the same as for Colour, while the remaining data is a CSV string of state values (0 = off, 1 = on).
Finally, the D command is sent without defined values. This is the "Display" command.
It is expected that the Client application will send a Colour command, followed by a State command and then finally a Display command. However, it doesn't matter which order the Colour and State commands are received, so long as they are received before the Display command, everything should be good.
showData
First, the showData function writes the current state collection object values to the Serial monitor, this is used for testing and validation.
Next, we turn ALL of the LED off.
Next, the function loops through the state collection to set the RGB colour that will be used for the items state values.
Within the collection loop, the function will turn the associated LED ON if the state array value is = 1 using the RGB values.
Attachments

Step 4: CSharp TCPIP Client


Here, we are creating a C Sharp Windows Forms application that will send messages to the ESP32 TCPIP Server.
For this project, I downloaded Visual Studio 2022 Community Edition (free) from Microsoft.
I decided, early on, that I would have to create a custom control in C Sharp so that I can easily have 5 instances of a component that controls each of the 5 matrices 25 LED and set the colour for the "player".
The Windows Forms application would also need to have a class library that would be used for configuration, the RGB and State data, a collection object for 5 x instances, JSON Serialize/Deserialize and TCPIP Client functions.
Of course, there would also need to be a main window and a configuration window.
Because I play different role playing games from time to time and for each of those games, I want to be able to play different instances (campaigns) of those games, I would need to be able to save the state of each game separately. Oh, and because I am an old programmer, I want to be able to set up each instance with (potentially) different labels for the check boxes.
I'll break each of the types up into the following steps.
Step 5: C Sharp Class Library
The Class Library is a collection of common user defined objects, properties and methods that will be consumed by other parts of the application. The Namespace WS2812ModelLibrary contains 5 public classes:
- WS2812BModel - a class for the single instance of the player data (ID, Player Name, RGB Array, and State Array);
- Configuration - a class used to define the overall configuration of the application including End Point, Port, JSONFile and Option Array;
- tcpFunctions - a class used to connect to the end point, send an IP message and receive a response;
- WS2812BCollection - a class used to "collect" 5 instances of the WS2812BModel class;
- SerializeJSON - a class used to Serialize and Deserialize the WS2812BCollection to an from a JSON file.
The Class Library uses:
- System.Net.Sockets
- System.Text
- System.Text.Json
Step 6: C Sharp TcpFunctions Class
The tcpFunctions class contains the "connect" function that is used to send the message to the TCPIP Server (on the ESP32) and receive a response.
public class tcpFunctions
  {
    public static String connect(string ep, Int32 port, String message)
    {
      try
      {
        message += "\n";

        TcpClient client = new TcpClient(ep, port);
        Byte[] data = System.Text.Encoding.ASCII.GetBytes(message);

        NetworkStream stream = client.GetStream();

        stream.Write(data, 0, data.Length);

        data = new byte[256];
        String responseData = String.Empty;

        Int32 bytes = stream.Read(data, 0, data.Length);
        responseData = Encoding.ASCII.GetString(data, 0, data.Length);
        stream.Close();
        client.Close();
        return responseData;
      }
      catch (IOException e)
      {
        String responseData = String.Empty;
        responseData = e.Message;
        return responseData;
      }
      catch (SocketException e)
      {
        String responseData = String.Empty;
        responseData = e.Message;
        return responseData;
      }
      finally
      { //nothing
      }
    }
  }
The function uses a try/catch method to ensure that the connection is cleaned up properly and allows us to catch some errors, should they occur. Honestly, the catch functions could be expanded a bit. I don't have anything specifically for a network timeout. Also, the application doesn't retry on an error, so sometimes, you have to hit the "Send to ESP32" twice to have the message successfully sent. I've seen that in about 1 in 30 messages, so it isn't a big deal.
Within the connect function, I append a newline character "\n" to the message so that it is guaranteed to match what the ESP32 is expecting for an end of line marker.
We create a TcpClient connection to the End Point and Port and then turn the message into a Byte array. Next we open a NetworkStream using the TcpClient object.
We grab the response from the server and then close the stream and the client before returning the server response.
The ESP32 sends a simple "ok" message when it has finished processing the message.
If you have read the ESP32 As TCPIP Server and this section and you're thinking "is that it?" well ... the answer is ... yes, that's it. There really isn't very much to the TCPIP Server OR TCPIP Client. It's simple and elegant. The main work is in how do you create the message, how do you process the message when you get it and what do you do with the message when you've processed it. That too, dear reader, isn't very hard!
Step 7: Configuration Window


The configuration window is used to set the main application configuration options. This window sets the IP address and Port of the TCPIP Server and the 24 Option Labels.
Note, the Player Turn radio buttons are part of the main application window, so there are only 24 option labels that can be set.
The configuration can be read from an existing JSON file and written to a new (or existing) JSON file.
The JSON file ALSO contains the current player data stored in the Collection object and will be read when the JSON file is loaded.
Clicking on the OK button prompts the main window to refresh it's data from the Collection object and so all of the control labels will be updated.
Step 8: Custom C Sharp Component

The custom component is a collection of components and functions that operate on each instance of a WS2812BModel object. The component is used to get and set values from the WS2812BModel which is then pushed into the Collection object of the main windows form.
The custom component exposes all of the data collected within the component through the Collection object. There are also a number of component properties that are exposed (such as the component title).
The component has a text field for the Player Name, an RGB button that allows the user to select the colour from a ColorDialog component, and 24 check boxes.
Step 9: Main Window


The Main Interface (WS2812B Network Controller) provides the main window where the user can enter the IP address of the end point, the port, select who's turn it is and send data to the ESP32. The user can also set the player name, state values, RGB values for each of the 5 player instances.
Clicking on the "Send To ESP32" button executes the updateESP32 function.
    private void updateESP32()
    {
      for(int i = 0; i < wsc.WS2812B.Length; i++)
      {
        WS2812ModelLibrary.tcpFunctions.connect(wsc.Config.EndPoint, wsc.Config.Port, $"C={i},{wsc.WS2812B[i].getRGBAsString()}");
        WS2812ModelLibrary.tcpFunctions.connect(wsc.Config.EndPoint, wsc.Config.Port, $"S={i},{wsc.WS2812B[i].getStateAsString()}");
        WS2812ModelLibrary.tcpFunctions.connect(wsc.Config.EndPoint, wsc.Config.Port, $"D");
      }
    }
The updateESP32 function loops through the Collection and sends 3 messages per collection object (15 messages in all).
What we are doing here is interfacing with the tcpFunctions.connect method, sending it the IP address, Port and an interpolated string. One message for C (Colour) one message for S (State) and one message (D) to instruct the ESP32 to "Display" our data.
Step 10: Overall Process Flow
- Plug the ESP32 board to the 5 WS2812B boards (daisy chained) and turn the ESP32 on;
- Launch the WS2812B Windows Forms application;
- Configure the application (or load a configuration from file);
- Set the player colours and names;
- Set the condition check boxes;
- Click on the Send to ESP32 button;
- Pretty lights.
You can save the current state (if you have already loaded or saved the configuration) by clicking the Save Game State menu item, this will save the current state so that you can load it again later and resume your game where you left off. No one has to remember if their character was unconscious in a weeks time OR whose turn it was!
Step 11: C Sharp Source
I will place a link to the C Sharp Source here when I have finished tidying it up (e.g. removing a bunch of useless and commented out functions, methods, and properties that are no longer used).
So, come back later if you want to grab it. Otherwise, it isn't a particularly complex application ... have an adventure and write your own ;)

Participated in the
Microcontroller Contest


