

Introduction: Edison Bulb Pendant Light Fixture


This antique/distressed edison pendant light fixture is perfect for an industrial look and can fit into many arts and crafts style homes. These type of lights can go for $900 or more, so building it yourself can save a lot of money. The design is highly configurable as well to find your need.
The instructable will take you through the box design, finishing, wiring and hanging. Another great reference for this type of build can be found here. http://grassrootsmodern.com/blog/2011/01/06/vintag...
I ordered most of the parts from Sundialwire, but another good site would be www.1000bulbs.com.
- Wire - http://www.sundialwire.com/W182RTBKXXMNF.aspx ($1.45 per foot) | 10 ft = $14.50
- Bulbs - http://www.sundialwire.com/W182RTBKXXMNF.aspx ($9.00) | 5 = $45
- Socket - http://www.sundialwire.com/W182RTBKXXMNF.aspx ($4.75) | 5 = $23.75
Total for this project was $83.25 (I had the wood, stain, and clear coat from previous projects)
Step 1: Step 1: Design


You will want to design your light based on the space available. For me, I was putting this above the sink in the kitchen and I have about 50 inches between cabinets.
Box needs to be 3-4 inches deep (space to put wires), but length and width can be almost anything you want. I was covering a can light which was about 8 inches total. My final dimensions were 10 inches wide by 40 inches long by 4 inches deep. I spaced the 5 lights evenly across the face (about 6 and 2/3 inches apart) .
Step 2: Step 2: Building the Box

I used some leftover 1 x 6 inches x 8 ft pine boards I had laying around. You could use popular or hardwood depending on what you want it to look like. Cheap pine with a dark stain fit my needs just fine. Actually quite pleased with how good it looks.
Box construction is relatively simple.
Top
- Cut 2 pieces of 1 x 6 to 40 inches long
- Glue and clamp them together side to side to create a piece 1 x 12 x 40.
- Rip that piece once dried to 10 inches wide
- This will be your top piece
Long Sides
- Cut 2 side pieces to 40 inches long
- Rip both 3.75 inches wide (any left over length can be used for the shorter sides)
Short Sides
- Cut to 9.5 inches
- You shouldn't have to rip to 3.75 inches as you should have some left over length from the other sides.
Glue up the box
- Lay the top down flat on the table
- Apply a bead of wood glue to a side piece
- Attach to the top piece and clamp until dry. (I also used a pin nailer to secure the pieces so that I could keep moving to the next piece). Use several clamps along the length to keep the joint tight.
- Redo these steps until all the sides are attached to the top pieceThe picture shows a long side being clamped to the top
Step 3: Step 3: Distressing the Box


This is the fun part. There is no right way to distress a box. For my project, I used a grinder, hammer, bike chain, chisel, blow torch and rasps to rough up the edges and surface.
You can google different techniques on this, I don't need to rewrite the book on this. My general guidance is to try to make it look naturally distressed. Focus on the edges and spread out the different textures over the surface.
Be careful on how hard you beat on it - the picture is when I had to re-glue the joints after a hammer blow knocked a side loose!
After you feel good about the level of distressing, go over the entire piece with 220 grit sandpaper on an orbital sander. This will prep the surface for the dye.
Step 4: Step 4: Dying and Sealing

The dye I used was Transfast water soluble dye - dark mission brown. There are lots of different options, but this looks very sharp. For sealing - I used Minwax clear satin polyurethane.
You will want to keep this off your hands, so get some latex gloves, a bowl you can trash, and a sponge.
- Put on your gloves
- Mix some dye with water in a throw away bowl. You won't need to mix all of it right now.
- Dip your sponge in the dye
- Wipe it on the surface. Keep it light at first. The more dye you apply, the darker the piece will be.
- Redo these steps until the entire surface is covered.
If you happy with the color, you can stop there and move on to sealing the piece. If you want it darker, apply a second coat after the first drys.
For sealing, use foam brushes and apply 2-3 coats until you get a good sheen. Like before, each coat need to dry first before applying the next. You'll want to do this step in a dust free area. The fixture should be looking really good now.
Step 5: Step 5: Wiring


This part is a little tricky and will depend on where your electrical source is located. I will add a disclaimer here. I am not an electrician - so my instructions here should be verified with an electrician. In my case, I had a can light fixture. Instead of removing the fixture - I cut the wires to the light bulb and used those to wire my new fixture.
- Turn off power
- Remove old fixture
- Cut out light socket keeping the white and black wires separate
- Cut your braided cord to the appropriate lengths. This is where you need to measure carefully. All lengths will not be equal as some of the lights will travel farther to get to the electrical source.
- Drill holes large enough for your wire to fit in the fixture evenly spaced. I did 5 holes spaces 6 2/3 inches apart.
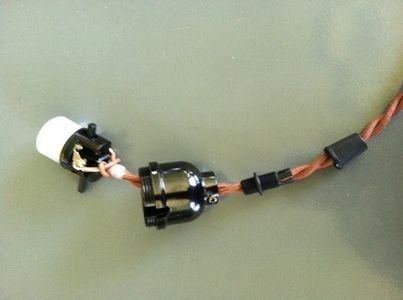
- Run the wire through the holes, strip the ends, and then attach sockets (Click on link for detailed step by step instructions: http://www.sundialwire.com/howtowireasocket.asp)
- Staple the wire to the inside of the box to secure it
- Repeat for each wire (I had 5 bulbs to wire)
- For each strand, keep track of the white and black ends. Tape them to the box to keep them separated until you wire them together
- Once all the wires are pulled through holes and secured to the box, take all the white wires and your white wire from your old fixture and insert them in a large wire cap and twist together securely. Repeat this for the black wires. You're connected!
- Turn power back on and test the wiring before mounting to the ceiling.
Tip: You may need to have a helper as you wire it up because you have to be close to the ceiling. I extending a longer board across the cabinets to be a make shift table to support the fixture while I wired it.
Step 6: Step 6: Hanging

To hang the piece I took some scrap 2 x 2s and screwed them into the studs in the ceiling - then screwed the fixture to these 2 x 2s.
- Cut two pieces of 2 x 2 to 3.75 inches (you want these to fit snugly in the box, but not overly tight.
- Find the studs in the ceiling
- Attach your 2 x 2 pieces to the studs with 4 inch screws
- Hold the piece close to the opening so that you can wire the light
- Slide it over the 2 x 2 pieces
- Screw into these pieces from the side - use 2 inch screws and put 1 screw into each side for each piece. You may want to counter sink them to get them flush.
- It ain't going anywhere

Participated in the
Lamps and Lighting


