

Introduction: Elderflower Champagne! a Cool Crisp BBQ Booze !!!


After seeing this done on a UK cookery programme i gave it a go! couldnt be easier and this instructible will show you how me and my brother went about it step by step making 6 Litres of lovely bubbly booze!
Not only is this my first published instructible but im also entering it in the Summer BBQ competition so lots of feedback and lots of votes please :) What better for your summer BBQ but some home made seasonal, summery, chilled fragrant elderflower champagne!
so as not to be accused of plagiarism the recipe was from here. hats off to Hugh and check out his site for more recipies, cookery books and to read up on his campain ' chicken out' to increase public awareness on battery reared chicken living conditions!
im in the last stage of the process at the mo and will update with pics of the grand opening!
to cover my back... a few obvious points:
-this makes an acoholic brew of unknown strength (probably around 4%) so no underage drinkers!
-the pressurised bottles may well explode so be careful and use common sense
-WARNING- I have just been informed by a much wiser instructabler that elderflowers look very similar to the VERY POISONOUS hemlock plant! make sure you know what you are picking!!! As far as i know the main difference is that elderflowers smell amazing and grow from larger bushes and hemlock (apparently used as an execution method in times BC and added to a brew by the Macbeth witches) has red spotts and marks on its stems. More to come!
Step 1: What You Will Need :


ok first things first... things you will need. gather em up before picking the elderflowers!
Equipment:
-a Big ol' bucket, (bigger than 6 litres) nice and clean, the one i got was marked safe for food products for extra safety but its up to you.
-lemon juicer and zester
-strainer and a clean tea towel or cheese cloth (for straining)
-enough bottles to fit it all in. make sure they are good thick bottles ideally with a latch type lid. this is gonna be under a lot of pressure and ive heard horror stories of this stuf exploding with messy and potentially dangerous consequenses!
-a way of getting the stuff into the bottles, i used a tube as a syphon but a jug or funnel would do.
ingredients (in UK measurements):
2kg sugar (i know i said 2KG but its actually supposed to be 1)
4 litres hot water and 2 litres of cold
Juice and zest of four lemons (make sure u get unwaxed lemons or ull get waxy scuzz on the top of ur brew)
1-2 tablespoons white wine vinegar
A pinch of dried yeast (you may not need this)
About 24-30 elderflower heads, in full bloom
All in all, pretty cheap ingredients!
Step 2: Mix It Up!


ok go pick a load of elderflowers (25 - 30 heads, this is no exact science). They're reaching the end of their season at the mo but there may be a few left still. i have some growing at the bottom of my garden but generally go for a walk and find a big elderflower bush in hedges). They are all over the UK but im not sure you get these elsewhere in the world so lemme know :)
the beauty of this recipe is the simplicity. elderflowers have a natural yeast on them and its best to pick the flowers on a dry sunny day so the yeast hasnt been washed off by rain.
-ok click on the kettle and boil up 4 litres of water - chuck it in the bucket!
-add 2KG* of sugar, sounds a lot but this is turned into alcohol - chuck it in the bucket!
-zest 4 lemons then juice em - chuck the zest and juice in the bucket! (are you sensing a trend here?)
-add the white wine vinegar (any light tasting light coloured vinagre would probably do) - Chuck it in the bucket!
-add 2 litres of cold water to cool the potion down a bit so as not to kill the flower's natural yeast - Chuck it in the bucket!
-check the flower heads for creepy crawlies but dont wash them or ull loose the yeast - Chuck 'em in the bucket
How easy was that! now cover ur bucket up with a thin cloth so it can breath and leave it for 2 days in a cool dry fairly airy place!
*i know i said 2KG but further research suggests its actually supposed to be 1KG, ill try this nxt spring and let u know how it fared.
Step 3: Take a Cheeky Peek.
after 2 days in the bucket give the brew a little peek. if the natural yeast is doing its job there shuold be bubbles on the top, maybe some foam and possibly even some fuzzy mould - dont panic this just means the yeast is doin its fermenting job and turning the sugar into alcohol!
if there are none of these signs add a little pinch of dried yeast. if you have a brewers yeast thats great if not go to your local bakery and ask nicely for a pinch of live yeast and they might give you some paste looking gunk. im sure you can guess what to do with it now ....Chuck it in the bucket and stir it all up!
after this, whether u added the yeast or not, put the bucket back in the cool dry place for another 4 days
Step 4: Sterilise and Strain


ok 6 days or so have passed now its time to bottle it up!
its best to clean the bottles and sterilise em as best u can.
you can do this chemically but i just put them all in the dishwasher (at 65oC) and then dried them by putting them in an oven on the lowest possible heat. i washed the lids seperately because the rubebr seals may have melted in the oven.
ok thats done let them cool down while doing the next bit.
mix the brew and give it a lil *sniff sniff*! smells good huh?
now get another squeaky clean container (at least 6 litres big or a 2 smaller containers) and put in the strainer with the thin cloth on top.
ok now pour the whole of the bucket's contents through the cloth and strainer into the other container
Step 5: Have You Got the Bottle!


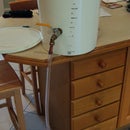
ok bottling time!
i used the old fashioned siphoning technique of put the bucket high with a tube in. suck the tube till the liquids nearly out then put the end into the bottle. this may seem slightly counterproductive after all the sterilising you did but on the plus side u may be lucky and get a lil taste he he.
now me and my bro could only find ten 500ml bottles untill we cleaned out the store.... massive preserving jar to the rescue!
box em up and put them back in the cool dry place. like i said i have heard stories of bottles exploding so best to put em in a box somewhere where out of the way that you wont mind cleaning up. Not by your bed, not by your pets bed , not on top of the ã5000 LCD TV etc.
right now leave em for another 8 days in the bottles (and jars) for the rest of the sweet sugars to be turned into alcohol and the gasses to buil up some pressure.
ive heard this brew, if done correctly, can last up to 2 years but im not gonna wait that long.
Runner Up in the
BBQ PDQ Contest
Participated in the
The Instructables Book Contest
Participated in the
BBQ PDQ Contest


