

Introduction: Experimental Greenhouse, Automatic Watering, With Heatsink, Community Input Needed.


I was given a used glass patio door from a friend and glass doors and glass panels and metal struts to hold them up when an office building firm when it out of business.(Rather than destroy the expensive, slightly flawed glass). I'm making a greenhouse from them.,
Foundation is build and part of the brickwork is done. Its a bit slow because the glass is all different sizes. One side and the entranceway is done. The north wall will be brick about 3 ft high and then glass to the top. Size is just under 10 sq. meters.
Step 1: Roof Alignment. Which Way Is Better?


I have rectangular pieces of glass that work to cover the roof. 2 side by side going sideways for one side and 3 side by side going longways for the other side and that means the roof has a steep side and a shallow side going roughly north south (because the length of the greenhouse is aligned east west), So which is better, steep side to the south or to the north. (Victoria latitude is at 48.4 degrees North)
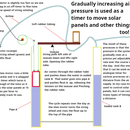
Step 2: The Airlift Pump to Circulate Water and How It Works With a "tipper" to Irrigate a Planter

I tore down my old tiny greenhouse, and reused the five big panes of glass from its sides for the roof of this new one. I have lightly compressed air piped to the old greenhouse so I will just pipe it over to this one instead, (its really close to the area where the old one was anyway). In the new greenhouse I will have the bottom 6 inches of the planters filled with water and then a wooden shelf and 12 to 18 inches of soil above the water chamber to grow the plants on. When I water the plants, the water will fall down into the chamber and I use an airlift pump to circulate the water up to keep the plants watered. It isn't constantly watered, because the airlift pump is on a timer. The "constriction airlift pump" is fairly efficient. and easily pumps water 2 or 3 ft high. It pulses up into a "tipper" that accumulates the water then tips it into a pipe with holes in it and that delivers it to the plants. It works kind of like drip irrigation.
Step 3: I'm Just Looking for Input at the Moment! Here Are Some Answers, Questions and Ideas.

Some of this greenhouse design is a bit weird because the glass is odd sizes and I have to fit those sizes in and also have ventilation windows.
the greenhouse is approximately 10 sq meters (about 107 sq ft and 7 ft tall. How much ventilation does it need? And vent windows All high or some low?
I'm going to use a 3 or 4 inch diameter plastic pipe filled with gravel as a heat sink under the soil, the idea is I pump hot air from high in the greenhouse down through empty pipe and then this turns and into the filled gravel pipe under the soil. The air gives heat up to the gravel, plus!! some moisture in the air condenses on the gravel, drips to the bottom of the 4 inch pipe and ends up in the soil via a hole at the end of the pipe. Potentially a lot of heat can be stored overnight under the soil with that method.
Dripwall...... Is another heat transfer method that I tested a few years ago. Simply put, water will be circulated on the back wall of the greenhouse, It will be contained on and in a double film of plastic as it drips down that solar heated surface, collecting heat as it goes, this heat is transferred either into the soil in the back planter or into the water beneath it. I'm undecided yet which is better.
Step 4: The Plan Is Loose, Modular and Adaptable! and Some Science Will Be Done! Where to Source DATALOGGERS?
I will be updating the steps as I make them. Hopefully, input form here will guide my steps (at least somewhat).
I'm going to need to log temperatures and flows pretty accurately so that heat transfer and heat losses can be measured among other things. I have never used a data logger. The nearest thing to a data logger I had in the past was a really accurate kitchen temperature probe with that could quickly measure temperature to 1/10 degree centigrade in the range .5 to plus 150C
Anyway, more pictures soon as I can figure out how to put instructables on my phone as well as my computer.
I'd love your input, This is my first instructable in about 5 years
Thanks Brian 14 December 2020
Step 5: Updates Here.


The greenhouse is a work in progress and the plan can change. Today 16th December I stopped the back wall at 2 ft 3 inches high originally it was going to be 3 ft high. (running out of suitable bricks, and I guess the rest will be wood and glass. Its been truly horrible weather and I think I'll work on the roof next just to let the inside soil dry out.
Step 6: Greenhouse in a Dry Climate.

I will have a large reservoir under the planter. This is to store water but also to store heat from the day and hopefully release it slowly at night to keep the soil bacteria and roots growing. The water will be pumped up as necessary to keep the plants watered. Another system will collect solar heat in water (like in a radiator system) and circulate it down in pipes under the soil to also keep it warm. Our climate is very dry in summer and city water is expensive so the more we store in the ground, the better!.
Step 7: The Theory of Storing Heat in Soil or Water

My 10 sq meter greenhouse will contain roughly 20 cubic meters of air. and this air weighs roughly 25 kg. On a sunny day, this air can get hot enough to damage plants and people usually vent the air. BUT! there is another option. You could store this heat in stone or soil or water. It takes 250 kjoules of energy to heat that amount of air up from 20 C to 30 C. Soil has only a slightly higher heat capacity so 250 kjoules will heat 23 kg of soil from 20 C to 30 C and water has more than 4 times the heat capacity so it takes 250 kjoules to heat just 6 kg of water (6 liters!) from 20 C to 30 C. My greenhouse will have a "hold" under the planter and the hold will contain as much as 300 liters of water. 250 kjoules will raise the temperature of that water reservoir by just 0.2 C.. And I will have a second planter (but with a lot less water capacity under it)


