

Introduction: Fabric Printing With Soy Wax


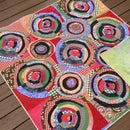
People who enjoy dyeing fabric often will use a resist to preserve a color or a design from being erased in progressive steps of dyeing. A resist is the most common way to preserve white if you are dyeing the rest of the fabric another color. In the first photo I used soy wax to preserve the teal circles while soaking the fabric in bleach. Using soy wax as a resist may be similar to using batik wax, except that soy wax is supposed to be a safer alternative. Rather than engage in a debate over the pros and cons of each I will just write about soy wax and hopefully save you from the mistakes and assumptions I made.
Step 1: Supplies:


- Soy wax
- Heat source
- Experience using Procion MX style dyes, soda ash etc
- Paint bush made from natural fibers
- an Iron
- Tons of newspapers
- Items to stamp with
This 'ible assumes you are already a fabric dyer and know how to mix up dye, use soda ash to fix the dye and have Synthrapol for washing out the dye.
Step 2: So I Heard That Soy Wax...

I heard that soy wax was great to use because unlike batik the soy wax could be washed out in the washing machine. Getting your washing machine to give you a truly hot wash in this day of government-regulated-energy-conservation-restricted-machines is impossible - unless you trick your machine by reverse hooking up your water lines; the cold goes to the hot, hot to cold. OK, so now you have truly hot water, which is supposedly all you need to get the wax out. Ha. Not true. At all.
But not knowing that just yet, I went ahead and starting printing with it.
Step 3: Melting the Soy Wax


Using an electric frying pan or your stove, or in my case a portable electric burner and an old pan large enough to dip my stamps into, I kept the heat on low and adjusted it a tiny bit one way or the other depending on if the wax was getting cloudy. But I kept it a long way from getting close to burning. If the wax was really runny like water I turned the heat back a bit. It's easy.
The crab trap buoys float so I had a good amount of wax in the pan - 6 cups actually.
Step 4: The Good News and the Bad News


The bad news is that the wax cools off so fast that painting it on with a paint brush even when the electric skillet is right next to your fabric is just not going to work. You may get one brush worth of wax on your fabric before you need to dip it again. What. A. Drag.
On the other hand if you have something you can stamp with, you can cover a large amount of fabric fairly quickly. I use old crab trap buoys that I cut up. The shapes are just so much better than anything I could come up with on my own. They are made of styrofoam.
Step 5: Printing


Of course the point of using a resist it to save some part or many parts of your original fabric color. It may be your last step in fabric design or just the first of many. In this example I am using about a yard of fabric that is dyed with some iron and leaves from an eco-dyeing class I took while I was in DC last year.
Start with fabric that you are able to dye because your next step is going to be to dye over the waxed fabric. What I mean is prepare your fabric for dyeing before you start printing on it with wax. For you that may mean washing in Synthrapol, using a fabric appropriate for your dye - ie I am using Procion MX-style dyes so I have to be using silk, or fabric such as cotton, rayon and linen.
Step 6: Dyeing


I mixed up a medium shade of gray and kind of just painted the dye on. I did this because I wanted to keep the wax circles from cracking and letting dye into the cracks. I've since dyed 3 more items and did not care if the wax cracked or not, so I just soaked the crumpled-up fabric in a normal dye bath.
Step 7: More Dyeing


I've since dyed 3 more items and did not care if the wax cracked or not, so I just soaked the crumpled up fabric in a normal dye bath in ziplock gallon bags.
Why I no longer cared: The soy wax is an oily wax, and it's not really a great resist to dye, or to bleach. The bleach wore away at the wax and the worn away or weakened wax allowed the bleach to creep in and lighten the design that was supposed to remain untouched.
Step 8: Into the Washing Machine


This is a really bad idea. I still for the life of me cannot understand why anyone says you can do this. Well you can if you don't mind cleaning out your washing machine for a long long time afterwards. I can only hope that my photos are worth a thousand words and you are saved from what I went through.
Step 9: I Hope You Like Ironing for a Long, Long Time


Since the washing machine was not going to get the wax off of my fabric I used an iron to melt the wax onto paper, newspaper, any paper... lots of paper.
The only good thing about this part is that is smells quite nice. But my fabric is still rather stiff. Too stiff to not think that it would be a good idea to try washing it again. But I've run the machine 6 times since that wax experience and I'm still finding bits of wax on my black clothing.
In summery there are effects such as white images on a dark background that will only ever be achieved with bleach, or using a resist. Is soy wax the resist you want to use? It may be if ironing is your thing, or if you are doing small pieces. I would love to hear of your experiences with soy wax - even if they are the same as mine.

Participated in the
Fiber Arts Contest 2017


