

Introduction: Flip Top Lego Table


This table was designed and built for my 2 year old grandson. The top is stained and sealed and is reversible. One side for lego blocks and the other for multi-use. The ends are small shelving units to store Legos, etc.
Step 1: Material List, But With Improvisations...
4'x8' sheet of 3/4 inch plywood
2'x4' sheet of 1/2 inch plywood
4 1x2 pine boards 8'
1 1x3 pine board 6'
6 lego base plates
Wood glue
Contact Adhesive
Sandpaper
Nail gun w/nails
Router
Step 2: Cut List

4 (plywood) 18" long x 8" wide for vertical base pieces
4 (plywood) 22 1/2" long x 6 1/2" wide shelves
2 (plywood) 22 1/2" long x 2 1/2 wide top base supports
2 1x3 boards 31 3/4" long front and back stretchers
8 1x2 boards 22 1/2" long shelf trim
2 1x2 boards 49 1/2" long table top trim, measure and cut to size
2 1x2 boards 25 1/2" long table top trim, measure and cut to size
Step 3: End Support/shelving


Glue and use nail gun to secure shelving ends and trim.
Step 4: Attaching the Front and Back Stretchers


I used metal bracing for extra support.
Step 5: Sizing the Top


Make sure to leave top a little larger so it's not too tight when removing to flip over.
Step 6: Trimming the Top


Trim the top by gluing, then using nail gun to secure. Make sure that the lip on the top and bottom will be equal. Router the edge a bit so it's not such a sharp edge.
Step 7: Adding a Little Trim


I added a little trim to dress it up a bit. Nothing fancy, just used ripped boards.
Step 8: Stain or Paint


I chose to stain the bottom part of the table gray.
Step 9: Stain or Paint the Top


I chose to stain the top and seal it will poly acrylic. Be sure to do both sides of the top.
Step 10: Adding Lego Base Plates


Measure to center plates like you'd like them. tape off and carefully spray adhesive. I used contact adhesive to stick on the Lego base plates. Spray both the table top and the back side of the base plates.
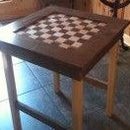
Step 11: Finished Product


This table should bring years of fun and activity to my 2 year old grandson.
Step 12: Addendum to Original


I had enough material, minus the legs, to make another table. I purchased (2) 36 INCH 2"X2" and cut them into four 18" legs and glued them to bottom of table and nailing them with nail gun. Then I braced the ends with some scrap wood I had using my KREG jig. This table seems very sturdy. I plan to clear coat it with spray polyurethane. This table will stay at my residence for my 2 year old grandson, while the blue table went to his house.

Third Prize in the
Tables and Desks Contest 2016

Runner Up in the
Homemade Gifts Contest 2016

Participated in the
Wooden Toys Challenge 2016


