

Introduction: Floating Loft Bed


my cousin wanted to be able to put a desk or couch bed in the room and still have room for activities so he asked me to build a loft bed that was stronger and cheaper than a store bought loft/ bunk bed
Step 1: First Measure the Twin Mattress

I built the base to fit around the mattress and left one end long so later on I have enough length to find a rafter in the ceiling each corner was glued and has four 2¹/²"screws
Step 2: Cut and Install Plywood


I glued and screwed 1/2" plywood to the bottom every 5 inches then installed a brace. (I didn't glue it) in case you could feel it under the mattress and needed to remove it then I painted it
Note: don't paint the outer part of the frame, I didn't install the rails yet before I installed the bed on the wall and had to sand the paint off to glue and screw them in place it wasn't a big deal but it was more work
Step 3: Find the Studs in the Wall


with a stud finder a level and an extra set of hands we put the base in place and I drilled holes into each stud and lag bolted two 4 1/2" long lag bolts in each stud
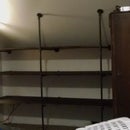
Step 4: Next Is the Corner Brace


for this brace I used 1/2" black steel gas pipe and 2 iron floor flange end caps the end on the ceiling is lag bolted to a rafter that I braced for strength and the pipe screwed into it. the other end was cut and welded into place then lag bolted into place. I used a scrap piece of 2/6 to double up the end and notched it to fit over the gas pipe for support and to hide it
I cut a 3" PVC pipe to the appropriate length and sleeved it over the pipe
I weigh 220 lbs and I jumped up there and bounced around to see if it would hold me and it didn't budge. I also put the dog up there what a wuss she didn't like the heights
Step 5: Bed Rail

I measured up 15" for the braces and cut a 2" hole an inch in a half from the top to fit 2" PVC through it then rounded the top and angled the bottom of each brace and glued and screwed them to the 2x6 bed frame
Step 6: The Ladder


I used 2x4s and drilled 2" holes every 10 inches and I kept them close to the top side so there was more meat on the board in the back for strength
initially I made 3 stringers because I thought the PVC wouldn't be strong enough but I tested it with just 2 stringers under my own weight and it didn't budge. the stringers are spaced 17 1/2" apart and screwed in at the base and at the top of the bed and each PVC rung has a screw in each side to stop it from sliding out before I put the end caps on
Step 7: More Paint and End Caps Are Needed


I just finished and home depot is closed so it will have to wait
Step 8: Tape and Paint


I taped off the the parts I didn't want purple as well as removed most of the PVC so I didn't get unwanted paint on them then started painting
Step 9: Trim


I cut some trim to size to fit between the rails to hide the edge of the plywood then painted them and let them dry before I installed them
Step 10: I Still Need End Caps for the PVC

Step 11: For the Supply List
3 ...2x6 by 16ft long
2 ...2x4 by 16ft long
1 ... 4x8ft 1/2"sheet of plywood
2 ... 2" PVC 10 ft lengths
1 ... 3" PVC length 5ft
14 ... 2" PVC end caps
1ea ...PVC cleaner and glue
1 ... 1lb box of 2 1/2" screws roughly 84 in a box
1 ... thing of wood glue
1 ... length of gas pipe 5 ft
2 ... gas pipe iron floor flange
and 2 lag bolts per wall stud, I used 16 lag bolts 4 1/2 " long and 16 washers
for the gas pipe end caps I used 4...1 1/2" lag bolts for the bed and 4... 4" lag screws for the ceiling each lag bolt has a washer
and your choice of paint


