

Introduction: Full-size F1 Replica Car


I was asked to build a replica of an F1-car.
I figured I had build enough other bespoke objects for exhibitions and an F1 car would be easy enough. That was my first mistake. I was always used to building things in wood and being able to make beveled cuts and then sanding them to make things round, but it turns out an F1 car is al lot more rounded than I originally imagened.
I started this build in the middle of April and I had to finish the 1st of July. As you will see in this instructable this was a build with it's ups and downs and a lot of mistakes.
the finished result is not the vision I had in mind when I started this build but I guess that is mostly on me (I would propably still be sanding and mixing filler to get that racecar finish). I do realize that with the limited time that was available this is the best result possible for me.
Supplies
plywood 18mm about 10 sheets
xps foam 40mm
2 component foam
epoxy resin
fiberglass
epoxy primer (2 component)
black spray paint (veidec super matt)
rustoleum paint red satin and black matt about 2.5liter each
mitter saw
handsaw
jigsaw
stanley knife
Step 1: Research


First order of business is research, especially dimensions were important. Heigth, width, length... The four pictures were my main focus. I always tweaked dimensions a litte bit to fit my own design.
When taking on this kind of build its important to understand that you are building your own car replica, nobody said you have to follow a set dimension type because every year these F1 cars are different and they have differences in dimensions.
My main guideline was to make the car about 5 meter long, about 1.4 meter wide and about 1.2 meter in heigth.
Step 2: Building the Mono Cockpit


up next,
cracking on with the making. The mono cockpit was the start of this project. I cut the project up in to nine big parts:
- mono cockpit
- front wing
- filling up the bodywork
- backwing
- wheels
- assembly
- disassambly
- transport
- final installation
The mono cockpit was a straight foreward job, taking some dimensions of the pictures and rebuilding in plywood. I figured that the bodywork would be as straightforeward, making one cut-out close to the driver position than duplicating that same side cut-out every 25cm but making the cut-out about 5 cm smaller every 25cm.
I did the same thing for the side body that goes from the driver position towards the front of the car but spaced the cut-outs every 10 cm and making them 3 cm smaller every 10 cm.
note: This was the first mistake: I should have made al the cut-outs to the back of the car the same heigth as the centrale backbone of the car. I made them all the same size and figured I could finish that part in plywood, turns out that could not be done in a decent way without stripping the entire body and rebuiling the bodywork, since I didn't have the time for that I had to improvise as you will see later on.
Step 3: Frontwing


The easiest part of this whole project.
all plywood, no weird corners or rounded over bits. simple cuts with the plunge saw, corners with the jigsaw. starting with the lowest splitter and building up to the third splitter. The main dimension here was that the frontwing had to be about 1.4 meters
Step 4: First Attempt at Filling the Bodywork (Fail)


My first idea to make the bodywork was using bendable plywood to make the bodywork, screwing everything in place to the cut-outs.
Turns out bendable plywood does not bend in these kind of corners and the whole bodywork looked miserable, at this point I started to doubt the outcome of this project. So I had to strip the bendable plywood off the car and had to come up with a new plan for the bodywork.
Step 5: First Test Fitting


Before stripping the bendable plywood I did do a test fitting of the frontwing and the mono cockpit to see if this would still be worth trying to finish. Turns out I did like the whole design but the bendable plywood had to go.
Step 6: Xps Foam to the Rescue


The biggest problem with the bendable plywood was the fact that it couldn't reach all the bends that were needed to follow the shape of the bodywork. An F1 car doesn't just make a bend inwards from the top to the bottom but it also bends towards the back of the car, luckely I had some xps foam left over from a previous build so I gave it a go shaping the xps first with a stanley knife and a handsaw to make up the main shape and later on using a gyproc scraper to get the xps to a final shape. I glued every piece of xps foam together with some xtac. Working the xps the same way as for the plywood cut-ous, making one example and cutting that shape out of xps, glueing everything together and reshaping to fit the bodywork.
Note: I tried some expanding building foam to speed up the proces of filling the bodywork but this was not a good idea, the xps foam has a much denser finish and the building foam is just full of holes so this was not the best solution.
Step 7: First Test With Some Filler


the first filler test I did was with red devil filler, this is a type of renovation paste that is easy to shape. This worked good but I could tell that this type of filler is finishing filler so as a first stage filler to make up the main shape this wouldn't do the trick.
Step 8: 2nd Test Fit


After sanding the first layer of filler I painted the side to see if the bodywork would hold up and start to look like an F1 car shape.
I added the frontwing and the basic layout for the wheels (the inside of the wheels are garbage cans cut in half to make the rim) and a first try for a back wing.
Step 9: Using 2 Component Boat Repair Foam


After seeing the 2nd test fit of the car I realised that I could do with some more knowledge of building up bodyworks and using fiberglass. I had never worked with these kind of materials so I asked for some guidance from the local boat repair compagnies to get me started on how to use 2 component foam.
Turns out that 2 component expanding foam works very good. Had I know this from the start I would have build the car differently. This type of foam expands very quickly and becomes rock hard once it's set. This also means that it was a lot more difficult to shape.
So the xps foam was easy to shape (just an good stanley knife and some patience does the trick) but not very strong, the 2 component is a lot harder to shape but is very strong.
this car is a mix of those 2 different types of foam
Step 10: Car Body Filler


The biggest difference between these 2 types off foam as far as the finishing goes:
- 2 component boat repair foam doesn't need additional care, you can just apply the 2 component car filler to it in different layers and start sanding
- xps foam needs an epoxy coating before the 2 component car filler is applied to it. If the epoxy coating is not apllied to the xps, the car filler will let the xps foam melt.
So before applying the car filler I had to apply epoxy coating to all the pieces of xps foam. I also reniforced the driver position and the side intakes with fiberglass as those are the most vulnerable pieces of the car
Once all of that was done I could start the "fun" job of filling the bodywork. I applied one layer, sanded the whole thing and then spraypainted everything black, this made it easier for me to see all the default in the bodywork.
Step 11: Wheels


the wheels were made from old garbage bins that I cut in half to make the rim. Then made 2 circles for every wheel and connected these 2 with some spare plywoods parts.
filling in the rest of the wheel (tyre) with the 2 component boat repair foam made the wheels sturdy enough.
Finishing the wheels of with some finish filler and finally spray painting them black and applying some rubber coating to make them look more real.
Step 12: More Sanding and Filling


the next stage of the build was a constant repetition of applying filler - sanding - filler - sanding - spraypainting the whole body black - sanding - filler - ...
I started with a P120 grit paper and then got through P180 - P240 - P400 - P800
Step 13: First Paint Test


At first I was happy with the matt black as a colour but the biggest issue with a matt finish is that the bodywork needs to be perfect. As this was not the case I had to think about a satin or even gloss finish.
I used rustoleum metal paint and started with a small piece before applying it to the rest of the car.
Red seemed an obvious choice.
Step 14: 3th Test Fit + Epoxy Primer


OnceI was happy enough with the bodywork (and the deadline started being a problem) it was time to do a decent test fitting of bodywork and wheels. The bodywork was still not on the ground because it still had to be manouvered around in the workshop. At this point I felt confident that this project would turn out allright.
I still had to apply 2 layers of epoxyprimer to the bodywork to make the whole thing more seemless. This was a great product - 2 component epoxy primer, you mix up both components and then you can apply it to the whole bodywork like a paint. It makes the bodywork feel a lot more solid.
Step 15: Down on the Ground


The final test was to put the bodywork on the ground and test fit everything again so I could make the suspension (nothing fancy, just some rounded pieces to make up a suspension they don't do any suspending)
when I made the bottomplate for the car I made sure there was still about 4 cm difference to stop the bottomplate from touching the ground. The whole body was then attached to the bottomplate
Step 16: Playing With Colours


I went through some different colour schematics but in the end the red stayed like it was in the beginning, this turned out to be a useless step that just cost me more time because I had to sand the body down again to erase the colours.
I was a bit to focused an making the car look like a modern day Ferrari F1-car. one of the many mistakes
Step 17: Transport


The car still had to be transported to it's final destination so the wheels had to come off again and the body was put on a bespoke pallet to transport.
At this stage the bodywork was 1.4 meters in width and about 4 meters long.
Step 18: Final Destination


Once the transport was done, I could install the car in it's final place. I had finished all the sanding at this point in the workshop but I still decided to change the colour and go full red and black and leave out the black stripe.
I filled and sanded the transition of the bodywork with the frontwing to even out that part. Got my son to sit in the car at least once before I put the dummy driver in.
Originally it was meant to be a car for the kids to sit in and experience what it's would be like to sit in a racecar, however due to covid-19 measurements this wasn't possible because it would have meant that someone would have had to disinfect the car everytime someone sat in it.
Step 19: Finished


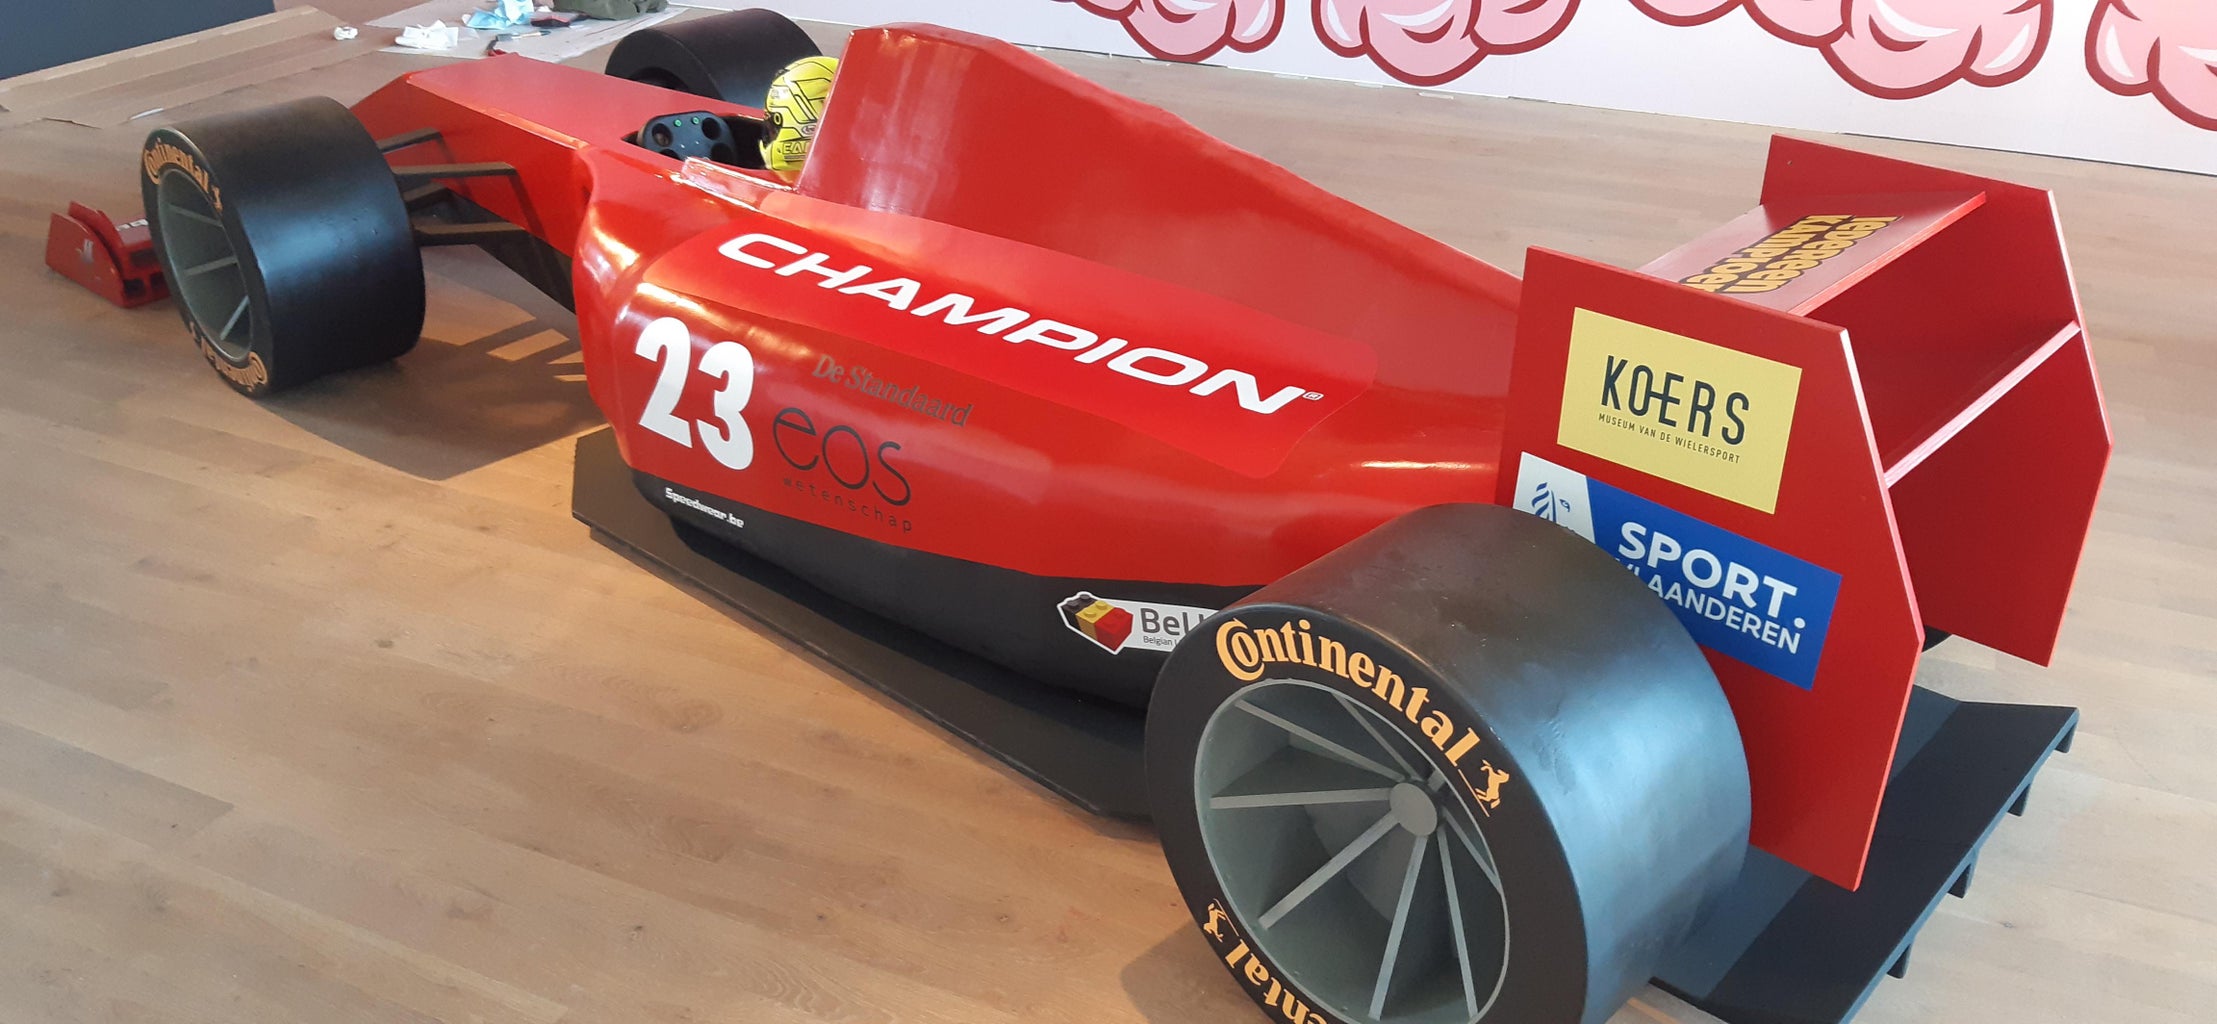


It's amazing what a few stickers can do to make a picture complete.
all the festival sponsor got their own stickers and were put on the car
The car is now part of the international Cartoonfestival of Knokke-Heist which is themed in "all things related to sports"
This was hard build due to the deadline and due to the fact that I was working with products I had never worked with before. It was also one of the builds I learned the most out of.
The final result is OK and I'm happy with it but I mostly see all the mistake I made.
Mistakes:
- I should have filled the bodywork in one go, now I filled in one half of the car and then weeks later I filled in the other half. This meant I never got both halves of the car exactly the same
- Not making the cut-outs for the bodywork the full length of the backbone. This cost me al lot of time to fix in the end.
- being to experimental with the colour scheme, again wasted to much time there.
- spend a decent amount of time reinforcing the driver seat and side intakes because the original idea was to let kids sit in the car, but then came the covid-19 restrictions

Participated in the
Fandom Contest


