

Introduction: GPS Route Tracking V2


Project: GPS Route Tracking V2
Date: May - June 2020
UPDATE
The first version of this project, while it worked in principle, had a number of faults which needed to be fixed. Firstly I did not like the box so I have replaced it with another. Secondly the calculations for speed and distance where not correct. Additional field tests with the unit placed inside a vehicle and allowed to map the route and then this mapped route was mapped onto GPS Visualizer and Google Earth Pro with excellent results both in terms of actual route mapped and distance calculated measured against the "ruler" option in Earth Pro.
In addition the circuitry was updated so that the 18650 batteries supplied power directly to the ESP32 DEV board, while the NEO7M GSP unit was powered directly from the Step Down module rather than via the DEV board. This produced a more stable system. The software was generally tidied up, with the Email option and subsequent connection to the local Router only performed if the unit found a file or files available to send. One final improvement was to change the "gps.location.isValid" test to "gps.location.isUpdated" this ensured that only updated GPS locations where saved within the route file, rather than multiple GPS locations each having the same latitude and longitude.
I would note at this point that this is the first GPS based system I have created, and subsequent versions would largely replace the existing wiring with a PCB based board. To ensure that all of the wire connections do not fail, during rough handling, all of these connections have been glued.
I have updated the ICO and Fritzing files and added new photos to show the changes I have made.
OVERVIEW
This project was a complete change of direction for me, moving away from Nixie Clocks, and WiFi based Robots. The use of a GPS based Arduino module has intrigued me for sometime and as I had some free time waiting for additional parts for the main project I am also working on, I decided to build a GPS Route tracking device, battery powered, light weight, portable, and able to transfer its route information either via a micro SD card or, if a WiFi network was available, via E-Mail and a attached file. This project required the use of four components that I had not used before, namely a 0.96” oLED screen, SD-Card reader, GPS Module, and the ESP32 Development Board. The final size of the unit, while certainly portable, could be further reduced, by a full 25-50%, if the wiring I used was replaced with a PCB board attached directly to the ESP32 Development Board and the 18650 batteries and step-down module where replaced with a suitable Li-ion 5V battery pack.

Supplies
1. ESP32 Development Board
2. DS3231 RTC Clock with battery backup
3. Micro SD Card SPI based reader, with 1GB micro SD Card
4. 0.96” oLED I2C based screen
5. NEO-7M-0-000 GPS Module
6. 10uF capacitor
7. 2 x 10K resistors, 4.7K resistor
8. DC-DC step down transformer
9. 2 x 18650 batteries
10. Double 18650 battery holder
11. Single pole switch
12. Momentary push switch
13. 2 x 100mmx50mmx65mm project boxes
14. Dupont wires, hot glue.
Step 1: CONSTRUCTION


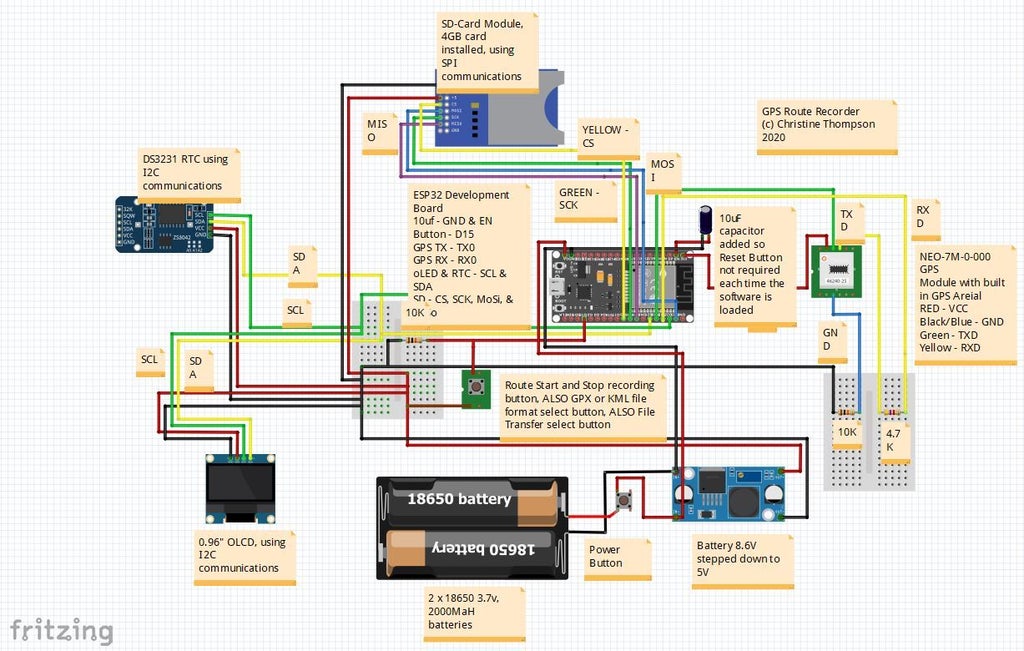
The attached Fritzing diagram shows the layout of the circuit. The two 18650 batteries and the step-down module could be replaced with an Li-ion battery pack providing 5V directly. I recommend the NEO-7M module with the integrated SMA external antenna plug which allows you to add a simple piece of wire 30cm in length which pick up the satellite information, this often takes a few minutes after the unit is initially switched on. The lower of the two project boxes has openings made for the screen, GPS antenna, switch, and SD-card, it also contains the RTC clock, SD-Card reader, 0.96” oLED screen, button, GPS module, and PCB board. The upper project box contains the ESP32 Development board, 18650 batteries and battery holder, step-down module, and a single opening for the single pole switch. The top of this project box is held in place with four counter sunk screws which can be removed to allow the two 18650 rechargeable batteries to be removed, charged, and then replaced. The unit is not water proof, however it could be made so. A suitable USB based battery charger could also be installed within this upper project box, with a suitable opening, to allow the batteries inside to be charged without the need to remove the box’s cover. While the GPS module can provide the time and date, as obtained from the satellite, I decided that the local time and date would be more suitable so I added a RTC module.
Some of the construction photos show the early development of this project where I was using a WeMos D1 R2 board and a simple 16x2 LED display, both of these where replaced in the final version.
Attachments
Step 2: SOFTWARE


The reason for the ESP32 based Arduino board was that after some research I found that the ESP32 can successfully e-mail to a G-Mail account, providing the account’s settings are changed so that it allows “less secure E-Mails to be received”, this requires a change in the G-Mail account settings. To access this, go to the “Manage Google Account” menu option, then select “Security” and finally scroll down till you see “Less secure app Access”, switch this feature on.
You will need to download and install the following include files:TinyGPS++.h, SoftwareSerial.h, "RTClib.h", "ESP32_MailClient.h", "SPIFFS.h", WiFiClient.h, math.h, Wire.h, SPI.h, SD.h, Adafruit_GFX.h, and Adafruit_SSD1306.h.
The program was developed using version 1.8.12 of the Arduino IDE, and the board selected was the “DOIT ESP32 DEVKIT V1”.
Due to the size of the program you cannot develop this program on an Arduino UNO, also when downloading the software, it is necessary to remove the TX wire from the GSP module otherwise the download will fail. A 10uF capacitor was attached to the “EN” and “GND” pins of the ESP32 board so that it was not necessary for the “EN” button to be pressed each time a new software program was downloaded.
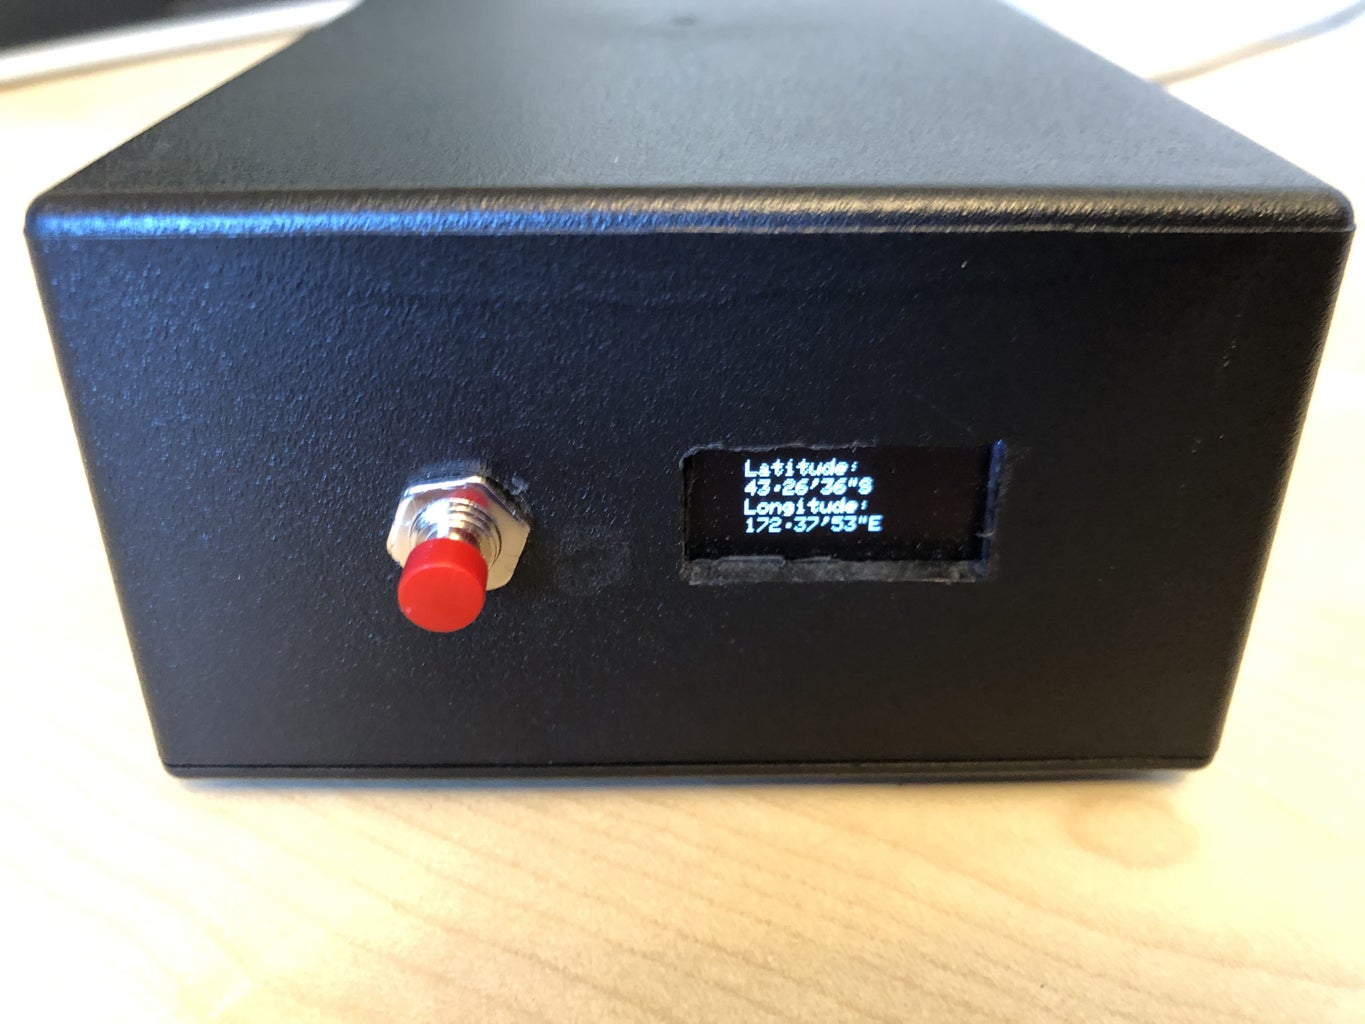
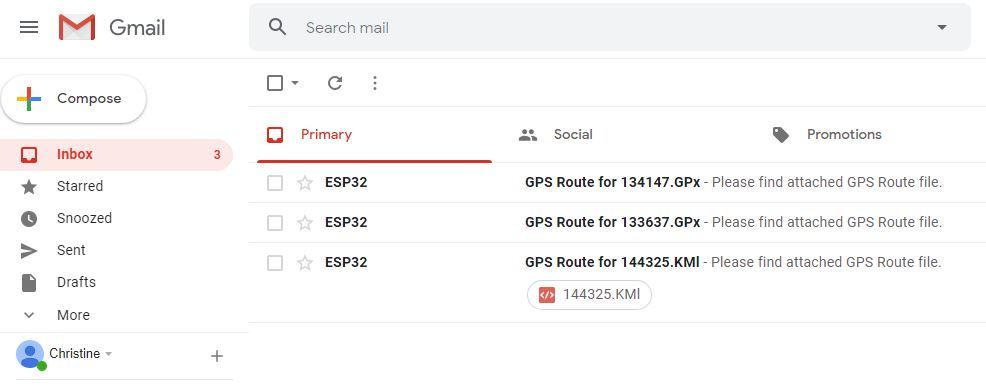
The Arduino software was developed to allow the user of the system to either record a route or routes within the unit and then remove the SD-Card and upload them via a PC based card reader, or to select the E-Mail menu option and have all of the route files held on the unit sent to a G-Mail account, one route attached to each E-Mail. The route files are formatted within the Unit and can take the form of two different styles, “GPX” format which can be directly viewed by using “GPS Viewer” a google application available free-to-use on the Internet, or “KML” format which can be directly viewed by using the “Google Earth Pro” application available to download from the Internet. This same application can also read and display the “GPX” based route files. Both these file formats are freely available as file format schematics and can be found on the internet at Wikipedia. Once the e-mail or e-mails have been sent the unit will return to the route monitoring, however it will default to the GPX file format. The push button is used to select the E-Mail option, select either GPX or KML file format, and to start and stop the route recording. In route monitoring mode the oLED screen will display the longitude and latitude of the current position and then on a second screen display the current time, date, altitude in meters, number of satellites being used, speed in Km, and finally course given as one of the cardinal compass points. While in the route recording mode the screen will display the route file it has opened, then in addition to the two previously described screens a third screen will be displayed which details the route file being used, the number of waypoints it has recorded, and finally the distance covering in Km.
The following images show how the e-mails, created and sent by the unit, are received and displayed by G-Mail.


Attachments

Step 3: CONCLUSION


I have learned much from developing this project, however this unit can only be considered a “back end” to an App based system which takes the GPX or KML files are displays them. Using third party software was an acceptable alternative to further development of this software. The availability of the “Less Secure App” menu option in the Google Account Management menu may be limited as changes may occur in June of 2020, if this is the case then re-directing the e-mail to an alternative account may be necessary or by using the 586 port on the mail server.
Step 4: GPS and KML File Formats


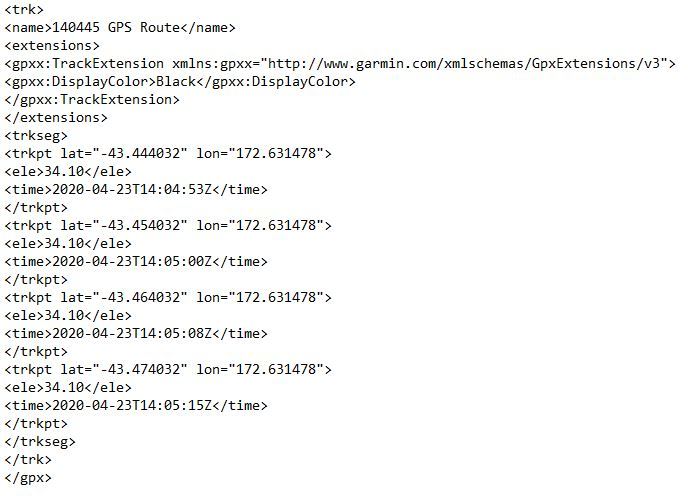
The following shows a typical file content for each type of file the unit generates, (the latitude and longitude values don't change much in these examples due to the unit being stationary). Both files contain the minimum header and footer data required by GPS Viewer and Google Earth pro to display a simple black line showing the route taken:
The KML file: 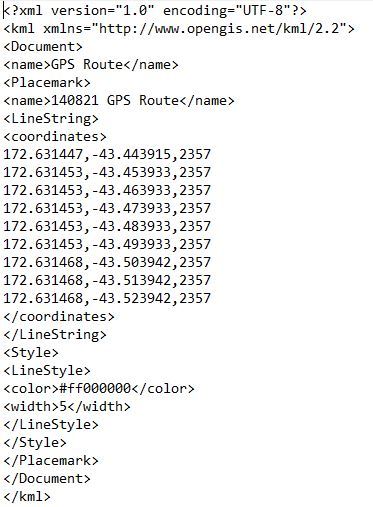
The GPX file:


![Tim's Mechanical Spider Leg [LU9685-20CU]](https://content.instructables.com/FFB/5R4I/LVKZ6G6R/FFB5R4ILVKZ6G6R.png?auto=webp&crop=1.2%3A1&frame=1&width=306)


