

Introduction: GoPro Tripod Stand Plate


I recently purchased a GoPro video camera. These cameras come with cases and mounts designed for action sports and have no built-in tripod connection point on the camera. I'm not much of a participant in action sports these days (my sports car is getting a bit old to pull much these days) and my intended use for the camera is much more mundane so I had to make a solution for how to mount the camera for my ordinary video capture needs.
With a piece of wood from a craft store and a couple of simple hand tools I built a connection plate that fits into the same tripod I use for my DSLR.
Step 1: Supplies and Tools


Supplies:
GoPro camera (with plastic case)
Tripod with removable plate
GoPro Flat Adhesive Mounts (if your GoPro kit didn't come with flat mounts or you've lost/used up the ones you have, you can find more here)
Light wood stock - I used 1/4" (0.6cm) thick stock
Paint and Paint Brush
I don't own many tools and I was able to complete the project with the tools listed below.
Tools:
Hand Saw
Miter Box & Saw
Sand Paper
Wood Glue
Clamp
Pencil
Ruler
Step 2: The Underside


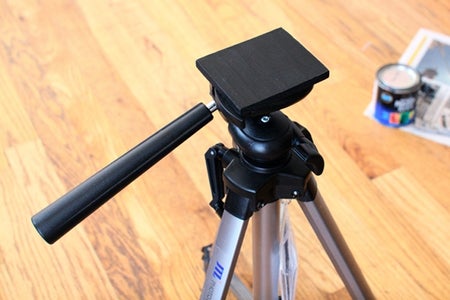
The goal is to as closely as possible duplicate the size and shape of the removable mount for the tripod. The removable plate for my tripod is relatively standard in shape and function. Hopefully you'll be able to find my exact techniques useful for your equipment.
Using the removable plate for reference, cut a piece of wood to fit inside the top of your tripod. I started with a piece of wood cut to the exact same size as the bottom of the plate mount and ended up sanding it a bit to get just the right fit.
Test the fit of the piece you cut by placing it inside the tripod stand.
The plate for my tripod has two angled ends to allow the plate to be removed or set/clamped in place for a secure fit. I cut one side at a 45 degree angle. After testing the fit and how everything sits in the tripod I decide to not angle cut the opposite end of the wood piece.
Step 3: The Topside


In mimicking the removable plate for my tripod I need to cut a piece of wood a bit larger than the previous piece that will be the top side of the plate and where I will attach the mount. I made the piece larger than the underside piece, large enough to hold the adhesive mount, but small enough that it will be unobtrusive to the field-of-view when recording video.
Using a bit of wood glue, I attach the smaller piece of wood to the newly cut larger piece. Pay attention to the orientation of the trimmed underside block when gluing in place. Clamp the piece together until the glue has set.
Step 4: Finishing the Wood


I put 2 coats of black acrylic paint on my new tripod plate. After the first coat I placed the plate into the tripod mount to be sure it still fit. A touch of sandpaper in tight spots will help you obtain the right fit.
Step 5: Adding the Adhesive Flat Mount


When adding the adhesive mount the only successful placement will come from clamping the plate in place on the tripod and positioning the connector in the best and most logical position for use. When you have determined the orientation and general placement desired remove the backing label and stick the mount in place.
Step 6: Completed Project

The GoPro case and mounting system is very well designed by the folks at GoPro. By using their adhesive mounts and plastic cases I can easily attach my camera to my tripod or release the clip from the tripod plate and attach it to another location where a mount has been placed.
The plastic case attaches to a mounting bracket with a thumb screw. This allows for an addition point of angle control when setting up your camera shot.
A bonus to creating this little tripod plate is that I now have a table-top stand for my GoPro.

Runner Up in the
The Photography Contest

Participated in the
A/V Contest


